Painted Stair Treads Sealed With Polyurethane Top Coats
Painted stair treads sit at the intersection of decorative ambition and practical durability. When a homeowner decides to apply pigmented finish to one of the most heavily trafficked surfaces in the house, every step in the process must be deliberate, because the coating system has to absorb the daily abuse of footwear, pet claws, dropped objects, and seasonal humidity swings. The remedy that has emerged through decades of professional practice is a layered system that pairs a high-bond paint with a clear polyurethane top coat, which together create a wearing surface that is beautiful at installation and remains beautiful years later.
This article explains how to design and execute that system, from the moment you sand the bare wood to the moment you walk back up the staircase several weeks after curing. It is written for the homeowner who is comfortable with a paint brush and a random-orbit sander, and for the smaller contractor who wants to refresh a client staircase without resorting to wall-to-wall carpet or expensive prefinished products. The advice draws on published guidance from The American Institute of Architects on residential interior finishes as well as from working painters who treat staircases differently than they treat any other surface in the home.
The Case for Painted Treads Over Stained or Carpeted Surfaces
Painted stair treads have a long pedigree in colonial New England, traditional Scandinavian, and contemporary cottage interiors, and they are enjoying a fresh revival in homes that prize clean lines and low-maintenance materials. Paint offers a uniform color that stain cannot achieve on lower-grade lumber, which means homeowners with construction-grade pine or fir stairs can produce a finished look that rivals tropical hardwoods at a fraction of the material cost. The opaque coverage also conceals patchwork repairs, knots, and previous stain or filler that would otherwise telegraph through a clear finish.
Compared to wall-to-wall stair carpet, painted treads are easier to clean and far simpler to refresh. A vacuum once a week and a damp microfiber pass once a month is the entire maintenance regimen, and when the finish eventually shows wear in the high-traffic center stripe, a light scuff sand and a refresh coat of polyurethane brings the surface back without dismantling anything. Households with allergies, asthma, or pet dander concerns often choose paint specifically because hard surfaces hold far less particulate than textiles do.
That said, painted treads are not maintenance-free. They will scratch under heavy point loads, they will show muddy footprints more clearly than carpet does, and they require a clear sealer over the color coat to handle abrasion. Have you mapped where your household traffic concentrates on the staircase, and have you talked through whether shoes are removed at the door? Those answers shape the durability budget for the system you choose.
Choosing the Paint System and the Polyurethane
The pigmented layer should be a hard-curing enamel formulated for floors, trim, or cabinetry. Acrylic enamels with urethane modifiers are widely available in low-odor water-based forms and they cure to a tough film within a few weeks. Oil-based enamels remain available in many markets and they level beautifully, but they yellow over time and they require longer recoat windows. Whatever chemistry you select, ask the retailer for a product that is rated for floor or porch use, because trim and wall paints are formulated for entirely different abrasion conditions.
The polyurethane top coat is where the system either succeeds or fails. Oil-based polyurethanes are exceptionally tough and they amber slightly over time, which can warm a cream or beige tread pleasantly but will dull a true white. Water-based polyurethanes stay clear and have far lower odor, making them attractive for occupied homes, and the best modern formulations rival oil for hardness. Floor-rated polyurethanes typically carry a higher solids content than furniture polyurethanes, and that extra resin is what delivers the depth and durability you need on a stair tread.
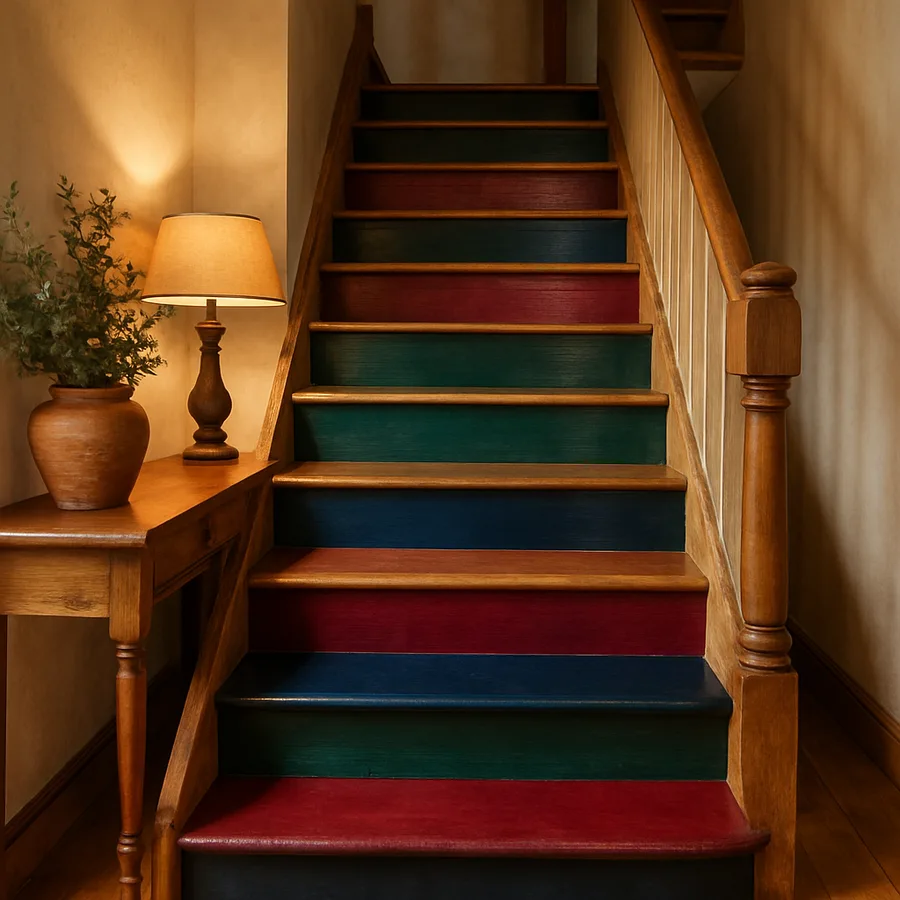
Sheen selection matters more than most homeowners realize. A satin polyurethane hides minor scratches and registers as a soft, residential surface. A semi-gloss polyurethane reflects more light and emphasizes geometric detail but shows wear faster. A high-gloss polyurethane is dramatic but unforgiving. Most painters working on stair treads default to satin for the practical balance it offers.
Preparing the Substrate
Preparation determines roughly seventy percent of the final result on any painted floor surface. Begin by stripping any existing coating completely. If the staircase wears old varnish or shellac, a chemical stripper followed by a thorough rinse is the safest path. If it wears modern polyurethane, a careful sand from one hundred grit through one hundred fifty grit will remove the film. Power sanding works for the broad surfaces, but the corners and the front nosing typically need hand work with a sanding sponge.
Once the wood is bare, fill nail holes and joint gaps with a paintable wood filler rated for high-movement applications. Allow the filler to cure fully before sanding flush, then vacuum the entire staircase including risers, skirts, and the underside of the nosing where dust collects. A tack cloth pass before priming captures the fine particles a vacuum will miss.
Prime with a bonding primer rated for floors. Two thin coats are better than one thick coat, and each coat should be sanded lightly with a fine grit before the next is applied. A well-primed tread feels uniform under the hand and shows no telegraphing of grain. The National Fire Protection Association guidance on residential surface finishes reminds installers to use low volatile organic compound products in occupied homes and to ventilate during application.
Applying the Color Coats
Apply paint with a high-quality short-nap roller for the broad surfaces and a fine-bristle brush for the edges, corners, and nosings. Roll in long strokes along the tread, then tip off with a brush in the direction of the wood grain to remove any roller stipple. Allow each coat to dry per the manufacturer's recoat window, which for most water-based floor enamels is between four and eight hours.
Two to three color coats produce the depth and hide most projects need, and a final light sand between each coat with a fine sanding sponge knocks down dust nibs without cutting through the film. Work the staircase in alternating treads so that the household can still use the stairs during the project, painting every other step on day one and the remaining steps on day two. This approach is borrowed from professional painters who refuse to render a staircase unusable for a paying client.
Watch for lap marks at the edges of each tread. A wet edge maintained through quick application prevents lap marks, but a tread is small enough that most painters can work the full surface in a single continuous pass. The risers, by contrast, can be painted at a more leisurely pace because they receive no foot traffic and can be touched up later if needed.
Sealing With Polyurethane
Once the color has cured for the full recoat window, apply the first polyurethane coat with a synthetic-bristle brush or a microfiber applicator. Work in long, parallel strokes along the tread, taking care to avoid pooling at the edges where excess can drip onto the riser below. The first coat will look thin and uneven, which is correct, because the goal is a thin film that bonds tightly rather than a thick film that sits on top.
Sand lightly between coats with a fine grit, vacuum and tack between sands, and apply a second coat using the same technique. Most floor-rated polyurethane systems specify two to three coats for residential use, and four coats is reasonable for staircases that anticipate heavy traffic. Allow each coat the full recoat window listed by the manufacturer, and resist the temptation to walk on the stairs before the final coat has cured for at least seventy-two hours.
The full cure of polyurethane takes considerably longer than the dry-to-walk-on time. Most water-based polyurethanes reach about eighty percent of final hardness within two weeks and continue to harden for several weeks beyond that. Place a sign at the top and bottom of the staircase reminding household members and visitors that the surface is curing. According to industry guidance from coatings manufacturers, more than thirty percent of premature floor finish failures stem from heavy use during the cure window rather than from product defects.
Living With and Maintaining the Finish
For the first month, walk in stocking feet whenever possible, place a small entry mat at each landing, and ask household members to leave outdoor shoes at the door. After the cure is complete, normal use will not damage the finish, but a few habits extend its life. Sweep or vacuum weekly to remove grit that would otherwise grind into the polyurethane under foot pressure, and damp mop with a wood floor cleaner monthly to lift residue without flooding the surface.
When wear eventually appears, usually first in the center of each tread, a refresh coat is straightforward. Scuff sand the worn area lightly, clean thoroughly, and brush on a fresh layer of polyurethane along the entire tread to keep the sheen uniform. Done every few years, this preventive maintenance extends the life of the system indefinitely, and the staircase will never require the full strip-and-repaint cycle.
Are there spots where guests routinely scuff or where a particular pet always sits? Place a small runner pad or a step-specific runner on those problem treads to spare the finish. The combination of a tough coating system and selective protection where needed produces a staircase that looks crisp for many years.
Conclusion
A painted-and-sealed staircase is one of the highest-impact projects a homeowner can complete on a modest budget. The finished product reads as deliberate and well-cared-for, and the simplicity of the maintenance regimen rewards the careful work invested up front. The key is patience, because each layer of the system depends on the layer beneath it being fully cured and properly prepared, and a rushed project will betray itself within a single season.
The materials are widely available at well-stocked paint stores, and many manufacturers offer dedicated stair-tread enamels and polyurethanes that simplify product selection. Spend a few extra dollars on premium products in this category, because the small cost difference is repaid many times over in durability and ease of recoating later. A staircase finished correctly should still look freshly painted after a decade of normal residential use.
If you are weighing the decision tonight, mentally walk your staircase and note where the existing finish is failing. Is there a worn nosing, a chipped paint edge, a tread that always squeaks? Those observations will help you decide whether a full repaint is in order or whether a simpler touch-up will buy another year. A small notebook kept near the staircase for a week, with a quick entry each time you notice a flaw, becomes a remarkably effective scope document for the project.
Plan for the work to happen in a season when windows can stay open for ventilation, and when the household routine can absorb the inconvenience of alternating-tread access for a few days. Most painters prefer late spring or early fall for this reason, when humidity is moderate and outdoor air is comfortable enough to leave windows cracked through each curing cycle. Sketch a plan this week, gather samples from your paint retailer, and you will be one weekend closer to a staircase that performs the way it looks.
More Articles You May Like


Comments
Post a Comment