Painted Stair Risers With Patterns or Quotes for Personality
A staircase is the most overlooked stretch of vertical surface in most homes. Treads get the wear, handrails get the touch, but the risers, those small rectangular panels facing the climber on every step, usually get nothing at all. They are sanded, primed, and painted the same trim white as the baseboards, and then they vanish from conscious thought entirely. This is a generous opportunity in disguise. A run of fifteen risers, each roughly seven inches tall and the width of the staircase, is essentially a sequential frieze waiting to be designed. Filled with patterns, hand-lettered quotes, or thematic illustrations, these little panels can become the most personal feature in the entire house.
The technique itself is centuries old. Painted risers appear in Mediterranean villages from Portugal to southern Italy, in the staircases of Moroccan riads, and in the hand-stenciled houses of New England's colonial revival period. What is new is the breadth of contemporary execution. Designers profiled by the American Society of Interior Designers (ASID) report a roughly three-fold increase in client requests for decorative stair treatments since the start of the decade, and editors at Better Homes and Gardens (BHG) have documented dozens of high-impact projects executed on weekend timelines. Painted risers have moved from quirky personality move to legitimate design strategy.
Why the Riser Is Such a Powerful Canvas
The riser benefits from a visual phenomenon most homeowners never consciously notice. When you climb a staircase, your eye line is pulled forward and slightly down, which means you are looking directly at the next riser ahead of you for the entire ascent. The same is true on descent, where your eye lands repeatedly on each riser before your foot does. Few surfaces in a home receive that much focused, unbroken attention. The riser is a captive audience, and any decorative content placed there has guaranteed engagement that an accent wall could never match.
There is a second advantage. Because the surface is small and divided into many discrete panels, you can take design risks on a riser that you would never take on a full wall. A wallpaper pattern that would feel overwhelming across an entire room becomes charming when restricted to seven inches of vertical face. A hand-lettered quote that would seem precious as a framed print feels intimate when discovered mid-stair. The riser absorbs intensity that other surfaces would amplify.
It is also a uniquely private design surface. Most guests never climb the stairs of a house they visit casually. The painted risers belong primarily to the family who lives there, encountered every morning and night, which makes them an excellent place for in-jokes, family mottos, children's names, or imagery that means something specific. Have you considered which message in your own life would be worth seeing fifteen times a day?
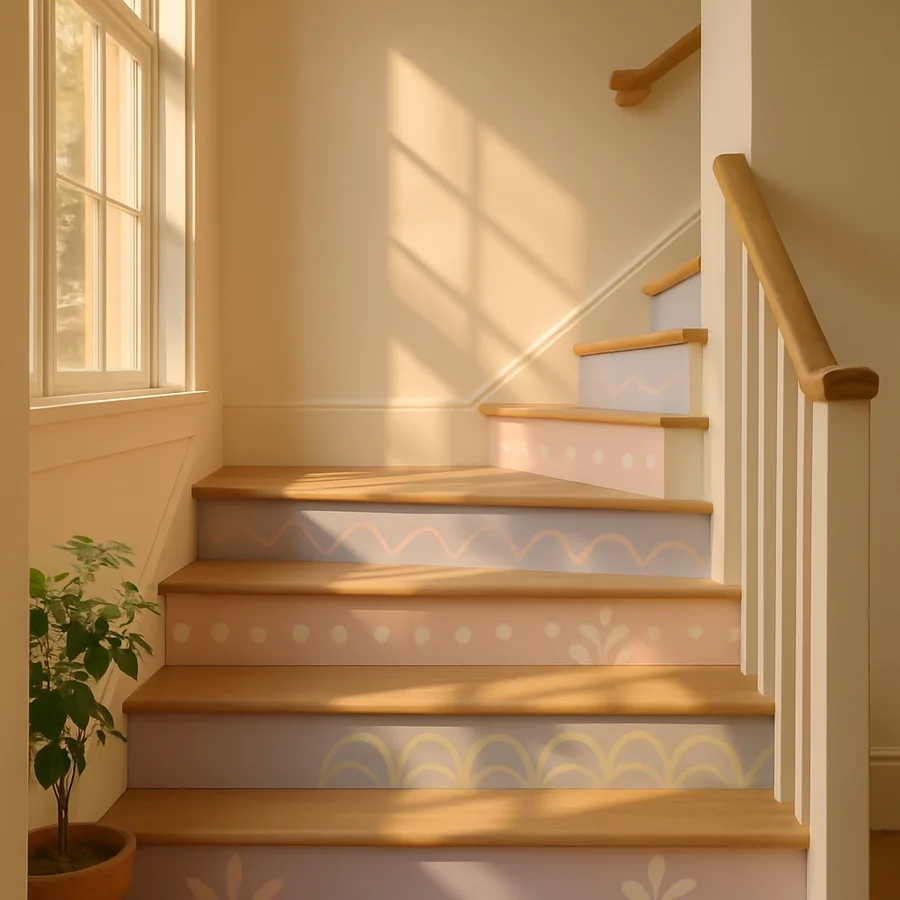
Pattern Strategies That Work Across a Full Staircase
The choice between repeating patterns and sequential motifs is the first major design fork. Repeating patterns treat each riser as one tile in a unified field. Sequential motifs treat each riser as a different scene, often telling a small story or progressing through a related set of images. Both approaches can be beautiful. They feel completely different to climb.
For repeating patterns, the most reliable strategies are geometric tile motifs drawn from Portuguese azulejo, Moroccan zellige, or Spanish encaustic traditions; botanical repeats like simplified leaves, vines, or florals; and graphic abstract patterns like dots, lines, or arcs that scale gracefully across many panels. The unifying principle is that the pattern should read coherently from a distance even before any single riser is examined closely. If the staircase looks like noise from across the foyer, the pattern is too busy.
For sequential motifs, themes that unfold naturally tend to work best: the seasons, a series of beloved book covers, family photographs translated into simple silhouettes, the chronological history of a meaningful family journey. The discipline is to keep the visual language consistent even as the imagery changes, usually by holding the color palette, line weight, and background treatment steady across all risers. The National Kitchen and Bath Association (NKBA) has noted in design briefings that the most successful sequential treatments share a single graphic style across all panels rather than mixing illustration techniques.
Hand-Lettered Quotes and Typographic Treatments
A quote-painted staircase is a different beast entirely. Where a pattern speaks visually, a quote speaks linguistically, and the choice of text deserves more thought than most homeowners give it. The text will be reread thousands of times by the people who live there. Choose something that will deepen rather than wear out with repetition. Family mottos, favorite poetry lines, original phrases, song lyrics that hold permanent meaning, and translated proverbs all work. Trendy aphorisms that felt clever this season often feel embarrassing within two years. Choose for the long view, not for the moment.
Typography itself is the second decision. A consistent typeface across the whole staircase reads as a single statement, while a different style on each riser reads as an anthology. Both can succeed. Hand-lettering brings warmth and irregularity that machine-cut vinyl cannot match, but requires either calligraphic skill or a willingness to accept a charming amateur quality. Stenciled letterforms produce cleaner geometry and are friendlier to first-time projects. Mixed media, where a stenciled outline is filled and refined by hand, often produces the best of both worlds.
Spacing and letter sizing should respect the riser height, leaving generous margins above and below the text so the words do not feel crushed. A riser that is seven inches tall might comfortably carry text at three to four inches of cap height with two inches of total margin, depending on stroke weight. Test on paper first at full scale and tape the test sheet to an actual riser before committing paint to wood. Have you walked your staircase recently and looked at how much room each riser actually offers?
Color, Background, and Visual Cohesion
Painted risers fail more often from color confusion than from drawing or lettering errors. The trick is to remember that the staircase, viewed from below, is a single composition, not a series of independent paintings. The risers' colors must work as a chord with the treads, the handrail, the wall behind the staircase, and any flooring at the top and bottom landings. A scheme that ignores any of those elements will feel disconnected from the rest of the house.
The simplest approach is to limit the riser palette to two or three values drawn from the existing house palette, then introduce the design in those colors only. A monochrome scheme, where every riser uses the same two colors arranged differently, is almost always more sophisticated than a multicolored riot. If you do want multiple colors, hold the saturation and value consistent so the palette feels intentional rather than accidental. Benjamin Moore's color guidance (Benjamin Moore) on coordinated palettes provides reliable starting points for risers integrated into broader interior schemes.
Backgrounds matter as much as foregrounds. A pattern or quote painted directly onto raw or stained wood will read very differently from the same design on a primed white background or a deep saturated background. Test all three options on scrap material before committing to the staircase itself. The Master Painters Institute (Master Painters Institute) recommends sealing the substrate first, even if the design will sit on raw wood, to ensure consistent paint absorption and a uniform final appearance.
Materials, Paints, and the Realities of Staircase Wear
Risers do not take direct foot traffic, which is the major advantage of this technique compared with painted treads. They do, however, accumulate scuffs from shoe edges, fingerprints from small hands, occasional scrapes from vacuum cleaners, and the gradual yellowing that affects any paint exposed to natural light over time. A riser finish must be tough enough to withstand these everyday insults and clean enough to wipe down regularly without smudging.
Acrylic enamel paints in a satin or eggshell sheen are the standard choice. They cure to a hard, durable film that resists scuffing and accepts gentle cleaning with a damp cloth. High-gloss finishes show every imperfection in the substrate and are usually too reflective for risers. Flat finishes mark too easily and are difficult to clean. Satin sits in the sweet spot for most homes. The National Association of Home Builders (NAHB) reports that satin and eggshell sheens dominate residential trim work in their annual finishes survey precisely because they balance durability with a forgiving appearance.
For added durability, especially in homes with children, pets, or heavy daily traffic, consider a final clear coat of waterborne polyurethane or a furniture-grade clear topcoat over the finished design. This adds a small amount of sheen and significantly extends the effective life of the painted artwork. Apply in thin, even coats and let each cure fully before recoating. Skip this step on quote-painted risers only if you are confident the underlying paint and lettering can survive direct cleaning without lifting.
Installation Logistics, Order of Operations, and Pitfalls
The actual painting is the easy part. The logistics of working on a staircase are what catches most homeowners off guard. You cannot block a staircase for the days required to paint, prime, and topcoat each riser, so you have to plan the work in stages that leave the staircase usable. The standard approach is to paint every other riser first, allow them to cure, then return for the alternating risers. This leaves enough usable steps to climb safely throughout the project.
Mask the treads carefully. Tape that wraps around the front edge of each tread protects the wood from drips, and a layer of red rosin paper or thick craft paper across the tread itself catches errant drops. Drop cloths on the landings prevent foot traffic from carrying wet paint into adjacent floors. Working from the top down means dust and drips fall onto already-finished work, so most professionals work from the bottom up after the initial prime coat is fully cured.
Common pitfalls include underestimating the cure time between coats, especially in humid climates; failing to remove tape before the paint fully cures, which can pull paint with it; and choosing a design that looks balanced on a flat sketch but unbalanced once installed at an angle. View renders or full-scale paper mockups taped to the actual risers before painting, and stand at the bottom of the stairs to evaluate the visual rhythm before committing.
Conclusion: The Stairs as Daily Encounter
A painted staircase is one of the most efficient design moves available in residential interiors. It uses surfaces that were already there, requires modest materials, and produces a result that family members will encounter constantly for years. Few other interventions deliver that ratio of effort to ongoing impact. The stairs become a small daily ritual, a moment of recognition between the people who live there and the home that holds them.
Approach the project with the right preparation and the right scope. Choose patterns or quotes that will hold meaning across years, not just this season. Test colors and lettering at full scale before committing. Respect the substrate preparation and topcoat protection that determines whether the work survives or peels. Plan the logistics so the staircase remains usable while the project unfolds. None of this is difficult. All of it is what separates lasting work from a regrettable weekend project.
If you are inspired by the idea but unsure where to start, photograph your existing staircase from the bottom and the top, sketch a pattern or text idea over the image, and live with the proposed scheme on your phone for a week. Whatever still feels right at the end of that week is probably the right starting point. Begin sketching today, choose your first three test risers, and start a project that will quietly delight you every single time you climb the stairs.
More Articles You May Like


Comments
Post a Comment