Inside Cabinet Lighting Motion Activated For Glass Doors
Glass-front cabinets are a designer favorite because they break up the visual weight of a wall of solid doors and turn the cabinet contents into part of the room. The catch is that the interior is dark by default, and the beautiful glassware or ceramic collection you wanted to display is invisible until someone opens the door. Motion activated inside cabinet lighting solves this elegantly by waking up the cabinet exactly when a person approaches and dimming away when no one is near.
This article covers every decision in a motion activated install: sensor type and placement, battery powered versus hardwired strips, color temperature for displayed objects, mounting locations inside the cabinet, and how to tune sensitivity so the light triggers reliably without false positives. By the end you will know how to specify and install a system that makes your glass front cabinets glow on cue without ever requiring a switch. Have you ever watched someone walk past a glass cabinet at a hotel bar and seen the contents light up automatically? That same technology is now affordable and installable in any home kitchen.
Why Motion Activated Beats Switched Inside Lighting
A traditional inside cabinet light requires a switch, which means someone has to remember to turn it on, then remember to turn it off, every time the room is used. In practice, this means inside cabinet lights stay off ninety percent of the time and the display benefit is lost. A motion activated system removes the entire switching decision and lights the cabinet only when there is someone in the room to see it, which delivers far more usable display hours per year.
The energy math also favors motion activation. A quality LED strip inside a single cabinet draws about three to five watts at full output, and a motion system runs that load for maybe two to four hours per day on average. The American Lighting Association estimates that occupancy-sensor controls reduce residential lighting energy use by twenty to forty percent in spaces where lights would otherwise be left on. For an inside cabinet system, the savings are higher because the alternative is leaving the lights on whenever you are home.
The aesthetic benefit is equally important. A motion triggered cabinet feels alive. When you walk into the kitchen at night to get a glass of water, the cabinet glows up softly as you approach, and dims away after you leave. That quiet responsiveness adds a layer of polish to the room that no switched system can match. Automation is itself a design feature when it is done well.
Sensor Types And Where To Place Them
There are three common sensor types for inside cabinet lighting: PIR motion sensors that detect body heat, microwave radar sensors that detect movement through doors, and reed switches that trigger when the door opens. Each has a place, and the right choice depends on whether you want the light to trigger on door opening, on someone approaching, or on both.
PIR sensors are the most common for inside cabinet use. They sit on the underside of an upper cabinet or on the inside edge of a base cabinet and trigger when a warm body enters their field of view. They work beautifully for cabinets you want to light when someone walks up to them. The drawback is that they only see in a line of sight, so they cannot trigger through a closed solid wall, though glass cabinet doors are no obstacle.
Reed switch sensors trigger when the door opens and shuts off when it closes. They are perfect for cabinets you only want lit when you actually reach inside. The Illuminating Engineering Society recommends door-triggered controls for closets and pantries because they eliminate any false positives and only consume energy when the cabinet is actively in use. For a display cabinet you want to glow whenever someone is near, a PIR is better. For a deeper utility cabinet, the reed switch wins.
Microwave radar sensors are the premium option. They can detect movement through wood and glass, which lets you mount them inside the cabinet structure where they are completely invisible. They are more expensive and slightly more prone to false positives if a pet walks through the room, but they are unbeatable for clean aesthetics. The National Electrical Code permits all three sensor types in low-voltage applications, and any of them can be paired with a 12V or 24V LED tape system.
Battery Powered Versus Hardwired Power Delivery
Battery powered motion strips are the easiest entry point. You buy a self-contained unit, stick it inside the cabinet, and the integrated sensor handles everything. Lithium-ion battery packs last from three to twelve months depending on use frequency, and the unit recharges via USB-C in a couple of hours. For renters or for a single cabinet pilot installation, this is the right answer.
The drawback to battery power is the recharge cycle. A row of six glass cabinets means six battery packs to track, six recharge schedules, and six separate units that may drift slightly in color temperature over time. For a coherent multi-cabinet installation, hardwired delivery is significantly better. A single low-voltage driver powers all the strips and sensors, the color temperature is matched across the whole run, and there is no battery maintenance.
For hardwired delivery, route a 24-volt low-voltage line from a driver mounted inside a base cabinet, up through the back of the cabinet structure, and into each upper cabinet via a small hole. Each cabinet gets its own short LED strip and its own PIR sensor wired to the same low-voltage feed. The Department of Energy notes that hardwired low-voltage systems consume essentially zero standby power when the sensor is in idle mode, so leaving them powered at the wall has no measurable energy cost.
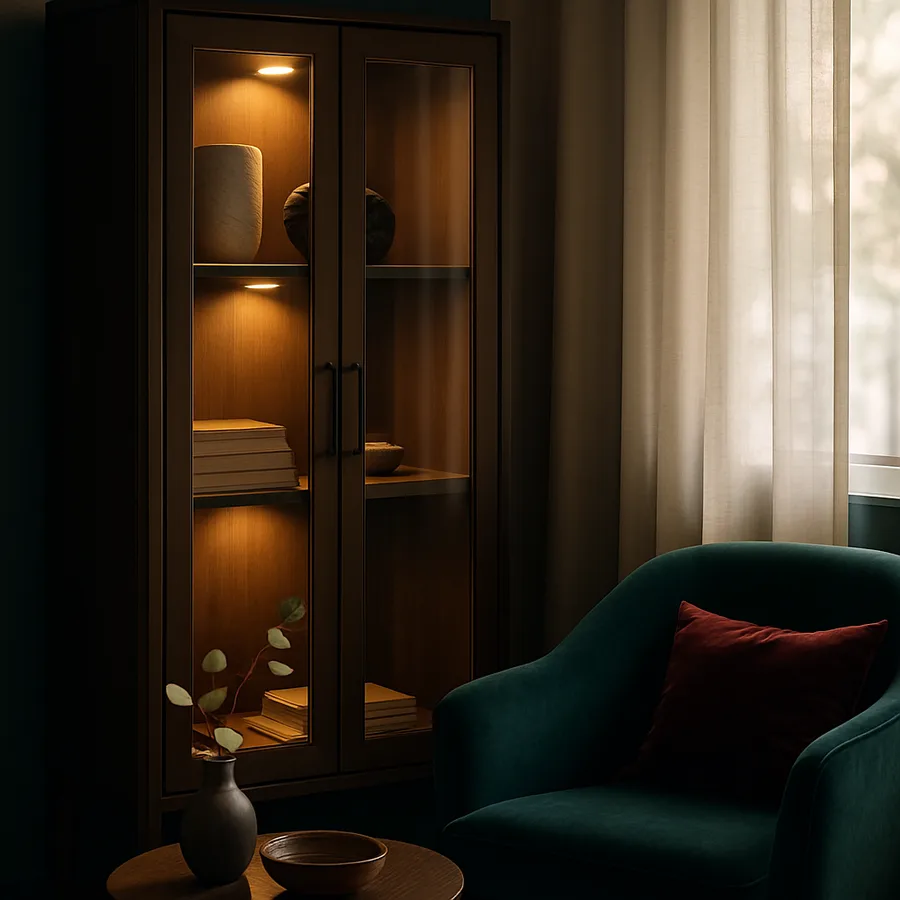
Color Temperature For Displayed Objects
The color temperature inside a glass cabinet matters more than almost anywhere else in the home because the light is grazing across small objects at close range. For a cabinet displaying warm-toned ceramics, wood, or amber glass, a 2700K warm white brings out the richness of the materials. For a cabinet displaying white or clear glassware, a slightly cooler 3000K reads as crisp without becoming clinical. For a cabinet displaying art glass or colored ceramics, 3000K to 3500K preserves the original colors without shifting them warm.
Color rendering index matters even more here. A CRI below ninety will dull the colors of anything displayed inside the cabinet, and a CRI of ninety-five or higher will make objects look like they do under daylight. The American Lighting Association recommends a CRI of ninety or higher for any lighting that grazes across textured or colored objects, and the ENERGY STAR certified product list includes CRI in the published spec for every fixture.
If you are displaying a collection of varied objects, choose a single color temperature that flatters the dominant material and accept that the others will read slightly differently. Have you ever seen a beautifully curated cabinet undermined by lighting that made the glass look gray? Color temperature mismatch is almost always the culprit.
Installation Step By Step
Start by emptying the cabinet completely. You will need clear access to every surface to mount the strip, route the wire, and place the sensor. Wipe down the interior with a damp cloth because dust on the strip backing prevents the adhesive from gripping properly. Plan the strip path so the diodes are aimed inward at the contents rather than down at the shelf edge.
For a standard glass cabinet with two or three shelves, mount the LED strip along the underside front edge of each shelf, facing back into the cabinet. This produces a soft wash across each shelf without glare visible from outside the glass door. For a single-shelf display cabinet, mount the strip along the top inside front edge of the cabinet face frame. Either approach gives you grazing light across the displayed objects rather than direct downward light.
Mount the PIR sensor near the top of the cabinet on the inside surface, angled outward through the glass door at roughly a forty-five degree downward angle. This field of view captures anyone approaching from a normal eye line without triggering on a pet on the floor. Test the sensor in dim room light because some PIR sensors have a built-in photocell that suppresses triggering during the day. The sensor placement determines the user experience more than any other single choice in the installation.
Sensor Tuning And Avoiding False Triggers
The biggest complaint with motion activated cabinet lighting is false triggers, and almost every false trigger is the result of incorrect sensor tuning rather than a defective sensor. A PIR sensor has three adjustable parameters in most quality units: sensitivity, hold time, and ambient light threshold. Tuning these correctly transforms an annoying installation into a system you stop noticing because it just works.
Sensitivity controls how much heat motion the sensor needs to see before it triggers. Set it too high and the sensor fires when a curtain moves in the breeze or a pet walks past at a distance. Set it too low and the sensor misses you when you approach from an unusual angle. Start at the middle setting and walk through the room from every direction the cabinet might see motion from, then adjust up or down based on whether you got false triggers or missed triggers.
Hold time controls how long the light stays on after the last detected motion. The default of thirty seconds is usually too short for cabinet display because the light dims away while you are still admiring the contents. Three to five minutes is a better starting point, with thirty seconds reserved for utility cabinets where the goal is brief illumination during access. The American Lighting Association recommends hold times that match the typical dwell time of the user in the space, which is rarely under a minute.
The ambient light threshold prevents the sensor from triggering during daylight when the cabinet is already well-lit from the room. Set this to a level that suppresses triggering during the day but allows it at dusk and through the night. Some premium sensors include automatic ambient compensation that adjusts the threshold based on the time of day, which is worth the small premium for a primary display cabinet. The Department of Energy notes that automatic ambient control improves user satisfaction with occupancy sensors more than any other single feature.
Maintenance And Long Term Reliability
Inside cabinet lighting lives in a clean environment compared to most kitchen fixtures, which extends its useful life considerably. There is no grease aerosol, no humidity from boiling pots, and no direct sunlight to age the diffuser. A quality 24-volt LED strip installed inside a glass cabinet typically delivers fifty thousand hours or more of useful service, which translates to roughly fifteen to twenty years at typical residential use rates.
The maintenance that does help is simple. Wipe the diffuser with a damp microfiber cloth once a year to remove dust and any residue from cleaning sprays. Check the sensor field of view occasionally to ensure no displayed object has shifted to block detection. If the strip is battery powered, replace the battery pack at the first sign of dimming rather than waiting for full failure, because the dim phase tends to drift color temperature in addition to brightness and the mismatch shows up in display photos before it shows up in person.
Conclusion
Motion activated inside cabinet lighting is one of those upgrades that costs little and feels like magic every day. The materials run between fifty and two hundred dollars per cabinet depending on whether you go battery or hardwired, and the installation takes one to two hours per cabinet for a careful homeowner. Once the system is running, you stop thinking about it and simply enjoy the way the cabinets respond to your presence.
Three details separate a great installation from a mediocre one. First, the sensor placement determines whether the system feels responsive or annoying. Test the trigger zone with the door closed before you mount anything permanently. Second, the color temperature determines whether the displayed contents look beautiful or muted. Match the LED temperature to the dominant material in each cabinet. Third, the power delivery determines whether the system stays reliable over years. Hardwire if you have more than two cabinets to light.
Think about this layer as a display tool first and a lighting tool second. The light is there to reveal what is inside the cabinet, not to brighten the room. Keep the output modest, the color temperature warm, and the sensor responsive. A motion activated glass front cabinet that glows quietly when you approach and dims away when you leave is one of the most satisfying details a kitchen can have.
Plan your install this week. Pick one cabinet to pilot, choose between battery and hardwired delivery, and order a quality PIR sensor with a matched LED strip in 2700K or 3000K. Reference the American Lighting Association guidance on occupancy sensor selection, review the IES recommended practice for residential lighting, and confirm your fixture against the ENERGY STAR certified product database before purchase.
More Articles You May Like


Comments
Post a Comment