Reptile Tank Built-In Furniture for Living Room Display
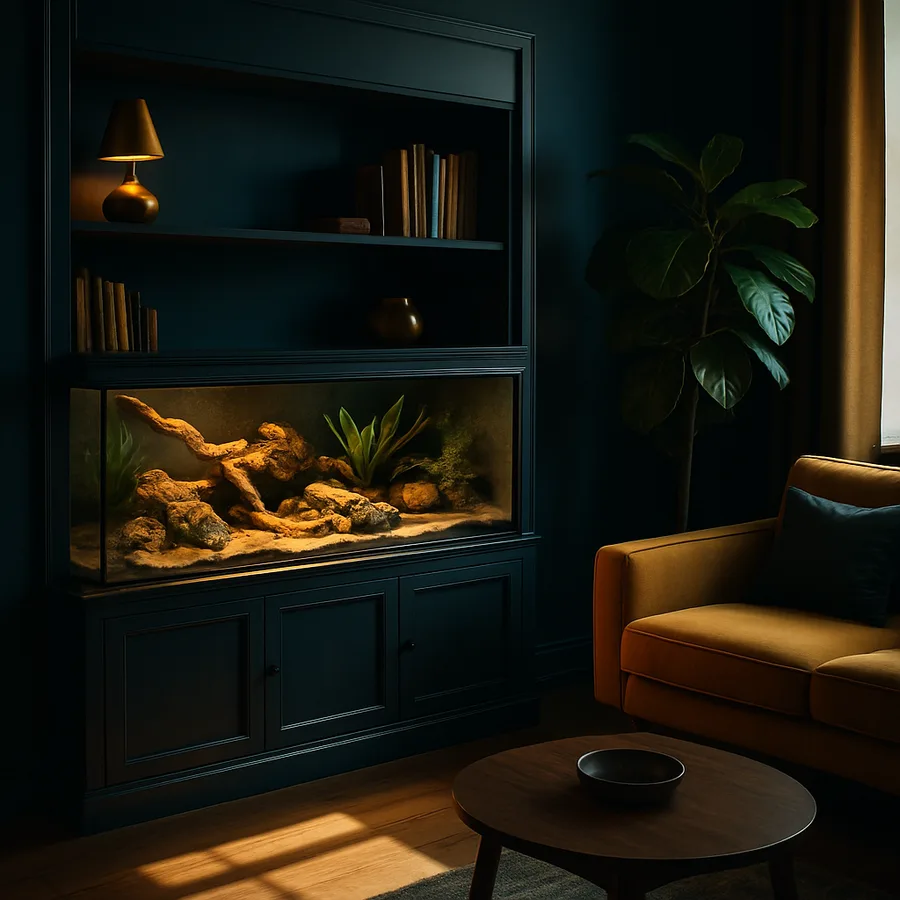
The era of plastic terrariums perched awkwardly on metal stands in spare bedrooms is fading fast. A growing wave of pet owners and interior designers are reimagining the reptile habitat as a centerpiece of contemporary living rooms, integrated seamlessly into custom millwork, media walls, and bespoke cabinetry. When done correctly, a built-in reptile enclosure becomes more than housing for a beloved bearded dragon, ball python, or leopard gecko, it becomes an architectural feature that doubles as living art. According to the American Veterinary Medical Association, roughly 4.5 million U.S. households now keep reptiles, a figure that has climbed steadily over the past decade as enthusiasts demand higher-quality husbandry and elevated aesthetics in equal measure.
This guide walks through the full design language of built-in reptile furniture, from structural planning and ventilation engineering to lighting integration, finish selection, and the practical day-to-day workflows that keep both your pet and your living room thriving. Whether you are working with a dedicated cabinetmaker, a general contractor, or rolling up your sleeves for a weekend DIY build, the principles below will help you avoid the most common pitfalls and create a display that reads as deliberate rather than improvised.
Why Built-In Reptile Furniture Has Become a Design Movement
Walk through any high-end pet expo or scroll through a curated interiors feed, and you will quickly notice that the freestanding glass terrarium is being replaced by something far more architectural. Designers are responding to two converging client demands: the desire for visually quiet rooms free of mismatched gear, and a deeper commitment to pet welfare that calls for larger, better-ventilated, more enriching habitats. A built-in approach satisfies both. By integrating the enclosure into a wall of cabinetry or a custom media console, the reptile gains square footage and vertical climbing space, while the room reads as a single unified composition.
There is also a sustainability story here. Custom millwork built from FSC-certified hardwoods can outlast three or four generations of off-the-shelf terrariums, reducing the volume of plastic and particleboard heading to landfills. The U.S. Green Building Council has long advocated for durable, repairable interior assemblies as a cornerstone of healthy buildings, and a well-built reptile cabinet fits that ethos perfectly. Resources from the USGBC on material specification and indoor air quality are surprisingly applicable to pet enclosures, particularly when you consider the off-gassing concerns associated with cheap MDF and the heat loads generated by basking lamps.
Have you ever walked into a friend's home and immediately felt that the pet setup was an afterthought, with cords snaking across the floor and a humidity-fogged tank wedged between a bookshelf and a sofa? The built-in approach eliminates that visual chaos by treating the habitat as a piece of architecture rather than a piece of equipment.
Choosing the Right Species and Sizing the Enclosure
Before a single dimension goes onto a drawing, the species selection drives every other decision. A juvenile leopard gecko has wildly different spatial, thermal, and humidity needs than a fully grown reticulated python, and a built-in enclosure designed for one will fail catastrophically for the other. The Association of Reptile and Amphibian Veterinarians publishes minimum enclosure guidelines that should be treated as a floor, not a target. For a single adult bearded dragon, that means a minimum 4-by-2-by-2-foot footprint, while a green iguana realistically requires a room-sized habitat that approaches 8 feet of vertical climbing space.
Built-in design actually makes oversizing easier and cheaper than freestanding alternatives. Because you are paying for cabinetry anyway, expanding the internal volume by a few cubic feet often costs only marginally more in materials and yields enormous welfare benefits. Design professionals who collaborate with reptile-savvy veterinarians frequently recommend doubling the published minimums whenever the wall space allows. The ASPCA echoes this guidance in its companion-animal welfare materials, noting that enrichment-rich environments correlate with reduced stress behaviors and longer lifespans across most reptile species. Their educational portal at ASPCA pet care includes overviews on appropriate housing for many of the species commonly kept in built-in displays.
Structural and Ventilation Engineering
A reptile enclosure pushes a cabinet far harder than a typical media console ever will. You are dealing with sustained internal temperatures of 80 to 110 degrees Fahrenheit at the basking spot, daily misting cycles that can drive humidity above 80 percent for tropical species, and lighting fixtures that draw 100 watts or more for hours at a stretch. The case must be engineered to survive these conditions for a decade or longer without warping, delaminating, or fostering mold.
Start with the substrate of the cabinetry itself. Marine-grade plywood with a phenolic resin face is the gold standard, particularly for the floor pan and any vertical surfaces likely to receive direct mist contact. All interior seams should be sealed with an aquarium-safe silicone, and any exposed plywood edges should be banded and sealed. The glass front should be tempered and at minimum 6 millimeters thick for enclosures up to 4 feet wide, stepping up to 8 or 10 millimeters for larger spans to accommodate live-load deflection without flexing the seal lines.
Ventilation is where most amateur builds fail. Reptiles need fresh air exchange to prevent respiratory infection, but uncontrolled airflow will drop humidity and waste expensive heat. The professional solution is a chimney effect: a low-mounted screened intake on the front face combined with a high-mounted exhaust near the basking lamp. This passive convection cycle pulls cool fresh air across the floor of the habitat, lets it warm and rise, and exhausts it through a screened vent at the top, all without a single moving part. A small computer-style fan can be added on a thermostat for tighter humidity control if needed.
Lighting Integration and Heat Management
Lighting is simultaneously the most critical welfare consideration and the trickiest design challenge in a built-in reptile cabinet. Most diurnal reptiles require full-spectrum UVB output to synthesize vitamin D3 and metabolize calcium properly, and this UVB must be unfiltered by glass or acrylic, which block the relevant wavelengths. The implication for cabinetry is that the lamp must either sit inside the enclosure on a screened canopy, or be mounted in a recessed soffit above a metal mesh panel let into the cabinet ceiling.
According to data published by the U.S. Department of Energy, modern LED and ceramic heat emitter combinations can deliver the same thermal and photic profile as legacy incandescent setups while using roughly 75 percent less electricity, a meaningful saving when a reptile lamp runs 12 hours per day, 365 days per year. Integrating these fixtures into a recessed soffit also lets you wire them through a dedicated 20-amp circuit with a thermostatic controller, eliminating the dangling cords and surge-strip clutter that plague freestanding setups.
One detail that elevates a build from amateur to professional is the inclusion of a hidden service hatch above the soffit, accessed from the cabinet top, that allows lamp replacement without disturbing the animal or the front display. Keepers tend to underestimate how often UVB bulbs need to be swapped, typically every 6 to 12 months depending on the model. Designing easy bulb access from day one prevents future demolition.
Materials, Finishes, and the Living Room Vocabulary
The visual question is how to make a reptile habitat feel like furniture rather than equipment. The answer almost always lies in matching or echoing the existing material palette of the room. If your living room features rift-cut white oak shelving and a travertine fireplace surround, the reptile cabinet should be built from the same oak with a continuous grain match across the doors, drawers, and habitat frame. If the room is anchored by walnut and brushed brass, then walnut veneer over a poplar substrate, with brass-finished hardware and brass-edged glass channels, will carry the visual story through the new piece.
Designers often treat the glass front of the habitat as a kind of vivarium-as-painting, framing it with a deep reveal that throws a subtle shadow line and gives the eye a clean transition between enclosure and cabinetry. The interior of the enclosure can then be styled like a miniature landscape, with naturalistic backgrounds molded from cork bark, foam-and-epoxy rockwork, or 3D-printed terracotta panels that read as artisanal rather than synthetic. The National Wildlife Federation has noted that bioactive enclosures with live plants and natural substrates not only improve animal welfare but also create more visually compelling installations, which is a powerful alignment of design and ethics.
Are you matching the cabinet to the room or letting it stand as a deliberate accent piece? Both approaches can succeed, but the choice should be made consciously. A monolithic walnut wall with the habitat reading as a softly glowing window into another world feels meditative and architectural. A contrasting piece in painted lacquer with brass inlay reads as jewelry, demanding attention. Choose the register that suits your space.
Daily Care Workflows and Hidden Storage
A built-in reptile cabinet is only as good as the daily workflow it supports. The best designs anticipate the realities of feeding, misting, spot cleaning, and seasonal deep cleaning, and they hide all the supporting gear behind doors and drawers integrated into the same case. Plan a base cabinet beneath the habitat for substrate storage, a pull-out drawer for feeding tongs and supplements, a refrigerator-style insulated drawer for live insect storage if your species requires it, and a tall pantry-style cabinet for spare lamps, thermostats, and backup equipment.
Plumbing is another opportunity for elegance. A small cold-water line tapped from a nearby wall and run through the cabinet to a misting nozzle manifold can automate humidity control and eliminate the need for handheld spray bottles. ENERGY STAR rated humidifiers and circulating pumps consume minimal electricity while providing far more consistent environmental conditions than manual misting, which translates directly to better animal health and less daily labor for the keeper.
Consider also the routine of guests visiting your home. A thoughtfully designed built-in invites curiosity rather than awkward questions, and many keepers report that integrated habitats become genuine conversation pieces that introduce friends and family to reptile husbandry in a respectful, well-presented way. Have you thought about how your enclosure will look on a Saturday evening when the room is full of dinner guests? The answer should be the same as how it looks at 7 a.m. when you are alone with your morning coffee, calm, beautiful, and clearly cared for.
Conclusion
Building a reptile habitat into your living room cabinetry is one of the most rewarding intersections of pet keeping and interior design available today. The investment is real, both in money and in planning time, but the payoff is a single architectural element that elevates the room, provides a meaningfully better life for the animal, and lasts for decades rather than the few short years a freestanding terrarium typically endures. By starting with rigorous species research, engineering the structure for sustained heat and humidity, integrating lighting through proper soffits, matching materials to your existing palette, and designing in the storage and workflows that real-world reptile care demands, you create a piece that feels inevitable rather than added.
The shift from gear to architecture also signals a broader maturation in how we think about the animals we share our homes with. When the habitat is built into the bones of the room, it is no longer a temporary accommodation, it is a commitment. That commitment shows in the daily care, in the stability of the environmental controls, and in the visual respect that the surrounding cabinetry pays to the creature inside. Owners who have made this transition consistently report stronger bonds with their reptiles, and many cite reduced stress behaviors and improved appetite within weeks of moving from a glass tank into a properly engineered built-in enclosure.
If you are weighing whether to pursue this kind of project, the honest answer is that it requires more upfront thought than buying a kit, but the technical knowledge is well documented and the design language is now mature enough that any skilled cabinetmaker can execute it with the right drawings. Spend time with your veterinarian, your designer, and your contractor before committing to dimensions, and budget for at least one design iteration as you discover constraints in your specific wall and your specific species.
Ready to begin? Start by sketching the wall where the habitat will live, photograph the room from three angles, and bring those images, along with your species selection and any veterinary notes, to a cabinetmaker who has experience with custom millwork. The conversation that follows will likely transform not just one piece of furniture, but the way you experience your entire living room.
More Articles You May Like



Comments
Post a Comment