Pottery Studio at Home With Wheel Setup and Kiln Ventilation
Carving out a dedicated home pottery studio is one of the most rewarding renovations a maker can undertake, but it is also one of the most technically demanding. Unlike a home office or a craft nook, a ceramics workspace must accommodate water, fine silica dust, electrical loads, and temperatures that can exceed 2,300 degrees Fahrenheit during firings. Done well, the room becomes a calming sanctuary for slow, hands-on work; done poorly, it becomes a respiratory hazard and a liability for your insurance policy. This guide walks through the design decisions that separate a hobby corner from a functional studio that can support hundreds of pieces a year.
Before you order a wheel or pour a slab floor, take a hard look at the room itself. Ceiling height, ventilation pathways, and proximity to a service panel matter more than aesthetic flourishes. A studio shoehorned into a finished basement with low ceilings and no exterior wall will fight you at every turn. By contrast, a detached garage with a 100-amp subpanel and a clear path to the roof can be transformed into a professional-grade studio for a fraction of the cost of relocating utilities. Read on for the framework I use when consulting on private studios.
Choosing the Right Room and Floor Plan
The single biggest mistake hobbyists make is treating studio location as an afterthought. The ideal space is on a ground floor or basement with a concrete slab, a dedicated 240-volt circuit run, and at least one exterior wall for venting. According to a 2024 American Craft Council survey, more than 62 percent of home ceramicists who reported chronic respiratory complaints had set up in carpeted bedrooms or attic spaces with no exterior airflow. The lesson is unambiguous: you cannot retrofit your way out of a bad location.
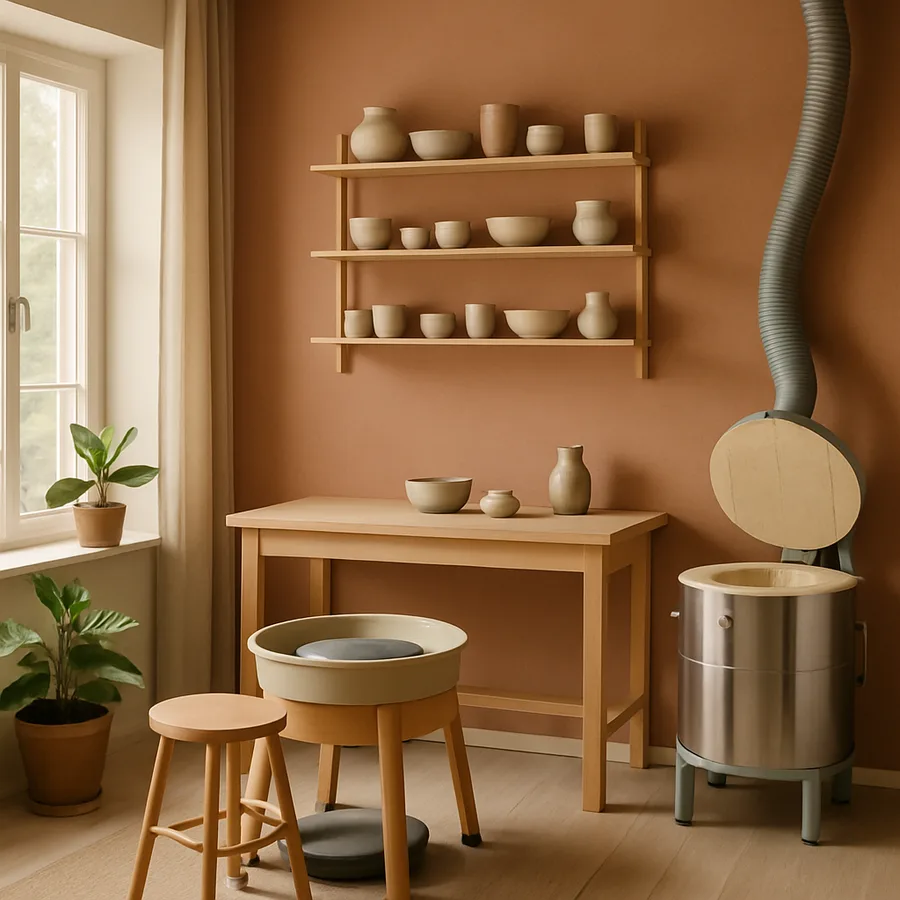
Within the room, plan distinct zones for wet work, dry work, glazing, and firing. Wet work includes wedging tables and the wheel, ideally clustered near a deep utility sink with a clay trap. Dry work covers trimming, hand-building, and decoration, and benefits from natural light. Glazing should be physically separated from dry trimming because airborne glaze chemicals will contaminate unfired greenware and ruin firings. The kiln, the most dangerous element in the room, should sit at the far end, on a noncombustible base, with at least 18 inches of clearance on all sides.
Have you ever tried to mop dried slip out of a wood floor? If you have, you already know why sealed concrete or epoxy flooring is non-negotiable. Avoid carpet, vinyl plank, and porous tile grout. Slope the slab a quarter inch per foot toward a floor drain if local code permits, and finish with an industrial epoxy designed for clay studios. That single decision will pay dividends every time you hose down the floor.
Wheel Setup, Wedging, and Workflow Ergonomics
Your wheel is a tool you will sit at for thousands of hours, so the setup must respect your body. Position the wheel so your dominant throwing arm has unobstructed clearance and your dominant hand is closest to a small splash bucket and tool tray. The seat height should let your knees sit slightly below your hips, with feet flat on the floor or on a stable footrest. Standing wheels are growing in popularity and reduce lower-back strain, but only if the splash pan height is properly tuned to your forearm angle.
The wedging table is the second cornerstone of the wet zone. Build it at a height where you can press down with locked elbows; for most adults, that lands between 32 and 36 inches. The top should be canvas-wrapped plaster or a porous concrete board so it pulls excess water from clay rather than smearing it. Place the wedging table within two steps of the wheel so reclaim and fresh clay move quickly between the two.
Storage is where studios either thrive or descend into chaos. The National Kitchen and Bath Association recommends storage planning principles that translate beautifully to a pottery studio: keep most-used items at hand height, less-used items below the knee, and rarely-used items overhead. Apply that to your tool drawers, clay reclaim bins, and bisqueware shelving. For deeper guidance on ergonomic studio design, the National Kitchen and Bath Association publishes excellent universal-design checklists that translate well to creative spaces.
Kiln Selection and Electrical Requirements
The kiln is the most consequential purchase you will make, and it dictates almost every other decision in the studio. Most home ceramicists eventually settle on an electric kiln in the 7 to 10 cubic foot range, which can reach cone 10 reduction-style temperatures in oxidation. These kilns typically draw 48 to 60 amps at 240 volts, which means a dedicated circuit and, in many homes, a service panel upgrade. Do not rely on the existing dryer outlet; kiln cycles run 8 to 14 hours, and dryer wiring is rarely sized for that duty cycle.
Hire a licensed electrician to pull a dedicated circuit from the main panel, in conduit, with a properly sized disconnect within line-of-sight of the kiln. The National Electrical Code, maintained by the National Fire Protection Association, governs these installations and requires specific clearances and overcurrent protections that vary by jurisdiction. A common rookie error is undersizing the wire gauge based on the kiln nameplate without accounting for continuous-load derating; the result is warm conductors and accelerated insulation breakdown over time.
Location within the room matters as much as the wiring. Kilns radiate enormous heat during firing, sometimes raising ambient room temperature by 30 to 40 degrees. Keep the kiln at least three feet from any combustible wall, never under a window with curtains, and never directly beneath a smoke detector. Use cement board or a ceramic-tile pad on the floor if the slab is not already noncombustible. Some manufacturers void warranties if the kiln is installed without these clearances, so document everything with photos before your first firing.
Ventilation Engineering for a Safe Studio
Ventilation is where amateur studios become hazardous and where professional studios stay healthy. Two separate systems are required: a downdraft kiln vent that pulls fumes from inside the kiln during firing, and a general room exhaust that maintains negative pressure during glazing, mixing, and cleanup. The kiln vent removes carbon monoxide, sulfur dioxide, and metallic vapors that come off glazes during the binder burnout and quartz inversion stages. Without it, you will literally smell those gases inside your home.
Sizing matters. A typical 7 cubic foot kiln needs a vent rated for at least 140 cubic feet per minute, ducted in metal pipe directly to the exterior, with as few elbows as possible. Avoid flexible dryer-style ducting; it sags, collects condensate, and presents fire risk. The general room ventilation should provide a minimum of 10 air changes per hour during glazing work, achievable with a wall-mounted exhaust fan and a make-up air vent on the opposite side of the room. The American Society of Heating, Refrigerating and Air-Conditioning Engineers publishes detailed standards for industrial workshop ventilation that apply directly to ceramics studios; their guidance documents are available through ASHRAE.
Workplace safety regulators take ceramics-studio air quality seriously. The Occupational Safety and Health Administration sets a permissible exposure limit for respirable crystalline silica of 50 micrograms per cubic meter averaged over an eight-hour day, and the agency reports that potters historically exceed this threshold during dry-clay handling. A 2023 OSHA technical bulletin estimated that roughly one in five small-studio operators tested above the action level during glaze mixing. You can review the agency's silica guidance on the OSHA website. The fix is straightforward: wet-clean every surface, never sweep dry, and wear a properly fitted N95 or P100 respirator during dry handling.
Glaze Chemistry, Storage, and Splash Defense
Glaze materials introduce a different category of risk than throwing clay. Cobalt, manganese, copper carbonate, and barium are common ingredients, and several are classified as hazardous when inhaled or ingested. Store dry chemicals in labeled, gasketed containers on shelves above splash height, never under the glazing sink. Keep a printed materials safety data sheet binder within reach; you will need it if a spill or accidental ingestion ever occurs.
The glazing area itself should be designed like a small wet lab. A laminate or sealed-stone counter resists chemical staining, and a stainless-steel splash backsplash makes cleanup trivial. Install dimmable task lighting at 4,000 to 5,000 Kelvin so glaze colors read accurately when wet, since most studio glazes shift dramatically between bucket, application, and fired result. A wall-mounted scale with a 0.1-gram resolution is essential for repeating tested recipes; eyeballing percentages is the fastest way to ruin a kiln load.
How often do you actually clean your glazing tools versus simply rinsing them? Cross-contamination is the silent killer of consistent results, and one missed brush of cobalt in a celadon bucket can turn an entire firing cycle into seconds. Build a habit of rinsing tools twice in separate buckets, then drying them on a slatted rack, before they ever return to a clean glaze. The discipline pays for itself in salvaged firings within the first month.
Maintenance, Insurance, and Long-Term Planning
A pottery studio is a system, and like any system it degrades without maintenance. Wheel splash pans should be deep-cleaned weekly, drive belts checked monthly, and bat pins inspected before every throwing session. The kiln needs more attention: vacuum the elements quarterly with a soft brush, inspect bricks for fractures after every firing, and replace thermocouples every 18 to 24 months depending on firing volume. Skipping these checks is how a working kiln becomes a fire hazard.
Notify your homeowners insurance carrier before you fire your first kiln. Most standard policies exclude kiln-related losses unless the equipment and electrical work are properly disclosed. Some carriers require a rider; others will refuse coverage and recommend a small commercial policy. The premium increase is typically modest, often 50 to 150 dollars annually, and is dwarfed by the cost of a denied claim after a kiln incident. Keep the licensed-electrician documentation, manufacturer install instructions, and any inspection reports in a single file for the carrier.
Plan for studio growth. The throwing wheel you buy first is rarely the only one you will own; serious makers often add a second wheel for slip casting or hand-building, plus larger kilns or specialty equipment like a slab roller or extruder. Leave at least 30 percent open floor space when you set up, and run extra conduit during the initial electrical work; pulling a second 240-volt circuit later costs three to five times more than including it during a panel upgrade. The National Association of Home Builders emphasizes this same principle of capacity planning in residential workshop guides published through NAHB resources, and the logic translates directly to ceramics.
Conclusion
A home pottery studio rewards the planning you put in long before the first ball of clay hits the wheel. The most prolific home ceramicists I know all share the same traits: they chose a room with the right bones, they invested in real ventilation rather than a window fan, they sized their electrical service for the kiln they would eventually want, and they treated dust control as a daily discipline rather than an occasional chore. None of those decisions are particularly expensive in isolation, but they compound dramatically over thousands of hours of practice.
If you are weighing a studio buildout right now, start by drawing the room to scale and placing the kiln, wheel, wedging table, and sink before you spend a dollar. Walk through the workflow on paper. Wet clay should travel from sink to wedging table to wheel to drying shelf to glaze area to kiln in a roughly linear path, with no backtracking. When the floor plan flows, the work flows. When the floor plan fights you, every session ends in cleanup frustration rather than creative satisfaction.
Treat your studio as the long-term creative infrastructure it really is. The respirator, the kiln vent hood, the floor drain, and the 240-volt circuit are not luxuries; they are the difference between a hobby that lasts a decade and one that ends with a respiratory diagnosis or an electrical fire. Build the studio you would build for a friend you cared about, then enjoy the calm, reliable space that results.
Ready to take the next step? Sketch your studio layout this weekend, get a licensed electrician on site for a panel evaluation, and price out a kiln vent system before you commit to the kiln itself. Send your draft layout to a working potter for feedback, and you will avoid the most common mistakes before they cost you anything. Your future self, sitting at a quiet wheel in a well-ventilated room, will thank you.
More Articles You May Like


Comments
Post a Comment