Painted Stripe Ceilings for Kids Bedrooms and Playrooms
Most kids' rooms get all of their personality from the walls. The ceiling is treated as an afterthought, painted flat white, and forgotten. That is a missed opportunity. The ceiling is the largest unbroken surface in any bedroom, and for a child lying in bed staring up at it, it is also the most-viewed surface in the entire home. A painted stripe ceiling transforms that empty plane into a focal point that can grow with the child, support imaginative play, and dramatically change how a small room feels in terms of scale and proportion.
Striped ceilings are not a new idea. They appeared in early 20th-century nurseries, in classical Italian villas, and in mid-century rec rooms. What is new is the range of paint formulations, layout tools, and color theory frameworks now available to anyone willing to spend a Saturday with painters tape and a roller. This guide covers everything from picking the right stripe direction to specifying the paint sheen that will survive a decade of fingerprints, sticker residue, and the occasional Nerf dart strike.
Choosing Stripe Direction Based on Room Geometry
Stripe direction has measurable psychological effects on how a room reads. Horizontal stripes running parallel to the longest wall tend to make a room feel longer and more horizontal. Stripes running perpendicular to the longest wall make the room feel wider, sometimes at the expense of feeling shorter overall. In a long, narrow bedroom, running stripes the long way amplifies the awkward proportions and can make the room feel like a hallway. Running them the short way visually balances the proportions.
For perfectly square rooms, stripe direction is more flexible. Some designers like to align stripes with the orientation of the bed so that a child lying down sees the stripes running head-to-foot, which can feel calming and orderly. Others prefer to run stripes perpendicular to the bed for a more dynamic, energetic feel that suits a playroom or a shared kids' space. Either approach is defensible, and it often comes down to whichever direction the natural light enters the room. Stripes running with the light tend to recede; stripes running across the light tend to read more strongly.
Diagonal stripes are a more advanced technique that introduces visual movement and can make a room feel larger and more playful. They are also significantly more difficult to lay out and tape correctly. If you are attempting diagonal stripes for the first time, start with wider stripes (8 inches or more) and use a chalk line snapped between two corner reference points to establish your first stripe, then measure and tape parallel stripes from there. Diagonal stripes work especially well in attic bedrooms with sloped ceilings, where they emphasize the architectural drama.
Stripe Width and Proportional Spacing
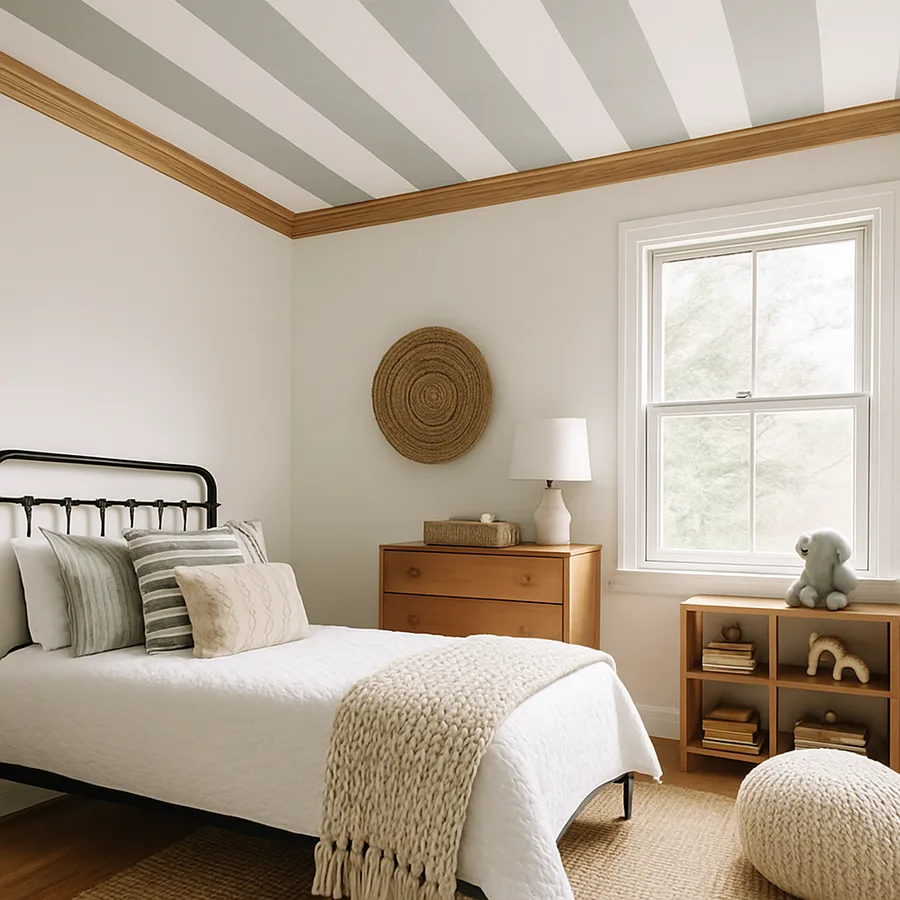
The single biggest mistake amateur stripe-painters make is choosing stripes that are too narrow. Thin stripes (1 to 2 inches wide) read as visual noise from a normal viewing distance. They look busy, almost vibrating, and they show every imperfection in your taping job. Wider stripes are forgiving, more elegant, and easier to lay out. Most professional designers recommend stripes between 4 and 12 inches wide for ceiling applications, with 6 to 8 inches being the most versatile range.
The number of stripes should be calculated to fit your ceiling dimensions evenly. If your ceiling is 144 inches wide and you want stripes 8 inches wide, you can fit 18 stripes across (144 divided by 8). Alternating colors gives you 9 of color A and 9 of color B. If the math does not work out evenly, you have two options: adjust the stripe width slightly to make it work (a 7.5-inch stripe instead of 8 inches), or plan for partial stripes at the edges that get hidden by crown molding or by deliberate placement against a wall.
For two-color stripe patterns, equal-width stripes are the classic look. For more sophisticated effects, try uneven stripe rhythms: a pattern of one wide stripe (12 inches) followed by two narrow stripes (3 inches each) followed by another wide stripe creates a more architectural, custom feel. This technique is especially effective in playrooms where you want a designer-quality result without using more than two paint colors. According to a 2023 survey of residential painters published by the National Association of Home Builders, custom striped ceilings have grown approximately 27 percent year-over-year as a specified upgrade in new homes built for families with young children.
Color Selection for Developmental Age Ranges
Color theory in children's spaces is not just about preference. Research from environmental psychology suggests that color affects mood, attention, and even sleep quality. For nurseries and toddler rooms (ages 0 to 3), soft pastels in low-contrast combinations (cream and pale blue, ivory and dusty pink, white and soft sage) create a calming environment that supports sleep. Avoid high-contrast color pairings in this age range, as they can be over-stimulating during nighttime wake-ups.
For elementary-age kids (ages 4 to 9), you have much more flexibility. Bolder color combinations work well in this range, especially if the bedroom doubles as a play space. Think classic combinations like white and navy, butter yellow and cloud blue, or coral and cream. According to research published by the American Library Association on children's reading environments, color contrast in ceilings can support visual development and help children orient themselves in a room, but the specific colors matter less than the consistency and predictability of the palette.
For tweens and teens (ages 10 and up), invite the child into the color selection process. This is the age when room ownership becomes part of identity development, and a ceiling stripe pattern they helped design will mean more than any palette an adult chose. Encourage them to pull color inspiration from things they care about: a favorite book cover, a sports team, a band album art, a beloved place. Translate those into wall paint sample sized chips and tape them to the ceiling for a few days before committing. Have you asked the child what they actually want?
Paint Selection: Sheen, Durability, and Cleanability
Paint sheen on ceilings affects both appearance and durability. The traditional choice for ceilings is flat or matte, which hides imperfections in the drywall and creates the most uniform appearance. Flat paint is also the most fragile and the hardest to clean. In a kids' room or playroom, where you might face occasional Nerf dart impacts, balloon residue, or projectile snacks, a slight sheen can save you years of touch-ups.
For striped ceilings in kids' spaces, consider an eggshell or low-luster finish. The slight sheen makes the stripes more visually defined (light reflects subtly off each stripe at slightly different angles), and the surface is washable with mild soap and water. Higher sheens like satin or semi-gloss are even more durable but begin to show every drywall imperfection, which is rarely desirable on a ceiling. If you must have maximum durability, use a satin finish but spend extra time skim-coating the ceiling smooth before painting.
Modern low-VOC and zero-VOC paints are the only acceptable choice for kids' rooms. According to studies referenced by the U.S. Environmental Protection Agency, indoor air pollution from off-gassing paint can take weeks to months to fully dissipate, and children are more vulnerable than adults to airborne chemicals because of their faster breathing rates and developing respiratory systems. Look for paints with VOC content under 50 grams per liter, and ideally under 5 grams per liter for the safest options. Brands like Benjamin Moore Natura, Sherwin-Williams Harmony, and Behr Premium Plus Ultra all meet these standards and come in unlimited custom colors.
Layout, Taping, and Painting Technique
The taping job is what separates an amateur stripe project from a professional-looking result. Use high-quality painters tape rated for delicate surfaces, such as Frog Tape or 3M Edge-Lock. Cheap tape lets paint bleed underneath and creates ragged stripe edges. Plan to spend significantly more on tape than you might expect for a single project; the difference in finished quality is dramatic.
Start by painting the ceiling the lighter of your two colors, edge-to-edge, and let it cure for at least 24 hours before taping. Snap chalk lines to mark the edges of every stripe. Apply tape on the chalk line so that the tape covers the lighter color where you want it to remain visible. Then use a flat plastic putty knife to firmly press down every inch of the tape edge; this is the step most people skip and it is the single most important factor in getting clean lines.
Before painting the second color, paint a thin layer of the original lighter color along the tape edge. This seals the tape edge with the same color that is already on the ceiling, so any bleed-under paint blends invisibly. Then apply your second color with a high-quality roller in two thin coats, letting the first coat dry fully before applying the second. Remove the tape while the paint is still slightly tacky to get the cleanest possible edge. Pull the tape at a 45-degree angle, slowly and continuously.
Themed Variations and Custom Touches
Beyond classic two-color stripes, there are dozens of variations that can elevate a kids' room ceiling from nice to memorable. Ombre stripes transition gradually from one color to another across the ceiling, creating a sunset or sunrise effect. They require a bit more skill to execute but use the same basic taping technique with multiple paint colors mixed in graduated proportions.
Glow-in-the-dark accents painted over the base stripe pattern can add a magical nighttime element that delights younger children. Modern phosphorescent paints are non-toxic, washable, and can be applied as decorative dots, small constellations, or thin highlight lines along stripe edges. They charge during the day from ambient room light and glow softly for several hours after lights out, which can also help anxious children settle into sleep.
For shared kids' rooms, consider stripe patterns that visually divide the space without requiring physical walls. Alternating one half of the ceiling in one color combination and the other half in a complementary combination can give each child a sense of their own zone while maintaining overall room cohesion. What if your child wants to redesign the ceiling in three years? Plan now for an easy refresh by photographing your stripe layout and saving the paint codes, so you can repaint specific stripes rather than starting from scratch when tastes change.
Conclusion
A painted stripe ceiling is one of the highest-impact, lowest-cost interior design changes you can make to a child's bedroom or playroom. The materials cost is typically under $200, the labor is achievable in a single weekend, and the result is a custom-feeling design feature that will define the room's personality for years. The keys to success are patient layout work, premium painters tape, low-VOC paint in an appropriate sheen, and color choices that suit the child's age and developmental needs.
Take the project seriously enough to plan it carefully but lightly enough to enjoy the process. Involve the child if they are old enough to participate; younger kids love watching the transformation happen, and older kids can take real ownership of the design decisions. Document the finished result with photos and save the paint colors and brand codes in a labeled folder so future touch-ups are easy. The painted stripe technique scales beautifully from tiny nurseries to expansive bonus rooms, and the visual rules are the same regardless of room size.
Industry research from the American Society of Interior Designers indicates that custom paint treatments are now specified in approximately 38 percent of new children's room renovations, up from 19 percent five years earlier. Ready to plan your own striped ceiling project? Pull out a tape measure, photograph your existing ceiling, and start sketching layouts in a notebook this week. Order paint samples in your top three color combinations, paint test stripes on a piece of foam board, and tape the board to the ceiling for a few days before committing to your final palette. The kids will remember this room for the rest of their childhood.
More Articles You May Like


Comments
Post a Comment