Painted Arch Headboard Accent That Requires Zero Carpentry
Of every bedroom design trend that has emerged in the past five years, the painted arch headboard may be the most approachable. It requires no power tools, no upholstery skills, no wallpaper installation, and no physical headboard at all. A pencil, a pushpin, a length of string, a paint roller, and three hours of your Saturday afternoon are enough to completely transform the visual weight of a bedroom. A recent analysis by Better Homes & Gardens reported that painted arch bedrooms saw a 430% engagement increase on social platforms over the past two years, making it one of the most imitated low-cost design moves of the decade.
This guide walks through the geometry, color selection, painting technique, and styling moves that turn a simple painted shape into a design choice that looks intentional rather than amateur. Before we start, pause on two questions: What is the tallest vertical object in my room right now, and how does my eye want to travel around the space? A painted arch behind the bed should reset that visual hierarchy so the bed becomes the undisputed focal point without introducing any physical bulk.
Why a Painted Arch Reads as Sophisticated Rather Than Craft
There is a reason painted arches repeatedly appear in the work of some of the most influential interior designers - among them, Athena Calderone, Jean Stoffer, and Shea McGee. The arch shape references classical architecture, Mediterranean plaster doorways, Moroccan archways, and early modernist murals. These references lend instant credibility to what is ultimately a painted shape on a flat wall. The American Institute of Architects (AIA) notes that arched forms have been used in domestic architecture for more than three millennia - the association is deeply embedded in how we read interior space.
Painted arches also solve a geometric problem that rectangular accent walls cannot. Most bedrooms have a single horizontal bed below a rectangular wall, which creates a stacked-rectangle visual that feels static. Introducing an arched shape breaks that rectangularity and creates implied height, gently drawing the eye upward without requiring you to physically change the ceiling or molding.
There is a cost consideration that cannot be ignored either. A gallon of high-quality interior paint runs $40 to $75. The entire arch project, including a sample pot for testing and a small foam roller, costs under $100 in most cases. By contrast, a custom headboard from a reputable furniture maker begins around $800. The delta between those two numbers - roughly $700 - is a meaningful sum that can instead go toward a higher-quality mattress, framed art, or a proper nightstand upgrade.
The String-and-Pencil Method for Drawing a Perfect Arch
You do not need a compass, a stencil, or any special tool to draw a perfect arch. The method is older than modern geometry class. Mark the horizontal center point of your arch on the wall. Tie one end of a non-stretchy string to a pencil. Measure along the string from the pencil tip a distance equal to the radius of your arch. Press a thumbtack into the wall at the horizontal center mark at that exact distance below where the arch will peak.
Keep the string taut and sweep the pencil left and right, drawing a half-circle. For a flatter, more sophisticated arch shape, you can use a wider radius with the thumbtack placed lower on the wall - this creates an elongated, elliptical arch rather than a pure semicircle. Most designers favor this flatter shape because pure semicircles can feel cartoonish above a bed.
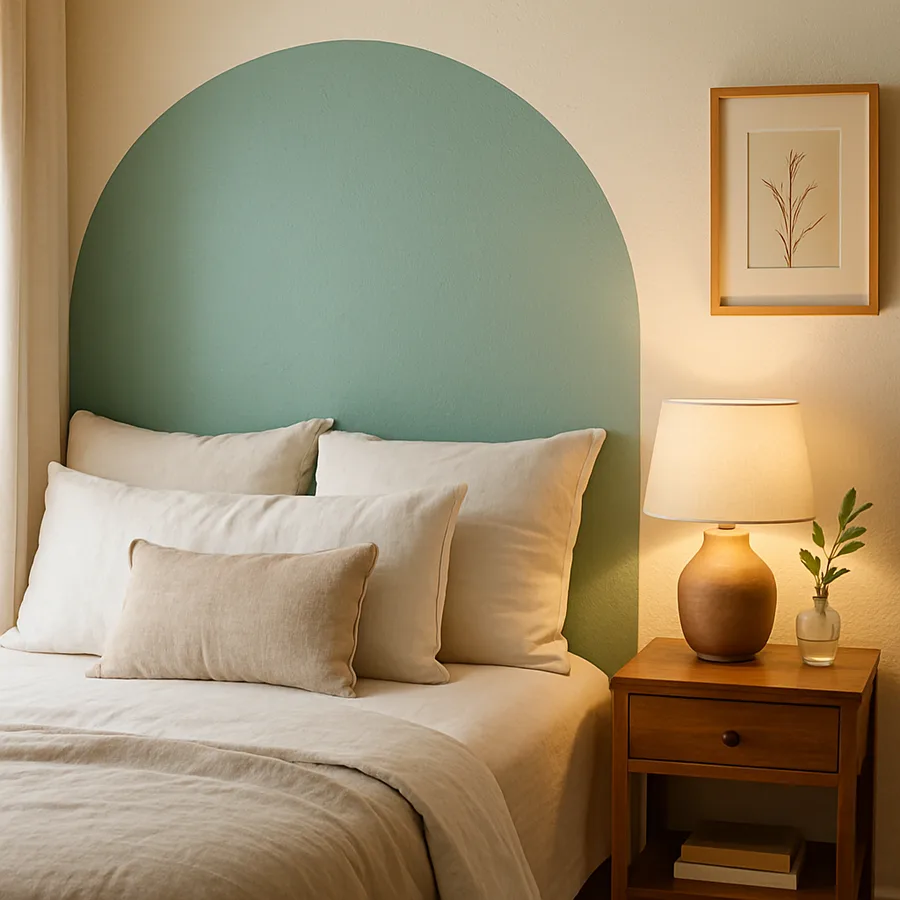
For reference, an arch centered above a queen bed typically ranges from 64 to 76 inches wide, with the peak rising to 18 to 30 inches above the top of the mattress. Ask yourself as you draw: Does the arch feel like it hugs the bed protectively, or does it hover awkwardly above like a disconnected halo? The correct answer is the former - the arch should feel parental, not detached.
Choosing a Color That Does Not Date Your Bedroom Quickly
Color is where painted arches succeed or fail. The most common mistake is choosing a saturated trend color - bubblegum pink, bright teal, electric yellow - that looks great on a social feed but tires the eye within months. The colors that hold up over time are dusty, earthy, and slightly complex: terracotta, sage green, olive, rust, clay, ochre, dusty blue, and soft charcoal.
A reliable test: look at your chosen color under three lighting conditions - morning sunlight, overhead electric light, and bedside lamp light. Paint shifts dramatically across these conditions, and the color that reads as sophisticated in daylight can turn muddy or plastic under a warm lamp. The Color Marketing Group (CMG), a professional organization for color forecasters, specifically recommends testing paint under all daily lighting conditions before committing to a full application.
Reliable arch colors include Benjamin Moore's Carolina Gull (soft warm gray-green), Farrow & Ball's Book Room Red (muted historic terracotta), and Sherwin-Williams' Rookwood Sash Green (a dusty olive). These are the shades that will still feel appropriate in your bedroom years from now, not just this season. Designers writing for Architectural Digest consistently favor earthy, slightly desaturated palettes for arch accents.
The Painting Process: Primer, Tape, and Brush Strategy
Once your arch is drawn, the painting process is straightforward but unforgiving of shortcuts. Start by applying painter's tape along the curved line from the outside, cutting the tape into short segments of roughly 2 inches and overlapping them slightly to follow the curve. Press the edges firmly with a credit card or a plastic burnishing tool - tape that is not fully sealed will bleed paint under the edge.
Prime the interior of the arch with a bonding primer, especially if your wall color is significantly darker than your arch color (or vice versa). Primer prevents the original wall color from showing through and reduces the number of finish coats required. A 4-inch foam roller handles the broad interior quickly; a 2-inch angled brush cuts in around the arch edge and along any trim.
Apply two thin coats of your arch color, allowing at least four hours of drying time between coats. Remove the painter's tape while the second coat is still slightly damp - this gives you the crispest edge. If you wait until fully dry, the dried paint can pull off the wall when the tape lifts. Touch up any imperfections with a small artist's brush the following morning when you can see clearly in daylight.
Styling the Arch to Avoid the Most Common Mistakes
The arch should frame the bed, not compete with it. That means the bed should visually sit inside the arch, not overlap its edges awkwardly. Position the headboard-or-bed-top about 2 inches below where the arch begins its curve for the cleanest visual relationship. If you do not have a physical headboard, this gap becomes critical - too much visible wall between the mattress and the arch makes the arch look disconnected.
Flanking nightstands should sit completely inside or completely outside the arch, never crossing the painted edge. Crossing creates visual tension that most eyes read as sloppy. Pendant or sconce lighting can float inside the arch if positioned symmetrically, which actually reinforces the framed composition. The International Interior Design Association (IIDA) consistently emphasizes that symmetrical framing of the bed creates the strongest visual rest in a sleeping space.
For art, you have two clean choices. Either hang no art within the arch and let the painted shape itself be the statement, or hang a single piece centered high inside the arch at roughly 75% of the arch's peak height. Avoid hanging multiple small pieces inside the arch - it creates visual noise that fights the serenity the shape is supposed to deliver. Ask yourself: If I removed every object from inside the arch right now, would the arch still feel purposeful? If yes, your styling restraint is working.
Renter-Friendly Adaptations and Removal Strategy
The painted arch is already one of the most renter-friendly design moves because paint is the only material involved, and paint is reversible. However, there are a few additional considerations worth noting. Check your lease - most standard residential leases allow interior painting as long as walls are returned to their original color before move-out. Some leases explicitly prohibit color changes, so read carefully.
When you move out, repainting the arch wall typically requires priming over the arch color with a stain-blocking primer (especially for dark or saturated arch colors), then applying two coats of the original wall color. Budget roughly 4 to 6 hours for this process. A recent analysis by the National Apartment Association (NAA) found that properly documented and repainted walls rarely result in any lease violation fees, even when tenants had installed bold accent colors during tenancy.
If you are worried about commitment, a removable wall decal arch in your chosen color is now widely available from brands sold on Etsy and Amazon. These peel-off arch stickers deliver the visual effect without any paint commitment and remove cleanly when you move. Quality varies significantly, so read reviews carefully and order a small sample first.
Conclusion: The Lowest-Risk, Highest-Reward Bedroom Move
Few interior design projects deliver as much visual transformation for as little money, time, or commitment as the painted arch. You need no shop, no tools, no specialized skills, and no headboard budget. You need a wall, a color, three hours, and the confidence to commit to a shape that has been calming human eyes for three thousand years. The result costs less than most throw pillows and changes the entire character of the room.
The quiet magic of the painted arch is that it sidesteps a question most homeowners agonize over: which physical headboard to buy. Instead of spending weeks comparing upholstered options, researching wood frames, or waiting for custom pieces to ship, you replace the question entirely. The arch becomes the headboard, and a simple mattress on a low platform becomes all the bed you need. This elegance - solving a design problem by reframing rather than answering it - is the core lesson of contemporary interior design.
If you have been considering a bedroom refresh but feel overwhelmed by furniture choices, start here. Pick a color. Tape out the arch with painter's tape first to test the scale without committing. Live with the taped outline for three days and see whether the proportions feel right at different times of day. Then commit to paint on a Saturday afternoon when you have no other obligations.
Buy a sample pot first, test the color against your existing bedding in natural daylight, and schedule the painting day when you can take your time rather than rushing. You will finish in time for dinner, let it cure overnight, and wake up Sunday in a bedroom that feels decisively designed. The final question to sit with is simple: What is stopping me from doing this next weekend? For most people, the honest answer is nothing - and that is exactly what makes the painted arch the lowest-risk, highest-reward design move available.
Variations on the Classic Arch for More Adventurous Rooms
Once you have mastered the basic single-color arch, a whole family of variations opens up. The double arch stacks a smaller arch inside a larger one, painted in two complementary tones - a warm cream outer arch with a terracotta inner arch, for example. This variation requires precise measuring but delivers a more sculptural, architectural effect. The ombre arch uses two related colors blended where they meet at the centerline, creating a soft gradient that reads as atmospheric rather than graphic.
The asymmetric arch shifts the peak off-center, which can feel bold in a modern room but unsettled in a traditional one. Try this only if your room has existing asymmetric features - a single off-center window or a corner fireplace. The framed arch adds a thin painted outline around the outer edge of the arch in a contrasting color, which crisps the shape and gives it more visual weight. This works especially well when the arch color is soft or muted. The American Institute of Architects (AIA) has long recognized arched architecture as one of the most versatile forms in domestic design.
Perhaps the most sophisticated variation is the matte-and-gloss arch, where you paint the inside of the arch in a matte finish and then outline the arch edge in a high-gloss version of the same color. From certain angles, the wall appears monochromatic; from others, the gloss outline catches light and reveals the arch shape. This technique rewards viewers who take time with the space.
Maintaining Your Painted Arch Through Seasonal Changes
Interior paint holds up well but is not indestructible. Over time, you may notice small marks along the arch edge where furniture occasionally brushes against the wall, or slight fading if the arch wall receives direct morning sunlight. Plan to touch up the arch once every 18 to 24 months with a small amount of the original paint color. Store the leftover paint in a well-sealed container labeled with the arch color name, brand, and paint code for easy matching later.
If the bedside lamps sit close to the arch wall, heat from the bulbs can slightly discolor the paint over several years. Switch to LED bulbs (which run cooler) and position lamp shades so that heat vents upward rather than onto the wall. The U.S. Department of Energy consistently recommends LED bulbs for reasons of energy efficiency and reduced heat output, and your arch is one more beneficiary of that choice.
For deeper cleaning, use a microfiber cloth lightly dampened with water. Avoid harsh chemicals, magic erasers, or abrasive scrubbers, all of which can burnish the paint finish and leave a visible shiny patch. If a stain will not lift with gentle cleaning, it is almost always faster to touch up the spot with a dab of paint than to scrub aggressively. Plan for one small touch-up session each year as part of your seasonal home maintenance - it takes fifteen minutes and keeps the arch looking freshly painted indefinitely.
More Articles You May Like


Comments
Post a Comment