Lazy Susan Corner Cabinet Replacement With Pull-Out Drawers
The corner cabinet is the most underused real estate in nearly every American kitchen. The traditional lazy Susan was a mid-century compromise that traded easy access for circular geometry, and homeowners have been wrestling with toppled vinegar bottles and stranded soup cans ever since. Replacing that rotating carousel with a set of dedicated pull-out drawers recovers as much as forty percent of usable volume, eliminates the dead zones behind the spinning shelf, and finally lets you see the back wall of the cabinet without crouching with a flashlight. According to a remodeling cost survey published by the National Kitchen and Bath Association (NKBA), kitchen storage upgrades remain among the top five renovation requests every year, and corner solutions specifically have climbed steadily in client briefs since 2019.
This guide walks through the full retrofit from demolition to drawer slide alignment. It covers the two dominant geometries (blind corner versus 90-degree corner), the hardware that actually survives a decade of pasta-pot duty, and the dimensional checks that prevent the most common rookie mistake: ordering pull-outs that crash into the adjacent cabinet face frame. Whether you are pulling out a stuck Rev-A-Shelf carousel from a 1998 builder-grade kitchen or designing a new corner from scratch, the principles are the same.
Why the Lazy Susan Lost Its Crown
The original lazy Susan solved a real problem: rotation made the back of a deep corner cabinet reachable without removing items in front. But the geometry forces every shelf to be a circle inscribed inside a square, which mathematically wastes the four corner triangles. On a typical 33-by-33 inch cabinet, that is roughly 230 square inches of shelf area lost per tier, multiplied across two or three tiers. The American Society of Interior Designers (ASID) has published kitchen workflow studies showing that homeowners abandon the back third of any rotating shelf within 18 months of move-in, effectively turning the corner into a junk drawer with delusions of grandeur.
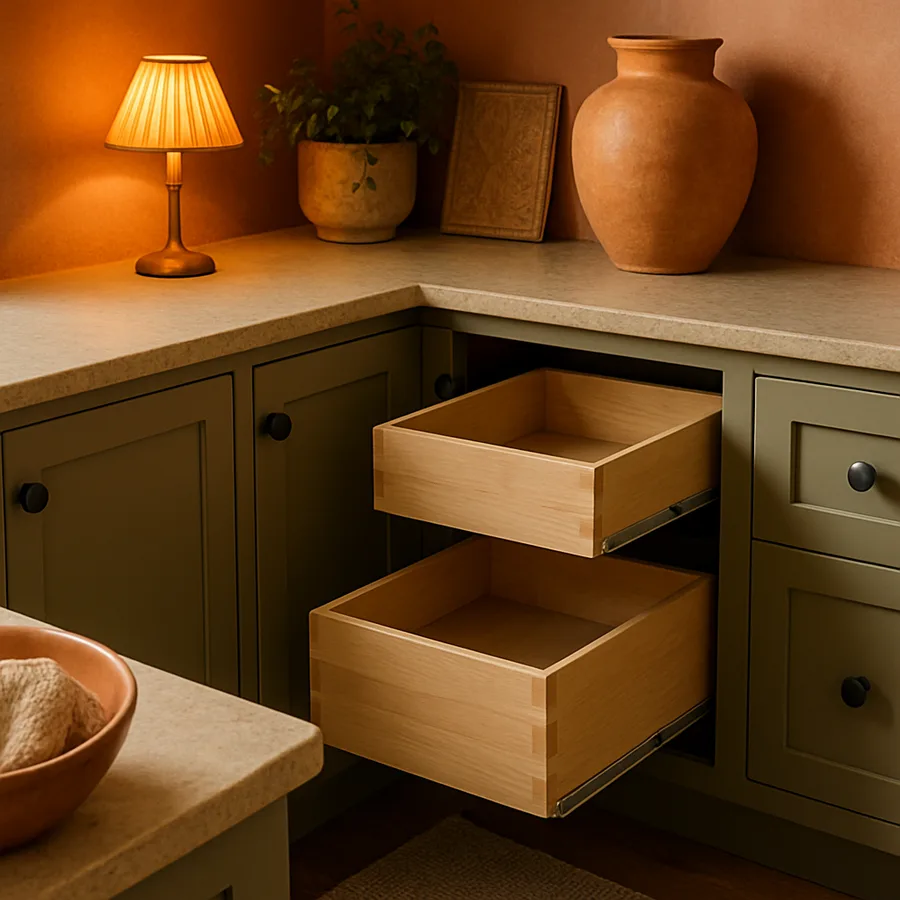
Pull-out drawers flip the problem on its head. Instead of rotating items toward you, the entire drawer slides into the room on full-extension ball-bearing slides. You see every item in plain view, you grab without bending, and you reclaim the full rectangular footprint of the cabinet box. Have you ever stood in front of an open lazy Susan trying to remember whether the molasses is on the top shelf or the bottom? That cognitive load disappears the moment the storage becomes linear instead of circular.
The other quiet advantage is structural. Lazy Susan center poles fail. The plastic clips wear, the alignment drifts, and shelves start scraping against the cabinet sides. A pull-out drawer system has no center pole, no rotation bearings, and no contact between the drawer and the cabinet box other than the slides themselves. Less moving complexity means fewer failure points.
Mapping the Two Corner Geometries
Before you order anything, identify which corner you actually have. A blind corner cabinet has one accessible door on the front face and a section that extends sideways behind the adjacent run of cabinets, hidden from view. A true 90-degree corner cabinet has two doors meeting at the corner, often with a diagonal or bi-fold front. The retrofit hardware is completely different for each, and ordering the wrong category is the single most common reason returns pile up at home centers.
For a blind corner, you want a two-tier pull-out system that first slides the front tray straight out, then swings or slides the rear tray laterally into the opening. Häfele, Blum, and Rev-A-Shelf all manufacture variants. The premium Häfele Magic Corner mechanism is the gold standard, and you can review their full technical catalog at Hafele.com for load ratings and mounting templates.
For a true 90-degree corner with two doors, the cleanest retrofit is a stack of two square pull-outs that pivot or slide on a single pedestal. Some installers prefer to remove the diagonal face frame entirely, install a wider single door, and run a deep pair of nested pull-outs straight back. That requires cabinet surgery but yields the largest usable volume.
Hardware That Actually Holds Up
Drawer slides are the heart of the whole project. For corner pull-outs you want full-extension, soft-close, ball-bearing slides rated for at least 100 pounds dynamic load. Anything less and the slides will sag within two years of holding a stand mixer. Blum's Movento line is widely considered the benchmark for premium kitchens, and Blum publishes loading specifications and undermount cutout templates on their site. You can browse their slide system documentation at the official Blum hardware portal.
Drawer boxes themselves should be either solid maple with dovetail joinery or 5/8-inch Baltic birch plywood with rabbet-and-dado construction. Avoid stapled MDF; the slides will tear out the screws within a few hundred cycles. The National Association of Home Builders (NAHB) consistently flags drawer-box quality as one of the top resale-value indicators in kitchen remodels.
For the pull-out trays in a corner system specifically, look for the following non-negotiables: stainless or zinc-plated steel rails (not aluminum, which gouges), a four-inch minimum gallery rail to keep cans from sliding off, and a soft-close bumper integrated into the slide rather than added as a separate cushion. The integrated soft-close lasts roughly three times longer in cycle testing.
The Dimensional Check That Saves the Project
Before any demolition, measure four things and write them down. First, the interior cabinet width at the door opening (not the outside of the box). Second, the depth from the back of the face frame to the rear cabinet wall. Third, the vertical clearance from the cabinet floor to the underside of the lowest fixed shelf or the cabinet top. Fourth, and most often forgotten, the lateral clearance into the blind portion of the cabinet, measured from the inner edge of the door opening sideways to the far interior wall.
That fourth measurement determines the maximum drawer width on the rear pull-out. On a typical 36-inch blind corner, you usually have about 14 to 16 inches of useful lateral travel before the rear drawer would collide with the side of the adjacent cabinet. Order a drawer wider than that and the system will jam halfway through deployment. Has your contractor ever quoted you a corner retrofit without first taking that lateral measurement? That is a red flag worth a second opinion.
Another dimensional gotcha: the door opening height. Many blind corners have a fixed center stile that splits the opening. If you want a single full-width pull-out tier, that stile has to come out, which usually requires modifying the door from a pair of narrow doors to one wide door or a bi-fold pair. Plan the door swap before you order the hardware, not after.
Step-by-Step Retrofit Sequence
Start by emptying the cabinet completely and removing the existing lazy Susan. The center pole usually unscrews from a top mount, then slides up out of a floor cup. Discard the shelves but save the floor cup hardware until you confirm your new system does not reuse it. Vacuum the cabinet thoroughly; a decade of crumbs hides in the corners and will interfere with slide alignment.
Next, install a sub-floor if the cabinet floor is uneven or warped. A 1/2-inch piece of birch plywood cut to the cabinet footprint and screwed to the existing floor gives the slides a flat reference plane. Shim it level in both directions; a slide that is even 1/8 inch out of plumb will bind under load.
Mount the rear slide assembly first. Most blind-corner kits include a bracket that anchors to the cabinet side wall and the back wall, forming an L. Use 1-1/4 inch wood screws into the cabinet structure, not pocket screws, and do not rely on toggle bolts unless you have hit the cabinet's own framing. Then mount the front slide rail and test the deployment empty before you ever attach a drawer box. The drawer should glide its full travel without scraping. Only after that test should you fasten the drawer boxes themselves and reattach the cabinet door.
Cost, Timeline, and DIY Reality Check
A quality blind-corner pull-out kit from a reputable manufacturer runs $350 to $750 for hardware alone. Premium two-tier swing-out systems from Häfele or Kessebohmer can reach $1,200. Add $200 to $400 for drawer boxes if you do not build them yourself, and another $150 to $300 if you need a cabinet-door modification. Total project cost for a single corner usually lands between $700 and $1,800 in materials, depending on hardware tier.
Labor for a hired installer is typically four to six hours for a single corner, which translates to $400 to $700 in a major metro at current rates. A confident DIYer with a level, a drill, and a partner to hold things in place can complete the install in a Saturday afternoon. The hardest part is not the assembly but the patience required to keep checking alignment as you tighten each screw.
One reader question I hear often: should you replace the corner cabinet entirely instead of retrofitting? In most cases, no. The cabinet box is structurally fine and replacing it means demolishing countertops, which cascades into a full-kitchen project. The retrofit is roughly one-tenth the cost of a new cabinet run and delivers ninety percent of the functional benefit.
For permitting and code compliance, almost every blind-corner pull-out retrofit is considered cosmetic and requires no permit, since you are not modifying plumbing, electrical, or structural elements. That said, in jurisdictions following the International Residential Code, a contractor performing the install for hire may need a basic remodeling permit; check your local building department before scheduling labor. The NAHB remodeler resources include a state-by-state quick reference for cosmetic-versus-structural permitting that is worth a five-minute review. For cabinet warranties, confirm with your manufacturer that drilling new mounting holes does not void coverage; most do not, but a few premium European brands have specific language about modifications.
One final note on workflow: if you are doing more than one corner cabinet (some larger U-shaped kitchens have two), order all the hardware kits at once and do them in the same week. The mental model for the install gets sharper with repetition, the second corner takes about half the time of the first, and you only have to make one trip to the hardware store for the inevitable forgotten screw size or extra shim stock. Batching reduces both cost and frustration, and a paired set of identical pull-outs in matching corners gives the kitchen a more cohesive feel from the inside out.
Conclusion
Replacing a lazy Susan with pull-out drawers is one of the highest-return upgrades you can make in an existing kitchen. The hardware is mature, the install is within reach for a determined DIYer, and the daily improvement to cooking workflow is immediate and undeniable. You will stop forgetting what is in the corner, stop fishing for items behind a stuck shelf, and stop apologizing to guests when you open the cabinet to grab the olive oil. The corner becomes a working part of your kitchen instead of a storage purgatory.
The most important takeaway is to measure carefully before you order, choose hardware rated for the loads you actually carry, and resist the temptation to skip the empty deployment test before mounting your drawer boxes. Those three habits separate a smooth retrofit from a frustrating return-and-reorder cycle. If you are unsure about the geometry of your specific corner, take photos with a tape measure visible and email them to the technical support team at the hardware brand you are considering. Most of them will return a sizing recommendation within a business day.
Are you ready to reclaim the most wasted square footage in your kitchen? Walk over to your corner cabinet right now, open the door, and look at how much of that space you have used in the last month. If the answer is "not much," you have just identified your next weekend project. Pull out a tape measure, take the four critical dimensions described above, and start comparing hardware kits today. Your future self, reaching effortlessly for the stockpot, will thank you.
More Articles You May Like


Comments
Post a Comment