Greenhouse Shed Combos With Workspace and Plant Storage
The greenhouse-shed hybrid has quietly become one of the smartest small buildings a homeowner can put on a backyard lot. It solves three problems at once: protected growing space for tender starts, dry storage for the tools and amendments those plants demand, and a workspace where you can pot, repair, propagate, and plan without dragging mud back into the kitchen. The National Gardening Association has tracked a steady rise in serious home horticulture since 2020, with nearly 20 million additional households reporting active vegetable or ornamental gardening in the years that followed. A meaningful percentage of that group has graduated past the lean-to greenhouse stage and into purpose-built combo structures.
This guide explains how to plan a greenhouse-shed combo that performs across all three jobs, and how to avoid the design mistakes that have turned a lot of expensive kits into glorified garden sheds with sad tomato plants in the corner.
Why The Combo Floor Plan Outperforms Two Separate Structures
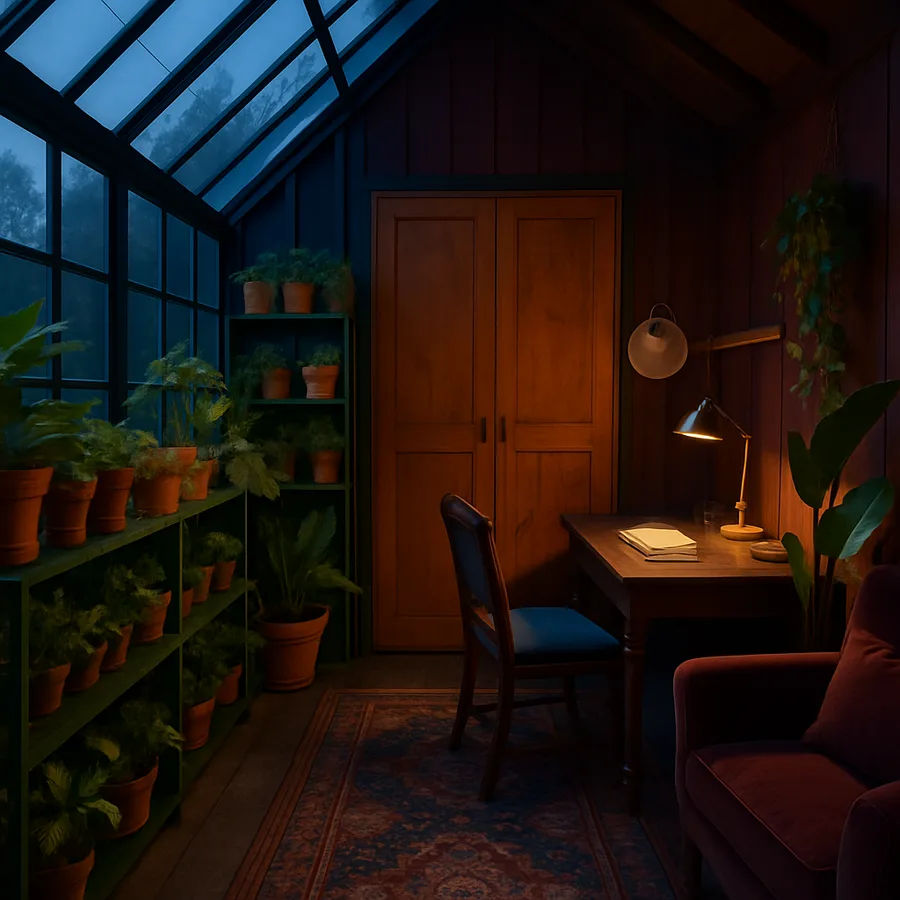
The reflex when planning a serious garden is to put a freestanding greenhouse in one corner of the yard and a tool shed in another. That arrangement looks tidy on a site plan, but it forces you to walk between the two buildings every time you start a tray of seedlings or repot a perennial. A combo structure puts the wet, warm, humid greenhouse zone and the dry, cool, ventilated workspace under one roof, separated by a single interior wall.
The shared wall is the architectural move that makes the combo work. On the workspace side, that wall holds tool storage, a potting bench, a small sink if plumbing is feasible, and electrical receptacles. On the greenhouse side, the same wall holds vertical staging for seedling trays, a thermal mass element such as a row of dark water-filled barrels, and the back-vent fan that exhausts hot air on summer afternoons. Sharing one wall instead of building four cuts material costs by roughly 25 to 35% compared to two freestanding buildings of the same total footprint, according to small-structure costing data tracked by the National Association of Home Builders.
A typical combo footprint runs 10 by 16 feet to 12 by 20 feet, with roughly two-thirds of the building dedicated to the greenhouse and one-third to the enclosed workspace. The exact split depends on your climate. In zones with long, cold winters, a larger conditioned workspace is justified. In mild climates with year-round growing, the greenhouse can claim three-quarters of the building.
Glazing Choices That Survive Real Weather
The single most consequential choice in any greenhouse design is the glazing material. Single-pane glass is beautiful and authentic but brutal in winter and prone to overheating in summer. Modern polycarbonate has largely taken over for serious growers, and the right product for a combo structure is almost always twin-wall or triple-wall polycarbonate.
Twin-wall polycarbonate at 8mm thickness delivers a U-value around 1.7 W/m2K, which is roughly twice as efficient as single-pane glass and significantly more impact-resistant. Triple-wall polycarbonate at 16mm pushes performance closer to a double-pane insulated glazing unit while remaining shatterproof. Both materials diffuse incoming light, which is actually beneficial for plants because it eliminates the harsh shadows and hot spots that single-pane glass creates. According to research summarized by the U.S. Green Building Council, well-specified greenhouse glazing can extend a productive growing season by 60 to 90 days in temperate climates without active heating.
Where the building meets the workspace zone, switch to a different glazing strategy. The shared wall can be solid and insulated to R-15 or better, with a single fixed window or a small interior door that lets you check on the plants from your potting bench. The workspace side benefits from one or two operable windows for cross-ventilation and a north-facing skylight or transom that delivers glare-free task lighting throughout the day.
Climate Control For A Building That Has To Be Two Things At Once
The greenhouse and the workspace want different environments, and managing that gap is the technical heart of the project. Greenhouses run hot and humid by design, with daytime temperatures often climbing 20 degrees above ambient even in spring. Workspaces want stable temperatures and low humidity to protect tools, electrical equipment, and any paper plans you keep on the bench.
The workhorse solution is a combination of passive and active strategies. On the greenhouse side, a roof-mounted automatic vent opens at a set temperature, typically around 75 degrees Fahrenheit, while a ridge or gable exhaust fan kicks in above 85 degrees. Shade cloth in 30 to 50 percent grades drops onto exterior tracks during peak summer afternoons. In winter, a small electric tube heater or a propane greenhouse heater holds the space above freezing on the coldest nights. Thermal mass barrels along the north wall absorb daytime heat and release it slowly after sundown, which can keep a well-sealed greenhouse 10 degrees warmer than the outdoors overnight.
On the workspace side, an insulated envelope plus a small wall-mounted exhaust fan handles most needs. If you plan to spend long sessions at the bench, a low-wattage radiant panel mounted overhead delivers comfortable warmth without raising humidity. The American Institute of Architects publishes climate-zone guidance for small accessory structures that is worth reviewing before you finalize the mechanical strategy. Two reader questions worth thinking about: what is the coldest temperature your most prized plants can tolerate, and how long do you expect to spend in the workspace on a typical winter Saturday?
Workspace Zone Layout For Real Gardening Tasks
The workspace side of a combo structure is where most of the actual labor happens, and it deserves the same kind of ergonomic thinking that goes into a kitchen. The standard potting bench at 34 to 36 inches high is comfortable for most adults, but if you tend to do long sessions of seed starting, a 38 inch bench reduces back strain. The bench should be at least 24 inches deep, with a lip on the back edge to prevent soil from cascading onto the floor.
Tool storage should be vertical and visible. A French cleat system on the workspace wall lets you hang and rearrange tools as your collection evolves, and it keeps everything off the floor where it can rust or trip you. A pegboard handles small hand tools, a magnetic strip holds shears and trowels, and a few open shelves accept rolling stacks of nursery pots and seed trays.
Plumbing dramatically improves the workspace if you can get it. A single deep utility sink with a sprayer makes washing pots, rinsing produce, and filling watering cans far more pleasant than carrying buckets from an outdoor spigot. If freezing is a concern, install a frost-proof sillcock on the exterior wall and run a flexible PEX line indoors with a shutoff valve and a drain. Electrical needs are modest but specific: at least two GFCI receptacles on the workspace wall, one dedicated circuit for any heating equipment, and a switched overhead light separate from the receptacles.
Plant Storage, Propagation, And The Long Winter Months
The greenhouse side of the structure is more than a sun room. With the right interior fittings, it becomes a year-round propagation lab and overwinter shelter for tender plants that would otherwise die outdoors.
Three-tier expanded metal staging along one or both long walls maximizes growing area without blocking light. Lower shelves accept overwintering pots that need cooler conditions; middle shelves hold active seedling trays; upper shelves catch the warmest air and work well for heat-loving starts like peppers and tomatoes. A central walkway of 30 to 36 inches gives you room to move plants in and out without damaging foliage.
For active propagation, a small heat mat with a thermostat under each seedling tray dramatically improves germination rates for warm-season crops. Supplemental LED grow lights extend the productive day during the dim months from November through February, with research from various horticultural cooperatives indicating that 14 to 16 hours of total light per day produces the strongest seedlings. Hanging baskets from the rafters add another vertical layer for trailing plants or overflow capacity during the spring rush.
Storage for soil amendments, fertilizers, and pots belongs in the workspace zone, not the greenhouse. The humid environment in the growing area accelerates corrosion of metal containers and clumping of dry amendments. A row of sealed plastic bins under the potting bench keeps everything dry, organized, and easy to access without crossing into the wet zone.
Permitting, Footings, and the Long-Term Maintenance Plan
A combo structure tends to push past the permit-exempt size in most municipalities. Anything over 120 to 200 square feet, depending on jurisdiction, will trigger a building permit, and adding electrical or plumbing pushes the threshold lower. Call your local building department early; the conversation is usually short and saves significant headaches later. The National Fire Protection Association publishes the electrical code adopted by most jurisdictions, and your inspector can tell you which cycle is currently in force.
Foundations matter more for a combo structure than for a basic shed. A frost-protected shallow foundation or a full perimeter footing prevents the seasonal heaving that can crack glazing seals and warp door frames. In regions with frost depths beyond 36 inches, a poured concrete pier system at each corner and at the midspan of the long walls is a cost-effective alternative.
Plan for ongoing maintenance from day one. Polycarbonate glazing should be cleaned annually with mild soap and a soft brush; aggressive scrubbing or harsh chemicals can scratch the UV-protective coating and shorten the panel life from 15 years to fewer than 8. Wood framing should be sealed every two to three years on the exterior, and the interior should be inspected for moisture intrusion at the same intervals. A 30 minute walk-around every spring and fall catches almost every issue before it becomes expensive.
Conclusion
A greenhouse-shed combo is one of those rare projects that delivers three useful spaces at the cost of a little more than one. The shared wall, the shared roof, and the shared site work all stack to produce real economies, and the daily convenience of having tools and plants under one roof transforms how you actually garden. People who build these structures consistently report spending more time outside and getting more from their growing season than they did with separate buildings or with no structure at all.
The financial picture is reasonable for the level of utility delivered. A quality combo structure built from a kit and finished thoughtfully runs $8,000 to $20,000 for the building and base systems, with additional cost for premium glazing, plumbing, and interior millwork. That number sits well below what a comparable add-on to a primary residence would cost, and it adds documented appraised value when properly permitted, particularly in markets where serious gardening is part of the local culture.
The deeper benefit is harder to put on a spreadsheet. A working greenhouse extends the rhythm of the growing year, gives you somewhere to be on a rainy March afternoon, and turns gardening from a seasonal hobby into a year-round practice. The workspace side keeps the chaos of pots and tools out of the garage and the kitchen, and the simple act of having a dedicated place for the work tends to make the work happen more often.
The combo structure also tends to evolve more than its owners expect. The first year is usually about getting comfortable with the basic rhythm: starting seeds in February, hardening off in April, planting out in May, and overwintering tender perennials in October. By the second or third year, owners often add features that were not in the original plan, including drip irrigation looped through both zones, a small water-collection cistern fed from the roof, or a second worktop dedicated to seed cataloging and record-keeping. Plan the electrical and plumbing rough-ins generously enough that these additions are easy to make later.
Ready to start planning? Sketch your yard to scale, identify the spot with the best southern sun exposure, and request quotes from at least two greenhouse-kit suppliers and one local builder. With those numbers in hand, you can decide whether a kit, a custom build, or a hybrid approach makes the most sense for your site, your climate, and the plants you most want to grow. The decision tends to be far easier once real numbers are on the table, and the conversation you have with a local builder will often surface site-specific issues, like drainage or solar exposure, that an online configurator cannot see.
More Articles You May Like


Comments
Post a Comment