Pergola Lighting Ideas With String Lights and Hanging Lanterns
A pergola without lighting is a daytime room that gets locked at sunset. Add even a single strand of warm-white string lights and the same structure becomes the center of gravity for evening entertaining. Layered lighting, where ambient, task, and accent sources work together, transforms a pergola into the kind of outdoor room where people linger long after the food is gone. The good news is that most of the elements involved are accessible, affordable, and forgiving of small mistakes.
This guide walks through proven approaches to lighting a pergola, starting with classic cafe string lights and hanging lanterns and moving through integrated LED strips, uplighting on posts, candle alternatives, and the practical electrical and control questions that determine whether the system feels effortless or annoying. Whether your pergola is a 10x10 weekend project or a fully built outdoor kitchen, the same layered lighting principles apply.
Cafe String Lights: The Foundation of Pergola Ambiance
If you only do one thing for your pergola lighting, it should be string lights. The visual signature of warm bulbs hung against a dark sky is so universally appealing that it has become shorthand for outdoor entertaining in everything from restaurant patios to wedding photography. Done well, string lights create a soft ceiling of light that flatters faces, defines the volume of the space, and feels intentional rather than decorative.
The bulbs themselves are the first decision. S14 LED filament bulbs in the 2200K to 2700K range deliver the warm Edison glow that most homeowners want, while G40 globes read slightly more contemporary. Look for bulbs with a Color Rendering Index, or CRI, of 90 or higher, which means colors of food, fabric, and skin appear natural rather than washed out. According to the Illuminating Engineering Society, the difference between a CRI 80 bulb and a CRI 90 bulb is dramatic in residential settings, and the cost difference is now negligible.
Spacing and pattern matter as much as bulb choice. The most common layouts are parallel rows running between rafters, a single zigzag traversing the space corner to corner, or a radial starburst from a central pole. For a 12x14 foot pergola, plan on roughly 50 to 75 feet of strand with bulbs spaced 12 to 24 inches apart depending on how dense you want the canopy. Always run strings through screw-in plastic or stainless cable hooks rather than staples, which damage the wire jacket and create failure points where moisture enters.
The most overlooked detail is end-of-strand support. Heavy-duty commercial strings rated for continuous outdoor use are worth the modest premium over indoor-rated holiday lights, and a steel guide cable tensioned across the longest spans prevents sag that pulls bulbs out of sockets. Once installed, the lights should look slightly slack rather than pulled drum-tight; a gentle catenary curve reads as intentional and prevents the popping sound that taut wires make in cold weather.
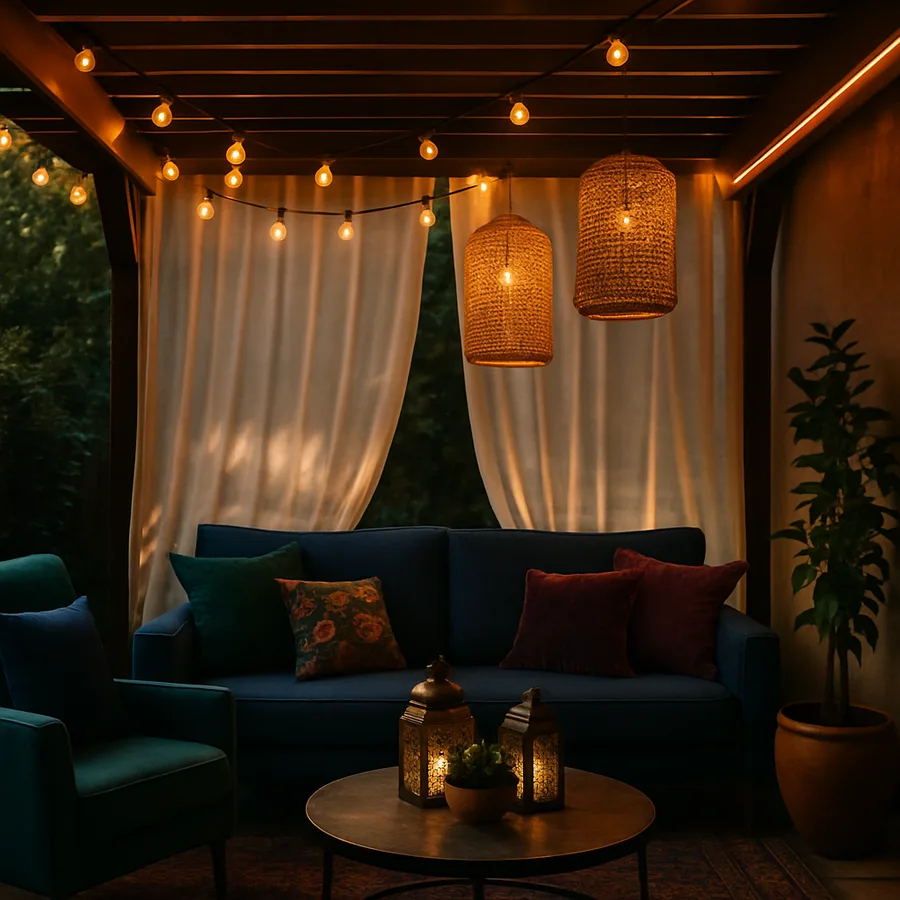
Hanging Lanterns: Visual Anchors at Eye Level
Where string lights spread soft glow across the ceiling, hanging lanterns provide visual anchors at human scale. A pair of lanterns flanking a dining table, or a single oversized fixture above a coffee table, creates focal points that make the space feel composed rather than randomly illuminated. Lanterns also let you introduce material, finish, and historical reference in a way that bare bulbs cannot.
The most successful pergola lantern installations follow a simple rule of three. One large statement piece anchors the main seating area, two medium pieces flank a secondary zone such as a bar or grill station, and three or more small candle-style lanterns wander through the perimeter at varied heights. Powder-coated steel in matte black or aged bronze is the most durable finish for outdoor use, while galvanized or weathering steel develops character over time but should be confirmed as suitable for residential use by the American Architectural Manufacturers Association or the manufacturer.
Hanging height is the most common installation mistake. Lanterns over a dining table should hang with the bottom 30 to 36 inches above the table surface, low enough to feel intimate but high enough that a tall guest does not bump them when standing. Over a lounge or coffee table area, the bottom should sit at least seven feet above the floor so people can move without stooping. When in doubt, hang slightly higher than feels right; you can always shorten the chain after a meal under the lantern reveals the perfect drop.
For lanterns over dining areas, look for fixtures rated as damp location or wet location per National Fire Protection Association NFPA 70 standards. Damp-rated fixtures are appropriate under a covered pergola where direct rain does not reach, while wet-rated fixtures are required for any open-roof pergola where the lantern could be soaked. Indoor-rated fixtures used outdoors are a common cause of corrosion, electrical faults, and ultimately fires that could have been avoided.
Integrated LED Strip Lighting: Hidden Glow That Defines Architecture
Integrated LED strips, run along the underside of beams or recessed into channels in the rafters, deliver a fundamentally different aesthetic from string lights and lanterns. Instead of seeing the source, you see only the result: a glowing edge that traces the architecture of the pergola and makes the structure itself feel like the light source. This approach reads as contemporary and architectural, and it pairs beautifully with motorized louvered or polycarbonate roofs.
The technical specification matters more here than with simpler systems. Look for IP65 or IP67 rated strips, which means they are sealed against dust and water jets. The strip should carry a high CRI rating above 90, the same standard that applies to bulbs, and the LED density should be at least 120 LEDs per meter to avoid the dotted appearance that cheaper strips produce. Color temperature in the 2700K to 3000K range matches the warm tone of cafe lights, while tunable white or RGBW strips let you shift between warm dinner light and cooler task light for cleanup or playing cards.
Installation requires more planning than string lights. The strip needs an aluminum extrusion channel both to dissipate heat and to hide the strip itself, and the channel should be installed before the rafters are stained or painted so the finish flows continuously over the surface. Power supplies need to live in a weatherproof enclosure, ideally within 15 feet of the strip run to avoid voltage drop, and runs longer than that may require power injection at multiple points.
The reward for the extra installation work is a system that disappears during the day and creates a custom architectural glow at night. Paired with string lights, integrated LED strips create the layered effect that lighting designers call a three-tier scheme: ambient overhead, accent at the structure, and decorative at human scale. Once you experience a pergola lit this way, simpler installations can feel flat by comparison.
Post Uplighting: Making the Structure Itself Glow
Uplighting the posts of a pergola is the most underused trick in outdoor lighting, and it dramatically changes how the structure reads at night. Small well lights recessed into the patio at the base of each post throw a narrow beam up the column, revealing the texture of the wood, metal, or stone and making the structure feel three-dimensional rather than flat. Done with restraint, the effect is theatrical without being gaudy.
The fixtures involved are usually 3 to 5 watt LED well lights with adjustable beam angles, set into the patio surface so the lens sits flush with the paving. A narrow beam, around 20 to 30 degrees, concentrates the light on the post itself; wider beams spill onto the surrounding paving and read as more general illumination. Cool white temperatures look harsh on most natural materials, so stick with the same 2700K to 3000K range used elsewhere in the system.
Glare control is the design challenge. Uplights aimed straight at eye level from across the patio are uncomfortable to look at, so the fixtures should have integrated glare shields or honeycomb louvers that confine the beam to the post itself. The goal is to see the lit post from any seated position without seeing the source. When this is done well, guests notice the warm glow on the structure but cannot identify where it comes from, which is the hallmark of professional landscape lighting.
For pergolas attached to a house, the post lighting should be coordinated with the broader landscape lighting plan. Members of the Association of Outdoor Lighting Professionals typically design these systems holistically, balancing the pergola with tree uplights, path lights, and architectural fixtures on the house itself. Even if you handle the installation yourself, sketching the full lighting plan before buying fixtures prevents the patchwork look that comes from accumulating products one impulse purchase at a time.
Candle and Flame Alternatives: Real Fire Without the Risk
The flicker of an actual flame adds a primal warmth that no LED can quite replicate, and there are several ways to incorporate flame into a pergola lighting plan without the risks that have made open candles a non-starter for most outdoor entertaining. Bioethanol burners, sealed gas torches, and electric flame-effect lanterns each offer the visual reward of fire with very different safety profiles.
Bioethanol burners run on denatured alcohol and produce a clean, odorless flame that can be installed in tabletop pieces or wall-mounted fixtures. They require ventilation and should never be used in fully enclosed spaces, but under an open or partially open pergola they offer up to three to five hours of burn time per fill on a typical residential burner. Look for products certified to ASTM E1812 standards, which set safety requirements for ventless ethanol-burning fireplaces.
Sealed gas torches run on propane or natural gas and offer a steady, controllable flame that can be wired into a wall switch. Because the fuel source is sealed, the risk of spillage is essentially eliminated, but installation should always be performed by a licensed gas fitter and should comply with local plumbing and fire code. Electric flame-effect lanterns use silk strips and LED arrays to mimic flicker without any heat or fuel, and the better recent products are surprisingly convincing in low ambient light.
Whatever flame approach you choose, the placement principles are the same. Keep flame sources at least three feet from any draped fabric or climbing plant, never below low rafters where heat could damage finishes, and well clear of the path of foot traffic. How would the pergola feel if every electric light went out and only the flame sources remained? Asking that question helps tune the balance between electric and flame elements so that each contributes something the other cannot.
Controls, Circuits, and Smart Integration
The lighting elements themselves are only half the system. The controls determine whether the experience feels seamless or fiddly, and a single weatherproof switch box near the pergola entrance often makes the difference between a setup people use every night and one that gathers cobwebs because turning it on requires three trips to different switches.
The simplest approach is a dedicated 20-amp GFCI-protected circuit serving the pergola, controlled by a wall switch in a convenient location and divided into at least three switched zones: string lights, lanterns and accent lighting, and any task or work lighting over a grill or prep area. The International Code Council publishes residential electrical guidance through the IRC, and any outdoor lighting installation should be inspected and permitted to comply with local code.
Smart home integration is increasingly the default rather than the upgrade. Wi-Fi or Zigbee-based smart switches let you create scenes that combine string lights, accent lighting, and even a music system into a single voice command or app tap. A common setup includes a "dinner" scene at warm low brightness, an "evening" scene that adds slightly more accent light, and a "cleanup" scene that brings up brighter task lighting after guests leave. Once configured, these scenes are addictive and quickly become the way the space gets used.
The final consideration is dimming. Every fixture in the system should be dimmable if possible, and the dimmers should be matched to the load type. LED dimmers must be specifically rated for LED loads; using an old incandescent dimmer with LED bulbs causes flicker, hum, and premature failure. The investment in proper dimmers and matched bulbs is small relative to the overall lighting budget but transforms how the space feels, because the right pergola light level varies dramatically between a sunny afternoon, a quiet evening, and a late-night conversation.
Conclusion: Building a Layered Pergola Lighting Plan
A great pergola lighting plan is built in layers, not chosen as a single product. String lights provide the ambient ceiling, hanging lanterns add focal points at human scale, integrated LED strips reveal the architecture, post uplighting grounds the structure, and candle or flame elements add the warmth that purely electric systems cannot match. Each layer can stand alone, but the magic happens when all five work together at carefully tuned brightness levels.
Start with the foundation, then build up over time. Cafe string lights and a few well-chosen lanterns can transform a pergola in a single afternoon, and the more elaborate elements such as integrated strips and post uplighting can be added in subsequent phases as budget and ambition grow. The important thing is to plan the electrical infrastructure for the eventual full system from day one, even if you only install the basics initially.
Remember that lighting is experiential rather than purely visual. The way a space feels depends on how the light falls on faces and surfaces, not just how the fixtures look turned off in catalog photos. Spend a few evenings observing pergolas in restaurants, hotels, and friends' yards before settling on a final plan, and pay attention to what makes you want to linger versus what makes you want to leave. Those instincts will guide better choices than any product specification can.
Ready to plan your own pergola lighting? Start by sketching a top-down diagram of your structure, marking the seating zones, dining areas, and traffic paths. Then use this guide to layer the appropriate light sources for each zone, and consult a licensed electrician for the wiring and circuit protection. The goal is a lighting plan that you stop noticing because it just feels right, every evening, in every season.
More Articles You May Like


Comments
Post a Comment