Archway Construction Between Rooms Without Removing Load Walls
An archway between two rooms can transform a closed, choppy floor plan into a connected, light-filled living space without committing to a full open-concept teardown. For owners of older homes, ranches, and Cape Cods built in the 1940s through the 1970s, the wall between the kitchen and dining room or between the entry and living room is almost always load-bearing. Removing it entirely means engineered beams, posts, and serious permit work. Cutting an archway opening, however, is a far more controlled intervention. Done correctly, an archway preserves the wall's structural role at the top and sides while opening a generous, framed passage at eye level.
This guide walks through the framing, structural calculations, finish detailing, and contractor coordination required to install a beautiful, code-compliant archway in a load-bearing wall. We will cover when an archway is the right answer compared to a flat header opening, how the structural math actually works, the realistic timeline and cost, and how to integrate the new opening with existing trim, flooring, and electrical. Whether you are working with a 1920s plaster bungalow or a 1990s drywall colonial, the same principles apply with adjustments for materials and code edition.
When an Archway Beats a Flat Header Opening
Both archways and flat-headed cased openings achieve the same basic goal: removing a section of a load-bearing wall to connect two rooms. The structural challenge is identical for both, since the load above must be transferred to new framing on either side regardless of whether the underside of the new opening is flat or curved. The decision between archway and flat opening is driven by style, ceiling height, and wall thickness, not structure.
An archway shines when ceiling height is generous and the wall is thick enough to give the curve real depth. Plaster homes from the early 20th century had walls of 4.5 to 5.5 inches finished thickness, plenty of depth for a meaningful curve. Modern 2x4 walls finished with half-inch drywall measure 4.5 inches thick, still workable but less dramatic. The arch curve becomes a sculpted soffit that catches light differently as it crosses the day, adds a craft-built feel to a room, and softens the transition between two distinct spaces.
A flat header reads cleaner and more modern. It pairs well with contemporary trim, board-and-batten paneling, and mid-century plans where the goal is visual quiet rather than ornament. A flat header also costs less to frame and finish, since the curved drywall and plaster work of an archway adds 8 to 16 hours of skilled labor. Have you walked through both an archway home and a flat-opening home and noticed which one feels more layered? That visceral response is your real answer to which fits your house. The structural and budget realities are similar; the visual and emotional outcomes are different.
How Load Transfer Works in an Archway Opening
The key structural insight is that an arch is not really doing the load-bearing work in a residential archway opening. Above the curve, a hidden flat-bottomed structural header carries the load. The arch itself is a decorative drywall and plaster soffit that hangs below the structural framing. This is the standard approach in residential construction across the United States and aligns with framing rules in the International Residential Code for headers in load-bearing walls.
Header sizing follows established prescriptive tables in the IRC for typical residential conditions. A common opening of 6 feet wide in a single-story load-bearing interior wall, supporting a non-snow-loaded ceiling, requires a double 2x8 header or a single LVL of similar capacity. A 10 foot opening typically calls for a double 2x10 or 1.75 by 9.25 inch LVL. For wider openings, two-story conditions, or any wall supporting a roof in a high-snow region, an engineered design is required. The National Association of Home Builders consistently recommends consulting a licensed structural engineer for any opening wider than 8 feet, any second-story interior wall removal, or any condition where attic trusses bear on the wall in question, with detailed guidance available through the NAHB technical resources.
Below the header, two new full-height king studs flank the opening and accept the header's load. Inside those, jack studs (also called trimmers) sit directly under the header and transfer the load down to the bottom plate. From there, blocking or solid lumber transfers the load through the floor system to the foundation. Failing to provide a continuous load path beneath the new jack studs is the single most common structural error in DIY archway projects: the header carries the load to the studs, but if the floor framing below cannot accept that point load, the floor sags, finishes crack, and the opening eventually fails inspection.
Temporary Shoring Before You Cut
Before any portion of the existing wall is removed, the load above must be supported by temporary shoring. This is non-negotiable. A typical interior load-bearing wall in a single-story home carries roof, ceiling, and possibly attic storage loads totaling 1,500 to 3,000 pounds per linear foot. Removing studs without proper shoring invites ceiling cracks at minimum and structural collapse at worst.
The standard approach is to build a temporary stud wall parallel to the existing load-bearing wall, offset by about 3 feet so workers have room to operate. This temporary wall is built with 2x4s every 16 inches on center, with double top plates and a single bottom plate. Adjustable steel screw jacks or wood shims wedge the temporary top plate firmly against the ceiling joists. The temporary wall must run the full length of the planned opening plus 4 feet of overhang on each side to fully transfer the load away from the work zone.
For the work to comply with permits in most jurisdictions, the shoring plan should be reviewed by either the contractor's lead carpenter or, on larger jobs, the project structural engineer. The American Institute of Architects publishes residential remodel guidance through AIA architect-in-practice resources that emphasizes documented shoring as a basic safety practice on any wall removal exceeding a single stud bay. Skipping documentation is the kind of decision that comes back painfully at the final inspection or, worse, during an unexpected attic load event.
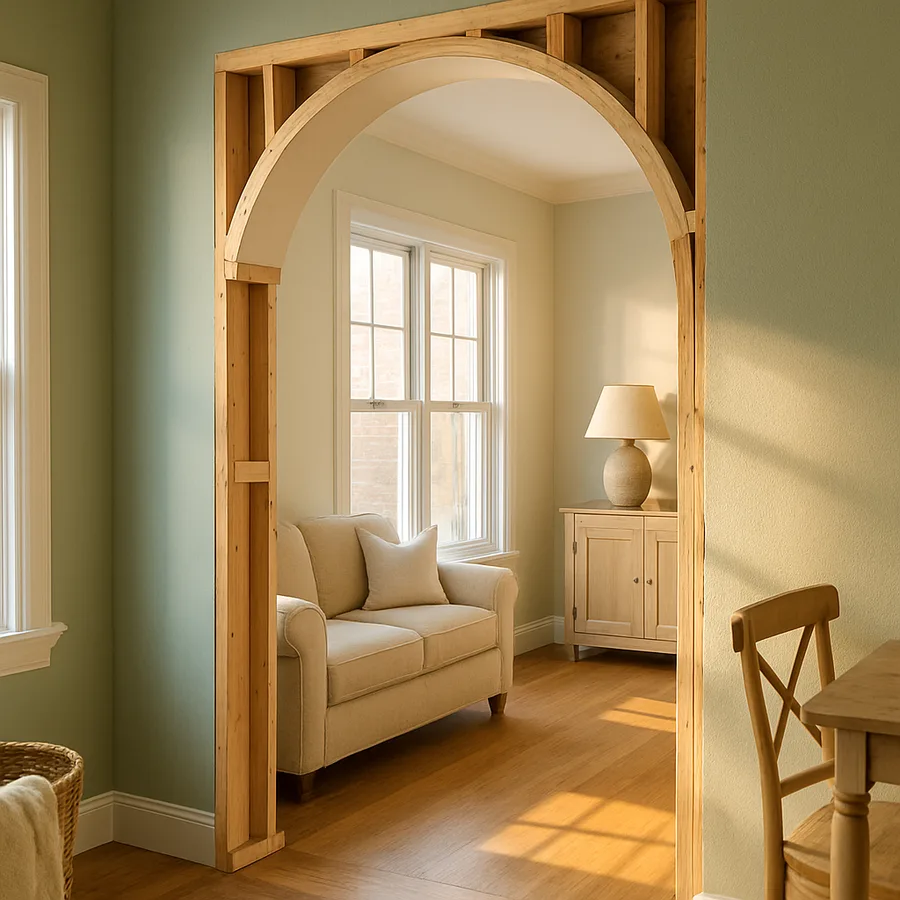
Framing the Header and Curved Soffit
With shoring in place, the interior finish is removed across the planned opening width plus 16 inches on each side. The exposed studs are cut at the height where the header will sit. The header itself is a flat-bottomed assembly: typically two pieces of 2x10 or 2x12 dimensional lumber, separated by a half-inch plywood spacer to match the wall thickness. For openings wider than 6 feet or carrying significant load, an LVL (laminated veneer lumber) header offers higher capacity in a thinner profile and is the modern default in quality remodel work.
The header is lifted into position and seated on top of the new jack studs, which are nailed to the king studs that flank the opening. Standard nailing patterns from the IRC apply: 16d common nails in pairs every 16 inches along the king-to-jack stud connection, and a triple stud assembly on each side. With the structural header in place and load transferred, the temporary shoring can be removed.
The curved arch is built below the structural header as a non-structural soffit. There are two common methods: plywood arch templates with framing infill, or preformed flexible drywall arches. Plywood templates are cut on a CNC or with a router and circle jig to the desired curve, then nailed to the underside of the header and to the jack studs. The space between the two plywood templates is filled with 2x2 nailers to give the curved drywall a substrate to attach to. Quarter-inch flexible drywall is then bent across the curve and screwed to the nailers, with two layers laminated for proper thickness. The result is a smooth curved arch face ready for tape, joint compound, and finish.
Finish Detailing That Makes the Arch Feel Built-In
A crisply framed arch that is poorly finished still reads as a remodel. The detailing of the curve, the trim or absence of trim, and the integration with adjacent surfaces is what makes the new opening feel like it was always part of the house. Three details deserve careful attention: the radius of the curve, the casing strategy, and the floor transition.
Curve radius matters more than most homeowners expect. A tight 12-inch radius reads as decorative or even Victorian, with strong visual contrast between the curve and the flat ceiling above. A gentler 24 to 36 inch radius reads as architectural and timeless, the curve barely registering as a curve at all but softening the corners just enough to relieve the rigidity of a flat header. Mock the curve up in cardboard and tape it in place before committing; the actual experience of standing under the curve is hard to predict from drawings alone.
Casing strategy splits into two camps. Traditional homes typically wrap the arch with a continuous casing or trim band that follows the curve, terminating at plinth blocks where the trim meets the floor. Modern and transitional homes often use no casing at all, with the drywall returning cleanly to a corner bead at the room face and a square-edged reveal at the wall thickness. Both approaches work; the key is consistency with the rest of the home. If every other doorway has 4-inch flat casing, the new arch should match. If existing openings are caseless, leave the arch caseless too.
Flooring continuity is the final detail. Under the original wall, there is no finish flooring; only subfloor. After the opening is cut, that gap must be filled with matching wood, tile, or stone that flows visually from one room to the other. In wood floors, the patch should follow the existing run direction with carefully matched species, stain, and finish. Skipping this step leaves a permanent reminder that something was changed, while doing it well makes the opening feel original.
Permits, Inspections, and Working with Contractors
Cutting a load-bearing wall almost always requires a building permit in U.S. jurisdictions, regardless of the opening size or whether the result is an arch or flat header. Permits typically require submitted drawings, header calculations, and at minimum two inspections: one at rough framing after the header is installed and before drywall, and one at final completion. Skipping the permit is a costly mistake; unpermitted structural work shows up at home sale, often forcing retroactive engineering, exposed framing inspections, and meaningful price reductions.
Choosing the right contractor matters as much as the design. A general contractor with documented experience in structural remodeling, a licensed structural engineer for any non-prescriptive condition, and a quality drywall finisher who has done curved soffit work before are the three roles that need to be staffed correctly. Ask any prospective contractor for references on similar projects, and ask to see at least one finished archway in a completed home before signing a contract. The National Association of Home Builders Remodelers Council maintains a contractor finder tool that filters for documented experience.
Realistic timelines run from 3 to 5 working days for a straightforward 6 to 8 foot single-story archway, plus an additional week for paint and finish. Total cost in most U.S. markets ranges from $2,500 to $6,500, with significant variation based on the complexity of the existing wall, hidden electrical or plumbing rerouting, and the level of finish detail. Have you scoped the electrical and plumbing inside the wall yet? Hidden runs almost always add cost and time, and discovering them mid-demolition is the single most common reason archway projects exceed budget. Schedule a contractor walk-through and infrared scan before final pricing to surface those surprises ahead of time.
Conclusion
An archway between two rooms is one of the most rewarding interior renovations a homeowner can commit to. The visual payoff is substantial: a closed floor plan opens up, light moves between rooms, and conversation flows across what used to be a hard wall. Compared to a full wall removal, the archway preserves enough wall above and beside the opening to keep the structural intervention manageable, the budget controlled, and the original character of the home intact. The opening itself becomes a piece of architectural craft, especially when paired with thoughtful trim, careful curve geometry, and seamless flooring continuity.
The structural engineering behind the work is well-established and prescriptive in most cases, governed by the IRC and supplemented by engineered drawings for non-standard conditions. The framing sequence is straightforward to a competent crew: shore the load, cut the studs, install the header, frame the arch soffit, and finish the surfaces. The pitfalls are not in the engineering but in the execution: insufficient shoring, undersized headers, missing load paths through the floor, poor flooring patches, and rushed drywall work on the curve. Each of these is preventable with planning, an honest assessment of the home's existing conditions, and a contractor who has done the work before.
Permits and inspections protect the homeowner more than they constrain the project. A documented, inspected archway adds value at sale, satisfies insurance requirements, and ensures the work will pass professional scrutiny in the future. The few hundred dollars in permit fees and the modest delay for inspections are small costs against the multi-thousand dollar savings of avoiding rework or legal trouble down the line. Treat the permit process as a partner, not an obstacle, and the project will move more smoothly than if you try to skirt around it.
If you are weighing an archway project right now, the most useful next step is to contact a licensed structural engineer or remodeling contractor for an in-home assessment. A 30 to 60 minute walk-through gives you a realistic structural opinion, a preliminary header recommendation, and an honest cost range based on what is actually inside your walls. Combine that professional input with the framework outlined here, and you will be able to commission an archway that opens your home, respects its structure, and reads as if it has always belonged.
More Articles You May Like


Comments
Post a Comment