Apron Front Farmhouse Sink Installation in Existing Cabinet Bases
The dream of a deep, exposed-front farmhouse basin is rarely the problem. The problem is the cabinet you already own. Most production sink bases were never engineered to carry a thirty-pound piece of fireclay, never mind a hundred-pound enameled cast iron model filled with dishes, water, and an enthusiastic toddler standing on the door. Retrofitting an apron front farmhouse sink into an existing cabinet means you are simultaneously a cabinetmaker, a structural carpenter, a plumber, and a stone-tolerance specialist, and the success of the project depends on respecting each of those roles.
This guide walks through the realistic decision points homeowners face when they want the look of a farmhouse sink without ripping out a perfectly good kitchen. It is written for the renovator who already has framed face-frame or frameless cabinets, a stone or wood countertop they would like to keep, and the patience to measure twice. According to the National Kitchen and Bath Association, sink replacement is one of the top three requested partial-renovation projects, and apron front models account for roughly a quarter of those upgrades. The popularity is real, but so is the difficulty.
Understanding What Your Existing Cabinet Was Designed To Do
A standard sink base cabinet is a hollow box engineered to carry a drop-in or undermount sink suspended from the countertop above. Almost none of the load passes through the cabinet itself; the counter does the work. An apron front sink reverses this assumption entirely. The basin sits on a horizontal cleat or platform inside the cabinet, the apron protrudes through the cabinet face, and the countertop is essentially decorative on top of, not structural to, the sink installation. Before you cut anything, open the cabinet, take photographs of the interior structure, and identify three things: the depth of the cabinet box, the presence and thickness of the top stretchers, and whether the cabinet is face-frame or frameless construction.
Face-frame cabinets, common in traditional American kitchens, have a hardwood frame around the front opening that adds rigidity but reduces interior width. Frameless or European-style cabinets present the entire interior width at the opening but lack that frame's reinforcement. Apron front sinks fit more cleanly into frameless boxes, but face-frame cabinets can absolutely be modified, and many older homes have surprisingly overbuilt sink bases that take to the conversion well. Confirm your cabinet's interior width is at least one inch greater than the sink's body width, and confirm the depth is at least an inch and a half greater than the sink's depth, or you will be cutting more than you bargained for.
Have you actually measured the inside of your cabinet, or just guessed based on the door opening? Door openings are misleading because the face frame steals an inch or more on each side. The American Society of Interior Designers recommends measuring the cabinet's interior at three points across both width and depth, since older boxes often rack out of square over time, and a half-inch of cumulative drift will haunt your template work.
Selecting A Sink That Fits Without A Full Cabinet Rebuild
The retrofit market has matured considerably, and there are now shallow-apron and short-apron sink models specifically engineered for cabinet conversions. These typically have an apron height of four to six inches rather than the traditional eight to ten, which dramatically reduces the amount of face-frame material you need to remove. They also tend to have flatter side walls, which helps them slide into a thirty-inch cabinet opening rather than requiring a thirty-three or thirty-six inch base. Manufacturers including Kohler, Native Trails, and Ruvati now produce conversion-friendly models, and several feature a back-rolled rim that lets the sink hang on a ledger rather than requiring full bottom support.
Material choice matters enormously when you are working inside the constraints of an existing cabinet. Fireclay sinks weigh between eighty and one hundred and twenty pounds empty and demand robust under-support. Stainless steel apron front sinks typically weigh thirty to fifty pounds, which gives you more flexibility with cleat construction. Enameled cast iron is the heaviest option at one hundred and twenty to one hundred and seventy pounds, and Houzz survey data from a recent professionals report indicates that more than thirty percent of failed retrofits involved cast iron sinks installed without supplementary cabinet bracing. If your cabinet is older particleboard rather than plywood, weight becomes the dominant factor, and a stainless model is the safer choice.
Modifying The Cabinet Face And Side Walls
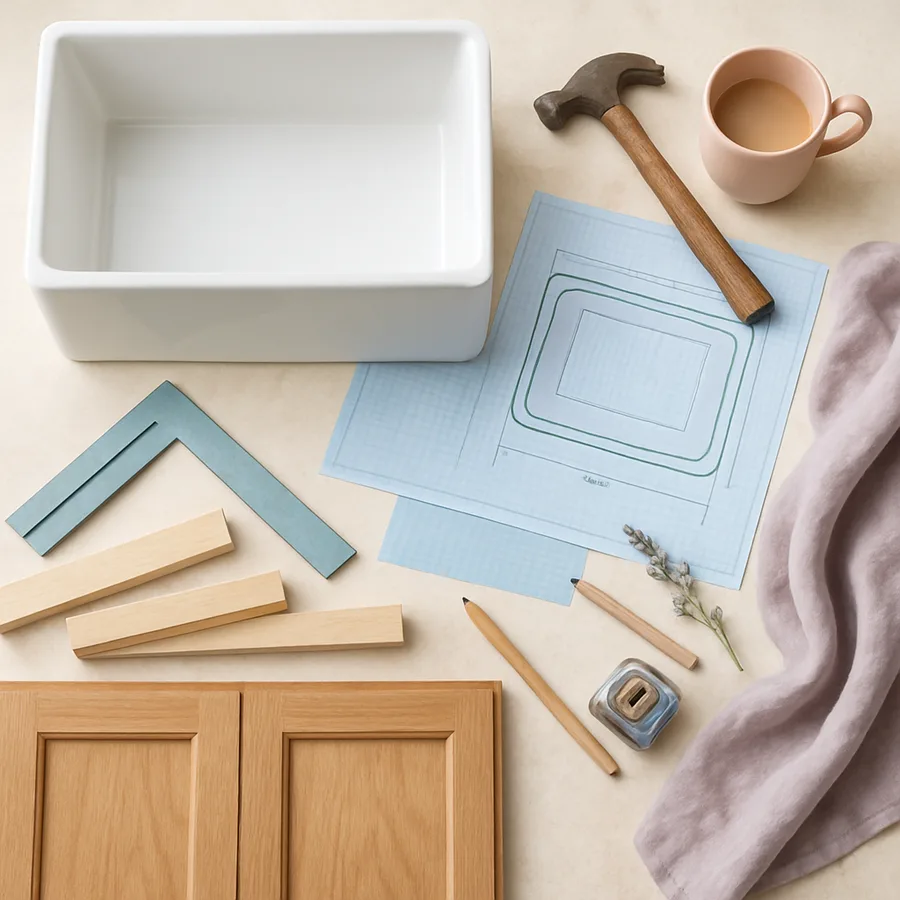
This is where the project becomes irreversible, so slow down. Remove the cabinet doors, drawer fronts, and hardware, and lay the cabinet's face on a low work surface if possible. Mark the sink's footprint on the front of the cabinet using the manufacturer's template, which should arrive with the sink itself. If no template is included, request one before proceeding; cutting from dimensions printed in an installation manual leads to errors. Use a square to extend the apron-cutout lines onto the inside of the cabinet, since you will be cutting from both sides to avoid tear-out.
The cleanest cut is made with a track saw or a circular saw guided against a straightedge, finishing the corners with an oscillating multi-tool. Cut the horizontal lines first, then the verticals, and stop your cuts an eighth of an inch shy of the corners so the multi-tool can square them. Maintain at least three quarters of an inch of face frame above the apron cutout if you have a face-frame cabinet, since this provides bracing for the countertop and prevents the cabinet from racking. If your design calls for the apron to sit flush with the cabinet front, you will need to remove the entire upper face-frame stretcher and replace it with an internal cleat, which we cover in the next section.
Side wall modifications are usually limited to notching the top corners of the side panels to receive the sink's flanges. Take careful measurements of the sink's width at the rim versus at the base, because many farmhouse sinks taper inward, and the rim width is what determines your cabinet opening, not the body width. Dry-fit the sink in the modified opening before you build any internal supports; you will inevitably need to refine the cuts.
Building The Internal Support Platform
The platform inside the cabinet that carries the sink is the single most important structural element of the project. The International Association of Plumbing and Mechanical Officials publishes guidance recommending that any sink weighing more than seventy-five pounds when filled receive dedicated support independent of the countertop, and for an apron front sink that means a purpose-built cleat-and-platform system. The platform should be constructed from three-quarter-inch plywood, ideally Baltic birch or marine grade, sized to support the entire bottom of the sink with a half-inch margin on the sides and back for plumbing access.
Cleats are run horizontally along the side walls of the cabinet at the height required to position the sink's rim flush with or slightly proud of the surrounding countertop, depending on whether you are doing a flush, proud, or undermount-style installation. A flush installation places the sink rim at the exact height of the countertop substrate, which gives the cleanest visual line but demands the most precise cleat work. A proud installation lifts the rim a quarter to three eighths of an inch above the counter, which is forgiving and traditional. An undermount-style installation drops the rim below the counter, which requires a stone or solid-surface counter cut to overhang the sink.
Glue and screw the cleats to the cabinet sides using construction adhesive and number ten screws into solid wood, never into a particleboard side panel without reinforcement. Some installers add a vertical post under the front edge of the platform, hidden inside the cabinet, that transfers the load directly to the floor of the cabinet box. This is overkill for a stainless sink and essential for a cast iron one. Always test the platform's deflection by standing on it before you place the sink; if you can feel any flex, add another cleat or upgrade to a thicker plywood.
Reconciling The Sink With The Existing Countertop
Counter coordination is the part of the project most homeowners underestimate. If your existing countertop is granite, quartz, or another stone, you cannot simply trim it on site to accept the new sink; you need a stone fabricator with a wet saw and an in-home cutting setup, and not all fabricators will work on installed material. Solid surface countertops like Corian can be field-modified by a certified installer. Wood and butcher block countertops are the easiest to retrofit, since you can rout the opening yourself with care.
The cutout on the countertop should be made after the sink and platform are dry-fitted but before final installation, so the actual sink position can be transferred to the counter rather than relying on theoretical dimensions. Always template directly off the dry-fitted sink rather than the manufacturer's drawing, because manufacturing tolerances on apron front sinks are surprisingly loose. A quarter-inch eased reveal on the back and sides is the most forgiving treatment, hiding any small alignment errors and providing a sealable seam for caulk. A flush or zero-reveal installation looks magnificent when executed perfectly but is unforgiving of any deviation.
Plan for the countertop's overhang on the sides of the apron. Most installations leave a quarter-inch reveal of the counter beyond the apron face, which protects the apron edge and creates a clean shadow line. If your existing counter is exactly flush with the cabinet face, you may need to add a small spacer behind the apron to push it forward into proper alignment. The Houzz Kitchen Trends Study has noted that homeowners who plan the apron-counter relationship in advance report sixty percent higher satisfaction with the finished installation, and the relationship is hard to fix retroactively.
Plumbing Connections And Garbage Disposal Considerations
Apron front sinks sit lower in the cabinet than drop-in sinks, which compresses the available space for the trap, garbage disposal, and supply lines. Map your existing plumbing before you commit to a sink depth. A nine-inch deep apron front sink in a cabinet with a thirty-four-and-a-half inch deck height leaves perhaps fifteen inches of vertical space below the sink for traps and connections, and a typical disposal unit takes nine to twelve inches of that. If your supply lines come up through the floor of the cabinet, they may need to be rerouted to come through the back wall instead, which is a job for a licensed plumber.
Are you planning to keep your existing garbage disposal, and have you confirmed the new sink's drain opening matches its mounting flange? Many farmhouse sinks use a three-and-a-half-inch standard drain opening, but some European models use a larger metric opening that requires an adapter or a different disposal model. Verify before you remove the old sink, not after. The NSF International marking on a disposal unit confirms it meets food-handling sanitation standards, and any replacement should carry the same certification.
Vent lines deserve attention too. If your existing sink had its vent integrated into a wall stack and your new sink relocates the drain by more than a few inches, you may need to add an air admittance valve to maintain proper drainage. Air admittance valves are accepted by the IAPMO Uniform Plumbing Code in most jurisdictions but check local codes because some municipalities still require hard vents. The plumbing detail is the second most common cause of post-installation regret after counter coordination problems.
Conclusion
Retrofitting an apron front farmhouse sink into an existing cabinet is an achievable weekend-plus project for a careful homeowner, or a two-day job for a skilled installer, but it is never the simple swap that the marketing photos suggest. The work happens in the careful sequence of measurement, cabinet modification, support construction, counter reconciliation, and plumbing adjustment, and skipping any one of those stages is how perfectly good kitchens end up with sagging sinks, cracked counters, or leaky drains six months after the install. The investment in extra time pays back in years of trouble-free service.
The single most reliable predictor of a successful retrofit is the willingness to dry-fit everything multiple times before any cut becomes permanent. Place the sink in the cabinet, set the counter on top, walk away for an afternoon, and come back with fresh eyes. Mistakes that seem invisible during the heat of the project are obvious after a break. Photograph each stage so you have a record of what you did, in case you need to revisit the work or replicate it for another sink at the prep area or in a butler's pantry.
If you are not confident in your ability to make precise cuts in cabinet face frames or to evaluate the structural integrity of a thirty-year-old particleboard cabinet, hiring a professional installer for the cabinet modification while doing the plumbing yourself is a reasonable hybrid approach. A certified kitchen designer working through NKBA channels typically charges three to six hundred dollars for the cabinet conversion alone, and the cost is small relative to the value of getting it right the first time.
Ready to start your installation? Begin by photographing your existing cabinet inside and out, requesting a template from your prospective sink manufacturer, and reading the IAPMO and NKBA installation guidance on IAPMO's official site, the National Kitchen and Bath Association, and design references on Houzz for inspiration before you commit to a final sink model. The preparation hour saves you ten in the field.
More Articles You May Like


Comments
Post a Comment