Aging-In-Place Bathroom Grab Bar Placement for Tubs and Showers
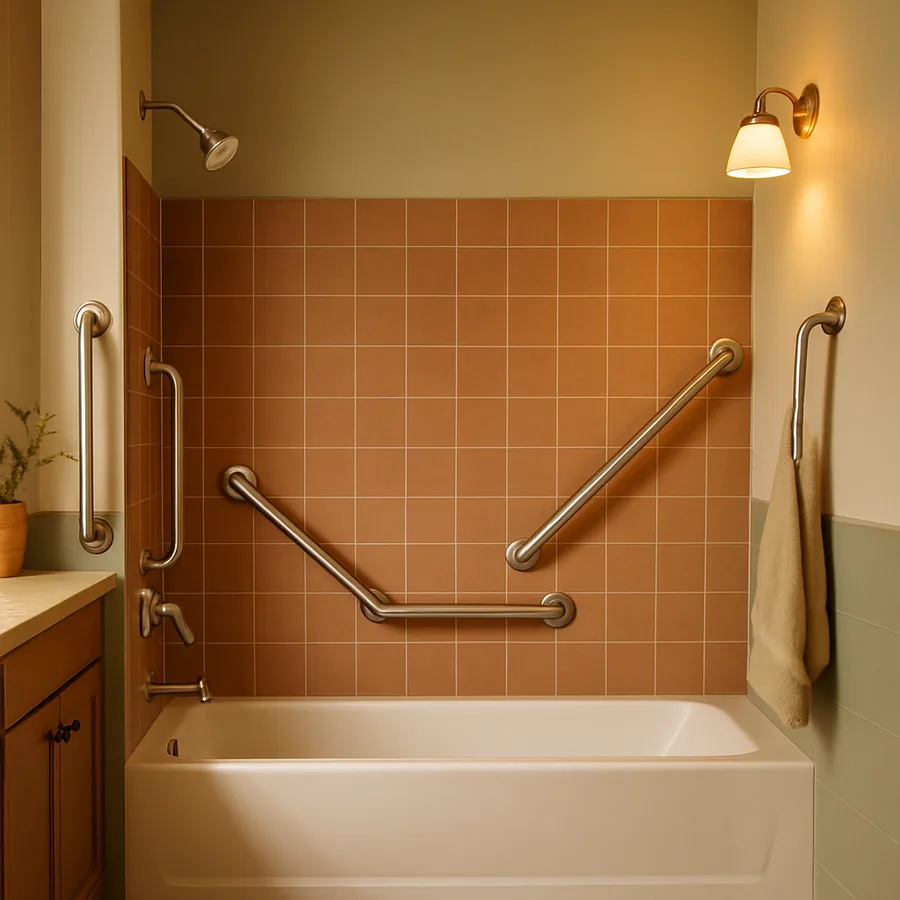
The bathroom is, statistically, the most dangerous room in the home for older adults. The Centers for Disease Control and Prevention reports that roughly 235,000 emergency room visits each year in the United States are linked to bathroom injuries, and the risk of a fall climbs sharply after age 65. Most of those falls happen exactly where you would expect: stepping in or out of a tub, pivoting on wet tile, or reaching for a fixed object that turns out to be a slick towel bar. Thoughtful grab bar placement is the single most cost-effective intervention you can make to keep someone safely independent in their own home.
Yet many homeowners install grab bars based on guesswork, screwing them into drywall at heights borrowed from a hotel they once stayed in. That approach almost always misses the body mechanics that matter. A bar placed two inches too high or six inches too far forward forces the user to reach in a way that actually increases the chance of a fall. This guide walks through the placement logic the National Association of Home Builders teaches in its Certified Aging-in-Place Specialist (CAPS) program, with practical adjustments for both standard tubs and walk-in showers.
Why Generic Grab Bar Placement Fails
Walk into any big-box hardware store and you will see grab bars sold with packaging diagrams that show one bar mounted horizontally inside a tub at roughly 36 inches from the floor. That diagram is a starting point, not a prescription. The user's height, dominant side, balance profile, and specific mobility limitations all change where the bar should actually go. A 5'2" grandmother with mild osteoarthritis needs a fundamentally different layout than a 6'1" stroke survivor with one-sided weakness.
Have you ever watched an older adult enter a tub-shower combination? The body moves through three distinct phases: weight-shift onto the threshold leg, lift of the trailing leg over the rim, and re-stabilization inside the wet enclosure. Each phase needs a different hand grip, which is why a single horizontal bar rarely does the job. Occupational therapists from the American Occupational Therapy Association typically recommend a combination of vertical, diagonal, and horizontal bars to support each phase distinctly.
Another frequent failure is mounting hardware that cannot bear the load. A properly anchored grab bar must support a static load of at least 250 pounds per the International Code Council's ICC A117.1 standard. That means the bar has to bite into wood blocking or a stud, not into hollow drywall held by a plastic toggle. If you cannot guarantee solid blocking, you should not be installing a grab bar there.
The Three Bar Positions Every Tub Needs
For a standard tub-shower combination, the gold-standard layout uses three bars working together. The first is a vertical entry bar mounted on the wall closest to where the user enters, typically the long wall opposite the showerhead. Its bottom should sit between 32 and 38 inches from the tub floor, and the bar itself should be 18 to 24 inches long. This bar gives the user something to grip during the pivot and weight transfer of stepping over the tub rim.
The second is a horizontal balance bar mounted on the long back wall of the tub, running parallel to the floor. The standard height is 33 to 36 inches above the tub floor, and the bar should run roughly two-thirds of the tub's length. This is the bar most people picture when they think "grab bar," but it is most useful after the user is inside the tub, providing a steady reference for washing, turning, and sitting if a transfer bench is in use.
The third is a diagonal control bar mounted on the wall containing the faucet controls. It runs at roughly a 45-degree angle, with its lower end about 33 inches from the tub floor. This diagonal placement is genius because it gives the user a continuously variable grip height as they raise or lower their body during sit-to-stand transitions. Together, these three bars create a continuous handhold envelope. The AARP HomeFit Guide reinforces this three-bar approach as the baseline for safe aging in place.
Walk-In Showers Need Different Logic
A walk-in or curbless shower removes the dangerous step-over but introduces its own hazard: a larger wet surface with fewer reference points for the body. The placement strategy shifts from "support the threshold crossing" to "support every possible turn within the wet zone." For a typical 36" by 60" walk-in shower, plan on a minimum of two bars and ideally three.
Mount a vertical bar at the entry, just inside the shower opening, with its lower end at roughly 34 inches. This gives the user a reliable grip the moment they cross the threshold, before their feet have committed to the wet surface. Pair this with a long horizontal bar on the back wall, ideally one that runs the full width of the shower. A 42-inch or 48-inch bar is not overkill here. It allows the user to walk hand-over-hand as they move through the space.
If the shower includes a built-in bench or fold-down seat, add a third bar on the wall adjacent to the seat. This bar should be horizontal, 33 to 36 inches above the seat surface, and at least 24 inches long. It supports the sit-to-stand transition, which is among the highest-risk movements in the bathroom. The National Kitchen and Bath Association publishes detailed bathroom planning guidelines that align with these recommendations and are useful when working with a designer or contractor.
Anchor Points and Wall Construction
The most beautifully chosen bar position fails if the wall cannot hold it. Before you drill anything, you need to know what is behind the tile. New construction or a major remodel makes this easy because you can install continuous wood blocking behind the cement board before tile goes up. A 2x8 horizontal blocking band installed at 30 to 48 inches above the floor accommodates virtually any future bar placement. This is the single best investment a homeowner can make during a bathroom remodel, and it costs almost nothing if done before tiling.
For a retrofit into an existing tiled wall, you have three options. First, locate studs with a quality stud finder and plan the bar so that at least two of its three mounting points hit solid framing. Second, use specialty anchors rated for grab bar loads, such as the WingIts or Solid Mount systems, which spread the load across a wider area of the wall sheathing. Third, if neither option works, open a small access panel from the back side of the wall, install blocking, and patch. The shortcut of using oversized drywall toggles alone is not acceptable for a grab bar that someone's life may depend on.
Always verify that any product you install carries a label confirming compliance with the ICC A117.1 accessibility standard. This is the consensus standard referenced by most state building codes and gives you objective assurance that the bar itself meets the 250-pound load requirement. Cheap decorative "grab-style" bars from a hardware aisle often do not meet this standard, even if they look identical to compliant ones.
Common Placement Mistakes and How to Avoid Them
The first common mistake is the "towel bar swap," where someone replaces a towel bar with a grab bar in the same location. Towel bars are typically mounted at 48 inches, which is too high for a useful grab bar at most users' grip strength. A grab bar mounted that high forces the user to reach upward, which raises the center of gravity and increases fall risk during the very moment the bar is supposed to prevent a fall.
The second mistake is failing to consider the user's dominant hand and any one-sided weakness. After a stroke or with conditions like Parkinson's disease, the user often has a strong side and a weak side. The vertical entry bar should always be on the strong side so the user can pull themselves into the tub or shower. If you mount it on the weak side because that is where the studs are, the bar may go unused or, worse, be grabbed reflexively by the weak hand at the moment the user starts to slip.
The third mistake is decorative finish over function. Brushed nickel and polished chrome look beautiful but become slippery when soaped up. Look for bars with a knurled, peened, or textured grip surface, or bars wrapped in a slip-resistant coating. Some of the best products on the market combine an attractive finish on the mounting flanges with a grippy, matte center section. This balance lets the bar disappear into a beautiful bathroom rather than scream "medical equipment."
Working With a Professional vs DIY
Plenty of competent homeowners can install grab bars themselves, particularly in a new build with accessible blocking. The decision tree is straightforward: if you can locate solid blocking or studs at the planned bar locations, if you have the right drill bits for porcelain or ceramic tile, and if you can torque the mounting screws to manufacturer specification, you can DIY. If any of those conditions fails, hire a contractor with a CAPS designation from the National Association of Home Builders.
A CAPS-designated remodeler brings two things a DIY homeowner often lacks. First, they perform a body-mechanics assessment of the actual user, not a generic occupant. They watch the person move, identify their specific reach envelope and balance pattern, and plan bar locations against the user, not against the room. Second, they coordinate with an occupational therapist when the situation calls for it, particularly post-stroke, post-hip-replacement, or with progressive conditions like multiple sclerosis.
Cost-wise, professional installation of a three-bar tub layout typically runs $400 to $900 in materials and labor, depending on whether new blocking is required. Compare that to the average cost of a hip fracture, which the CDC estimates at over $40,000 in direct medical expenses. Even from a purely financial perspective, professional grab bar installation is one of the highest-return home modifications available to an aging homeowner.
Conclusion
Grab bar placement is a small project with outsized consequences. Done well, it can extend independent living by years and prevent the cascade of decline that often follows a single serious bathroom fall. Done poorly, it creates a false sense of security and may even introduce new hazards. The difference between the two outcomes comes down to understanding body mechanics, choosing the right number and type of bars, and anchoring them into wall construction that can actually carry the load.
If you are planning a bathroom remodel, install continuous wood blocking now even if no one in the household needs grab bars yet. The blocking is invisible, costs almost nothing during construction, and gives future you the freedom to mount bars wherever the user actually needs them. If you are retrofitting an existing bathroom, start with the three-bar tub layout or two-bar walk-in shower layout described above, and adjust based on the user's height and dominant side.
Most importantly, do not let aesthetics drive the project at the expense of safety. There are beautiful, code-compliant grab bars on the market today that look at home in any well-designed bathroom. The era of clinical chrome bars that announce "elderly person lives here" is over, and there is no longer any excuse for postponing this work because of how it might look.
Take action this week: measure the bathrooms in your home or your parents' home, photograph the existing tub or shower walls, and book a consultation with a CAPS-designated contractor. Even a one-hour assessment can produce a written plan you can act on at your own pace, and the peace of mind it provides for the entire family is worth far more than the consultation fee. Bring along a tape measure, a notepad, and any medical documentation that describes the user's current mobility profile, since these inputs help the specialist design a layout that fits the actual person rather than a generic occupant. Many CAPS professionals will also walk through the kitchen, hallways, and entries during the same visit, identifying secondary modifications that pair well with the bathroom upgrade and can be sequenced to spread cost over time without losing project coherence.
More Articles You May Like



Comments
Post a Comment