Updating Bathroom Hardware Without Replacing the Entire Vanity
Bathroom vanities represent one of the largest single investments in any bathroom renovation, with mid-range replacements running between $1,200 and $3,800 including installation according to data from the National Kitchen and Bath Association (NKBA). Yet the vanity cabinet itself - the box, the countertop, the storage configuration - often remains perfectly functional long after its hardware begins to look dated. Faucets develop mineral deposits and lose their original luster. Drawer pulls reflect a design era that has passed. Towel bars and robe hooks clash with updated paint colors and tile selections. The instinct to replace the entire vanity when these surface-level elements age is understandable but frequently unnecessary, and it overlooks a targeted strategy that delivers dramatic visual results at a fraction of the cost and disruption. By updating the hardware components attached to and around the vanity, you can shift the bathroom's aesthetic from dated to contemporary while preserving the cabinet, countertop, and plumbing connections that still serve their purpose well.
Assessing What Stays and What Gets Swapped
The first step in a strategic hardware update is an honest evaluation of the vanity's structural and surface condition. Run your hands across the cabinet doors and drawer fronts, checking for warping, delamination, water damage at the base, and hinge deterioration. Open and close every drawer to assess the slide mechanism. Examine the countertop for chips, deep stains, or structural cracks that no amount of hardware change will address. If the cabinet box is square, the doors close properly, the drawers operate smoothly, and the countertop surface is intact, the vanity is a strong candidate for a hardware-only refresh. The National Association of Home Builders (NAHB) estimates that a well-constructed bathroom vanity has a useful life of 20 to 30 years, meaning many vanities that look dated are nowhere near the end of their functional lifespan.
With the structure confirmed as sound, inventory every piece of hardware currently attached to or associated with the vanity. This list typically includes the faucet and its handles or lever, the drain stopper mechanism, the cabinet knobs or pulls, and the mirror frame if it is mounted directly above the vanity. Expand your view to include the towel bar or ring positioned beside the vanity, the robe hook on the adjacent wall, and the toilet paper holder visible in the same sightline. Each of these elements contributes to the hardware story that the bathroom tells, and updating only one or two while leaving the rest unchanged creates a patchwork effect that undercuts the investment in the pieces you did replace.
Prioritize the elements by visual prominence and interaction frequency. The faucet commands the most attention because it occupies the center of the countertop and receives direct hand contact every time someone uses the sink. Cabinet pulls rank second because they repeat across the vanity face and establish the dominant hardware profile. Towel bars and accessories rank third because they occupy wall space at the periphery of the vanity zone. This hierarchy should guide your budget allocation: invest the most in the faucet, ensure the cabinet pulls deliver strong visual impact, and select accessories that coordinate without requiring the highest-end price point.
Does your vanity have elements that could benefit from non-hardware improvements as well? A coat of cabinet paint in a current color, new knobs, and a fresh faucet together cost less than ten percent of a full vanity replacement while delivering eighty percent of the visual transformation. Recognizing which components need replacing and which simply need refreshing is the discipline that separates a smart bathroom update from an unnecessarily expensive one.
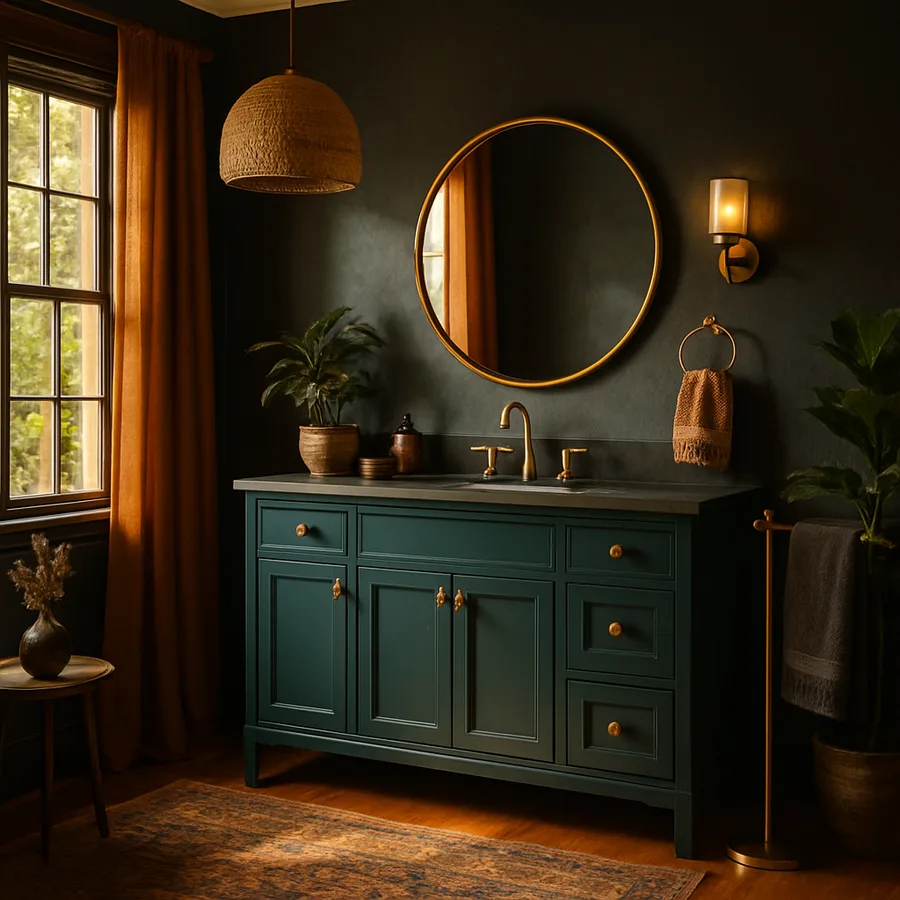
Choosing a Faucet That Redefines the Vanity
The faucet swap is the single most transformative hardware change you can make on a bathroom vanity because it replaces the largest, most centrally positioned, and most frequently touched piece of hardware in the room. Modern bathroom faucets have evolved dramatically in both form and function, with single-hole widespread designs, vessel-height options, and waterfall spouts offering aesthetic variety that did not exist when many existing vanities were installed. A faucet change reframes the entire vanity composition, making the cabinet and countertop look like a deliberate backdrop for the new fixture rather than the tired setting for an old one.
Compatibility with your existing countertop determines which faucets are viable options. Count the holes in your countertop: a single center hole accommodates single-hole faucets directly or widespread faucets with a deck plate cover. Three holes spaced four inches apart indicate a centerset configuration, while three holes spaced eight inches or more indicate a widespread mount. Measuring these dimensions before shopping eliminates the disappointment of falling in love with a faucet that physically cannot be installed on your countertop. If your countertop has three holes but you prefer the clean look of a single-hole faucet, a deck plate accessory covers the unused holes and most major faucet manufacturers include one or offer it as an add-on.
Finish selection for the faucet sets the tone that all other hardware in the room should follow. Matte black faucets have surged in popularity and pair exceptionally well with white, gray, and natural stone countertops, creating the high-contrast graphic statement that defines contemporary bathroom design. Brushed gold and champagne bronze faucets bring warmth and sophistication, particularly against darker vanity cabinets or marble countertops. Brushed nickel remains a versatile middle ground that complements nearly any color scheme without making as bold a statement as black or gold. The key is selecting the finish first and then sourcing all subsequent hardware - pulls, towel bars, accessories - in the matching or deliberately complementary finish.
Water efficiency is a practical benefit that accompanies many faucet upgrades. Faucets manufactured in the last five years carry WaterSense certification from the Environmental Protection Agency, indicating a maximum flow rate of 1.5 gallons per minute compared to the 2.2 GPM standard that older faucets typically deliver. According to the EPA WaterSense program, replacing an older faucet with a WaterSense-certified model saves approximately 700 gallons of water per year per faucet, a meaningful conservation contribution that also reduces the water heating energy associated with bathroom sink use. The performance of modern aerators is excellent, maintaining perceived water pressure while reducing actual flow volume.
Refreshing Cabinet Pulls and Knobs for Immediate Impact
Vanity cabinet hardware operates on the same visual principles as kitchen cabinet hardware: it creates a repeating pattern across the face of the cabinetry that establishes the stylistic register of the entire piece. A bathroom vanity typically has fewer hardware pieces than a kitchen - often just two to six pulls or knobs - but each piece carries proportionally greater visual weight because there is less cabinetry surface area to distribute attention across. This concentration means that vanity hardware selections should be particularly intentional, favoring pieces with interesting proportions, satisfying weight, and finishes that coordinate precisely with the faucet.
The transition from knobs to pulls is one of the most effective single changes available in vanity hardware. Small round knobs, especially in polished brass or white ceramic, are strongly associated with traditional and country-style bathrooms of the 1990s and early 2000s. Replacing them with linear bar pulls in a contemporary finish immediately updates the vanity's character without touching the cabinet doors themselves. A five-inch or six-inch pull on a vanity drawer front creates a clean horizontal accent that echoes the lines of the faucet and countertop edge, tying the composition together through shared geometry. If the existing knob holes do not match the new pull's center-to-center measurement, a cabinet hardware jig makes drilling precise new holes straightforward.
Backplate pulls offer a solution for vanities where the existing hardware has left visible marks, screw holes, or finish shadows on the cabinet doors. The backplate - a decorative rectangular or oval plate that sits behind the pull - covers a larger area of the door surface than the pull alone, hiding evidence of previous hardware while adding visual substance. Backplate designs range from ornate traditional profiles to simple geometric rectangles, so they can be matched to virtually any design direction. For vanities with painted cabinet doors that show the ghosting of old hardware outlines, a backplate pull avoids the need to repaint the doors while solving the cosmetic issue completely.
Consider the ergonomic relationship between your vanity hardware and the specific way you use it. Bathroom vanity drawers often contain heavy items - hair dryers, curling irons, bottles of product - and a substantial pull with a comfortable grip makes opening these loaded drawers easier and more pleasant. Cabinet doors below the sink may need to be opened while your hands are wet, making a pull's longer grip surface significantly more practical than a small knob that requires precision finger placement. These functional considerations often align perfectly with the aesthetic preference for larger, bolder hardware, creating a rare situation where the best-looking option is also the most practical one.
Accessory Hardware That Completes the Transformation
The hardware story in a bathroom extends beyond the vanity itself to the accessories mounted on the surrounding walls, and leaving these accessories in an old finish while upgrading the vanity hardware creates a dissonance that undermines the entire update. Towel bars, towel rings, robe hooks, and toilet paper holders are the core accessory set, and replacing them as a group ensures that every piece of visible hardware in the room speaks the same design language. The major hardware brands - Moen, Delta, Kohler, and Pfister - all offer coordinated bathroom accessory collections where every piece shares the same finish, proportions, and design details, eliminating the guesswork of matching individual components from different sources.
Towel bar placement and sizing deserve fresh consideration during the update rather than defaulting to the same location and length as the bar being replaced. A 24-inch towel bar is the standard for a hand towel adjacent to the vanity, but the mounting height and position relative to the vanity edge affect both accessibility and visual balance. Mounting the bar 48 inches above the finished floor with at least four inches of clearance from the vanity edge provides comfortable reach while preventing the towel from draping onto the countertop. If your bathroom layout allows, consider a double towel bar that stacks two bars vertically, providing storage for both a hand towel and a washcloth in the same wall footprint.
Robe hooks have gained ground as an alternative or supplement to towel bars, particularly in smaller bathrooms where wall space is limited. A row of two or three matching robe hooks spaced six inches apart provides hanging capacity for towels, robes, and clothing while occupying less wall space than a full towel bar. The visual effect of a hook row is also more contemporary than a traditional bar, particularly when the hooks feature a minimal geometric profile in matte black or brushed gold. This configuration works especially well adjacent to a shower entry or on the back of the bathroom door, locations where a towel bar's horizontal projection might interfere with movement through the space.
The toilet paper holder is the accessory most frequently forgotten in a hardware update, probably because it occupies a low, inconspicuous position and receives less visual attention than pieces mounted at eye level. However, a polished chrome toilet paper holder in a room where everything else has been updated to matte black is precisely the kind of detail that subconsciously registers as "unfinished" even if no one can articulate exactly what feels wrong. Replace it as part of the accessory group, and use the opportunity to consider whether a recessed holder, a freestanding pedestal holder, or a shelf-style holder that provides a surface for a phone or small item would serve the space better than the standard wall-mounted roll holder.
Mirror and Lighting Adjustments That Amplify Hardware Changes
The vanity mirror and its associated lighting occupy the most prominent visual real estate in any bathroom, and their interaction with updated hardware determines whether the refresh reads as a comprehensive design update or a collection of new individual pieces. A builder-grade plate mirror adhered directly to the wall above the vanity is one of the strongest visual signals of an un-designed bathroom, and framing or replacing it can be accomplished alongside the hardware swap at modest cost. Framing an existing plate mirror with a prefabricated frame kit from companies like MirrorMate transforms it into a deliberate design element in under an hour, and frame finishes are available in matte black, brass, wood tones, and painted colors that coordinate with the new hardware palette.
If the mirror is being replaced entirely, the selection criteria should prioritize shape and scale. Round and oval mirrors have displaced the rectangular plate mirror as the contemporary default in bathroom design, breaking the rigid geometry of the vanity, countertop, and tile grid with a softer organic shape. A round mirror 28 to 32 inches in diameter centered above a standard 36-inch vanity creates proportions that feel balanced and intentional. Framed round mirrors with thin metal frames in a finish matching the faucet and hardware create the final link in the coordinated hardware chain, connecting the vanity surface to the wall plane above it.
Vanity lighting deserves evaluation even if the fixtures themselves are not being replaced, because the light's color temperature and direction affect how all the new hardware finishes appear. Warm white lighting in the 2700K to 3000K range flatters brushed gold and brass finishes, enhancing their warmth and depth. Neutral white lighting at 3500K to 4000K presents matte black and brushed nickel most accurately, without the yellow cast of warm bulbs or the clinical feel of daylight bulbs. If your existing vanity light bar contains bulbs that can be replaced, swapping them to the color temperature that flatters your new finish choice is a five-dollar investment that meaningfully improves the way the entire hardware update presents throughout the day.
How does the lighting in your bathroom currently interact with the hardware finishes you are considering? Take a sample piece of hardware into the bathroom, hold it in the position where it will be installed, and evaluate it under both the artificial lighting and any natural light the room receives. Finishes can shift dramatically between warm incandescent lighting and the cool daylight from a window, and seeing the finish in situ prevents the disappointment of a hardware color that looked perfect in the store but reads differently in your bathroom's specific lighting conditions.
Executing the Project Efficiently
Bathroom hardware updates benefit from a specific sequence of operations that minimizes plumbing disruption, avoids return trips to the hardware store, and ensures that the finished result looks cohesive rather than assembled piecemeal. Begin by purchasing all hardware simultaneously - faucet, pulls, accessories, and any mirror framing materials - and unbox everything to confirm that the finishes match across brands and that all mounting hardware and supply lines are included. Discovering a missing component after the old faucet is removed and the water supply is shut off turns a smooth project into an inconvenient scramble.
The faucet replacement is the most technically involved step and should be completed first while your patience and focus are fresh. Turn off the hot and cold supply valves beneath the vanity, disconnect the supply lines and the drain tailpiece, remove the mounting nuts from below the countertop, and lift out the old faucet. Clean the countertop surface where the old faucet sat - years of mineral buildup and caulk residue often accumulate here - before positioning the new faucet. Connect the new supply lines, reconnect the drain, and turn the water back on slowly, checking each connection for leaks. The entire faucet swap typically takes 45 to 90 minutes depending on the accessibility of the under-sink connections and the condition of the supply valves. The Plumbing-Heating-Cooling Contractors Association recommends replacing supply valves that show any signs of corrosion or stiffness while the connections are open, as a failing valve during a future supply line replacement will require the same access you currently have.
Cabinet hardware installation follows the faucet and proceeds quickly. Remove the old pulls or knobs, fill any unused screw holes with matching wood filler if necessary, and install the new hardware. If the vanity has painted cabinet doors, this is the ideal moment to apply touch-up paint to any chips, scratches, or areas discolored by contact with the old hardware. A small artist's brush and a sample pot of matching paint accomplish this in minutes, and the fresh hardware conceals the repair areas.
Wall-mounted accessories complete the project. If the new towel bar, hooks, or toilet paper holder uses the same mounting hole locations as the old accessories, the swap is direct and requires only a screwdriver. If the mounting points differ, patch the old holes with spackle, sand smooth, touch up the paint, and drill new holes at the positions specified in the accessory mounting templates. Use wall anchors rated for at least 50 pounds in drywall installations to ensure that towel bars can support the significant pulling forces that wet towels and daily use generate. The entire accessory phase typically adds 30 to 60 minutes to the project, bringing the total investment for a complete bathroom hardware transformation to approximately two to four hours of focused work.
The Lasting Value of Strategic Hardware Updates
The decision to update bathroom hardware while preserving the vanity reflects a design philosophy that values precision over replacement and strategy over spending. A bathroom where every piece of hardware has been thoughtfully selected, finish-coordinated, and properly installed presents exactly the same visual coherence as a bathroom with a brand-new vanity, because the eye reads the surface details - the faucet gleam, the pull profile, the towel bar finish - far more prominently than the underlying cabinet construction. This reality is well understood in the hospitality industry, where hotel bathroom renovations routinely refresh hardware, fixtures, and surface finishes while retaining structurally sound vanity cabinets to maximize the renovation budget.
The financial math strongly favors the hardware approach. A comprehensive hardware update - faucet, cabinet pulls, towel bar, robe hooks, toilet paper holder, and mirror frame - typically costs between $250 and $700 depending on the finish tier and brand selection. A full vanity replacement with comparable hardware, including the cabinet, countertop, sink, faucet, installation labor, and plumbing modifications, ranges from $1,200 to $4,500. The hardware-only approach delivers approximately 80 percent of the visual transformation at 15 to 20 percent of the cost, a return ratio that few other home improvement strategies can match.
Environmental considerations add another dimension to the hardware-first approach. A vanity cabinet that goes to a landfill represents the embedded energy and materials of its original manufacture - the lumber, adhesives, finishes, and transportation - all discarded despite the cabinet remaining functionally sound. By extending the vanity's useful life through hardware updates rather than replacement, you avoid generating that waste stream while still achieving the aesthetic goals that motivated the project. As sustainable design practices gain traction in residential markets, this approach aligns with the broader movement toward renovation strategies that minimize material waste without compromising design quality.
Ready to transform your bathroom without the disruption and expense of a full vanity replacement? Begin by identifying your vanity's faucet configuration, count the cabinet hardware pieces, and select a coordinating finish that will thread through every element. The entire project fits comfortably within a weekend afternoon, and the refreshed bathroom will greet you with a contemporary, cohesive look that extends the vanity's useful life by years while delivering the visual satisfaction of a thoughtful design investment.
More Articles You May Like


Comments
Post a Comment