Linear Chandeliers Over Rectangular Dining Tables: Height Rules
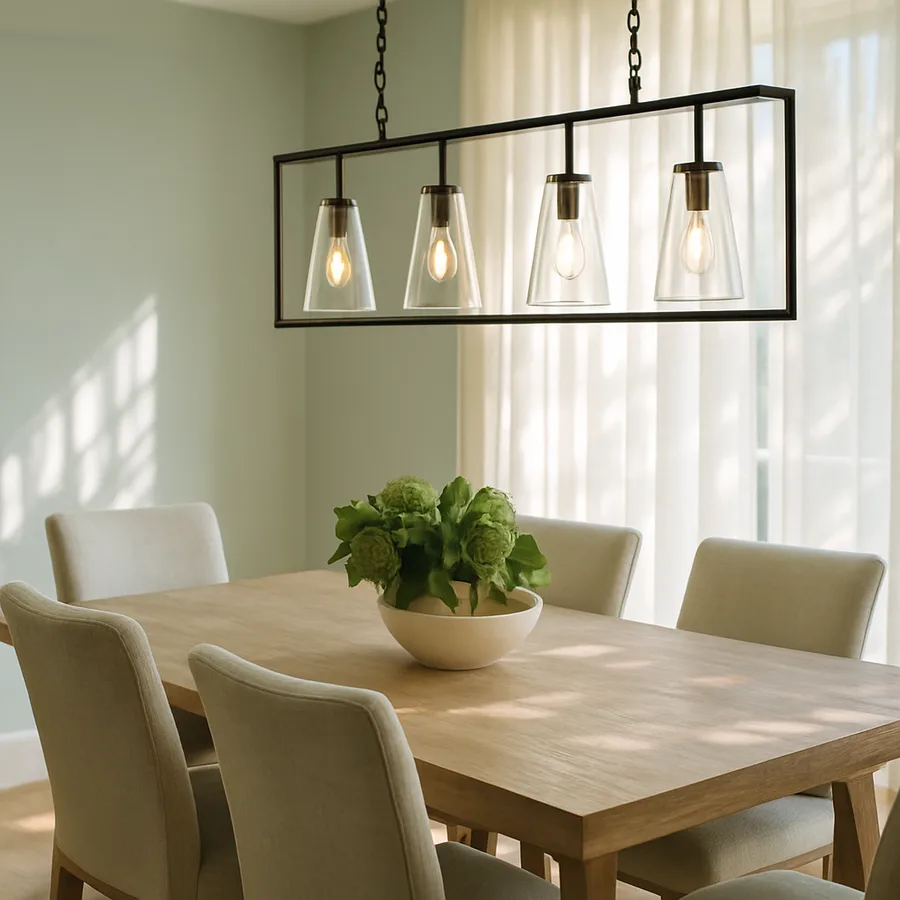
A linear chandelier above a rectangular dining table is one of the most photographed moves in residential design, and also one of the most commonly hung wrong. The drop is often too high, the length too short, or the alignment shifted off the table centerline by an inch or two that the eye registers as a full-room imbalance. The good news: the rules that fix all three problems fit on an index card.
According to guidance from the Illuminating Engineering Society (IES), roughly 40 percent of residential pendant and chandelier installations fall outside manufacturer-recommended mounting heights. The pattern is not carelessness. It is the absence of clear, table-specific rules. This article supplies them for linear fixtures over rectangles, pulling from ASID continuing-education materials, American Lighting Association guides, and hundreds of field installs.
Why Linear Fixtures Suit Rectangles
A single round chandelier scaled to the width of a rectangular table often feels visually starved across the table's length. A round fixture large enough to span the length pushes into head-strike territory for standing guests and overwhelms the rest of the room. The linear chandelier resolves both problems by extending along the table's long axis while keeping its width tight.
The silhouette also serves acoustics and conversation. A linear fixture draws the eye along the table, subtly telegraphing to guests that the space is organized for cross-table dialogue. That may sound abstract, but Houzz designer polls routinely find that clients in linear-lit dining rooms report more engaged meals than those under single-pendant setups.
Ever wondered why the most-pinned dining rooms on design blogs almost always feature linear fixtures? It is because the silhouette photographs beautifully from the standard 4-foot-high camera position, where round fixtures can flatten into circles and lose their drama.
Linear fixtures also excel for tables that are used primarily for meals on both long sides, with less seating at the ends. The extended light source parallels the primary eating positions, delivering more even task light to each seated diner. A round fixture tends to concentrate output at the table's center, which serves a formal dinner less efficiently than a linear distribution for daily use.
In open-plan homes, linear fixtures also carry a wayfinding benefit. They visually define the dining zone within a larger great-room, acting as an architectural anchor that separates dining from adjacent living or kitchen areas. Round fixtures can feel ambiguous in open plans, while linear ones read as deliberate zoning.
The Length Rule: Two-Thirds of the Table
The governing length ratio for a linear chandelier is two-thirds of the table length, plus or minus five percent. An 84-inch table pairs with a 52- to 60-inch linear fixture. A 96-inch table takes 60 to 68. A 72-inch table wants 46 to 52.
Why two-thirds rather than matching the full length? Because a fixture longer than about 75 percent of the table begins to read as a beam, not a fixture, and the negative space at each end of the table collapses. Negative space matters. It is what gives the fixture tension against the table's footprint.
Staying short of two-thirds is the more common error. A 40-inch fixture above an 84-inch table looks like a tie that is too short. If you are choosing between two fixtures and one sits slightly above two-thirds while the other sits well below, choose the longer.
One caveat. If your linear fixture has sculptural ends, such as turned wood caps or extended metalwork, measure only the illuminated body when applying the two-thirds rule. Decorative terminations do not count toward functional length.
Edge-case exception: sculptural modern tables with dramatic negative space, such as trestle bases with open centers, often accept fixtures slightly longer than two-thirds because the table itself reads visually longer than its actual footprint. A trestle table that reads 90 inches of presence with an 84-inch top may accept a 60-inch linear fixture without looking crowded. Trust the visual presence, not just the tape measure.
When sourcing, check whether the manufacturer specifies length with or without sculptural caps. Some brands list only the lit body, others include terminations. A 56-inch listed length might actually install at 62 inches of visual presence if terminations extend three inches past each end. Always request a full elevation drawing before purchase on fixtures over 48 inches.
The Drop: Measuring From the Right Surface
Drop height is measured from the bottom of the fixture to the top of the table, not the floor. For 8-foot ceilings, the target range is 30 to 34 inches. For 9-foot ceilings, 33 to 37. For 10-foot ceilings, 36 to 40. Add three inches per additional foot of ceiling height up to about 14 feet, beyond which proportional perception begins to plateau.
The variance within each range exists for a reason. Taller diners and more formal dining rooms benefit from the upper end of the range. Families with children or homes where the table doubles as a work surface benefit from the lower end, because light reaches the tabletop more directly.
The common failure mode is hanging too high. Installers often default to 36 inches regardless of ceiling, because that is what manufacturers print on spec sheets. In an 8-foot room, 36 inches leaves the fixture floating near the ceiling, and the table below feels unlit. In a 10-foot room, 36 inches is actually on the low side. Adjust for your room rather than trusting the carton.
Dimmer settings also interact with perceived drop. A brighter fixture draws the eye and makes a 32-inch drop feel lower than the same fixture at half output. If you plan to entertain at full brightness frequently, consider installing at the upper bound of the clearance range. If you dim to a low level for most meals, the lower bound is usually more flattering and more intimate.
Centering and Alignment
A perfectly sized and hung fixture still fails if it is off-center. There are two centerlines to respect. The first is the long-axis centerline, which runs down the length of the table. The second is the short-axis centerline, which runs across the width. The fixture should be centered on both, not on the room.
This matters because few dining tables sit perfectly centered in their rooms. Built-in cabinetry, buffet placement, and window alignment often shift the table by several inches. Hanging a fixture on the room's centerline when the table is offset produces a visible misalignment from every seated position.
Use painter's tape to mark both centerlines on the ceiling before the electrician cuts. Hold the fixture template at drop height with a second person confirming the sight lines from the doorway and from each seated position. The 20 minutes you spend confirming alignment in advance saves the awkward patch-and-repaint of a mislocated junction box.
If your existing box is off-center, you have three options: relocate the box, use a swag kit with a decorative chain that routes power to the correct center point, or specify a fixture with an asymmetric suspension that can compensate. Each is a legitimate fix.
Heavy linear fixtures above 40 pounds benefit from dual mounting points, which prevent long-term sag of the canopy. A single-point mount can gradually tilt a 60-inch fixture over years of thermal cycling and vibration. Ask your electrician about adding a second anchor point when the fixture length exceeds four feet. This structural consideration is rarely discussed in consumer guides but makes a meaningful difference in how a fixture ages.
Bulb Count, Lumens, and Dimming
The visual rule of thumb is that each linear foot of fixture should carry two to three light sources, whether bulbs, diffusers, or LED modules. A 60-inch fixture with only four bulbs reads as sparse; with twelve, as restaurant-grade. The sweet spot for most residential installs is one light source every 8 to 10 inches.
For total output, IES guidance suggests 30 to 40 lumens per square foot of dining surface at the table plane. A 40-by-84-inch table covers about 23 square feet, which calls for roughly 700 to 920 lumens delivered to the tabletop. With typical fixture efficiencies, that translates to a total installed lumen budget of 1,600 to 2,200.
Dimming is non-negotiable. A linear chandelier without a dimmer runs at one emotional register, typically too bright for intimate dinners and too dim for prep. Use a UL-listed dimmer matched to your bulb type. LED-compatible dimmers have improved dramatically in the last five years, but incompatible pairings still cause flicker and buzz.
Integrated LED fixtures change the calculus. A linear chandelier with integrated LEDs typically publishes a single lumen spec for the whole fixture. Compare that to the IES target at the table plane, accounting for a roughly 50 to 70 percent efficiency loss between fixture output and table-plane illumination. A 3,000-lumen integrated linear LED may deliver only about 1,800 lumens to the tabletop, which aligns well with the 700 to 920 lumen target for mid-sized tables.
Also verify the integrated LED's color rendering index (CRI). For dining rooms, specify CRI of 90 or higher. Lower CRI values flatten the color of food and skin tones, an underrated factor in how a meal feels under the fixture.
Ceiling Types and Installation Gotchas
Flat 8-foot drywall is the easy case. Vaulted, beamed, and coffered ceilings complicate installation. For vaulted ceilings, use a sloped-ceiling adapter, and measure drop from the lowest point of the ceiling directly above the table, not from the peak. For exposed beams, center the fixture between beams when possible, or hang from a beam directly for a more architectural look. For coffered ceilings, align the fixture within a single coffer if the table fits, or bridge two coffers with a fixture clearly longer than one coffer but shorter than two.
Structural support is another overlooked detail. A heavy iron or crystal linear fixture can exceed 40 pounds. Standard junction boxes are rated for 50 pounds, but only when mounted to solid framing. Have your electrician confirm the fixture weight against the box rating, and add a fan-rated brace when in doubt.
Finally, think through your bulb-change reach. A linear chandelier at 40 inches above an 84-inch table sits roughly 70 inches above the floor. Changing a bulb requires a stable platform on the table or a tall ladder. Choose lamps with long rated life, ideally 25,000 hours or more, to minimize service visits.
Drafty rooms present another subtle challenge. Forced-air supply vents near the ceiling can cause long linear fixtures to sway gently, which looks beautiful in a catalog photo and annoying in real life. If your dining room has a nearby supply register, ask the HVAC contractor about redirecting the diffuser or adding a baffle.
Older homes may also lack a dedicated junction box at the correct center point. Retrofit installations often route power through a swag or chain-and-plug system, which is legitimate but introduces a visible cord. Plan the cord path along beams or walls to minimize visual disruption, and confirm that your chosen fixture's canopy style accommodates a swag conversion.
Conclusion
Linear chandeliers reward precision. They frame the most-used surface in the house, and they fail visibly when sizing, drop, or alignment drifts even slightly from the rules. The rules themselves are not complicated. Two-thirds table length, 30 to 40 inches above the table depending on ceiling height, and centered on the table rather than the room.
The payoff is a fixture that feels inevitable rather than installed. Guests register the room as calm and composed without being able to name the cause. Photographs of your dining space take on the quiet balance that separates professional interiors from well-intentioned amateur work. The difference is almost always in the inches.
Take twenty minutes before purchase to measure the table, confirm the drop for your ceiling height, and mark both centerlines with painter's tape. Confirm the lumen total against IES guidance, and specify a dimmer that actually matches your bulb chemistry. None of these steps are glamorous, but together they close the gap between "nice chandelier" and "this room is extraordinary."
Ready to hang yours right? Use the Interior Bliss linear sizing worksheet to plug in your table dimensions and get a clear length and drop target in under two minutes, then browse fixtures that meet those numbers.
Additional authority references: Illuminating Engineering Society, American Lighting Association, and the curated pro-designer tours at Houzz.
More Articles You May Like


Comments
Post a Comment