Hexagonal Tile Entryway Transitions to Hardwood in Open Plans
Hexagonal tile in the foyer is one of the most recognizable design moves of the last decade, and it is not going anywhere. When it meets hardwood in an open-plan home, though, the transition between the two materials becomes the single hardest detail in the entire room. Get it right and the foyer reads as an intentional, architected zone. Get it wrong and you end up with a jagged, amateurish seam that becomes the first thing guests notice. This deep dive covers layout planning, cut strategies, threshold hardware, height matching, and the contractor conversations you need to have before anyone starts cutting expensive hardwood planks.
Why the Hex-to-Hardwood Transition Is Harder Than It Looks
Traditional floor transitions assume one rectangular material meeting another along a straight line. Hexagons refuse to cooperate with that assumption. Each hex has six edges at 30-degree angles from true horizontal, which means a clean edge can only be achieved by either stopping short with a straight saw cut (which defeats the decorative logic of the pattern) or by letting the hexagons interlock with shaped hardwood pieces (which is expensive and requires a skilled carpenter). The National Wood Flooring Association (NWFA) notes in its installation guidelines that custom-scribed transitions can add 6 to 10 labor hours per linear foot compared with a straight T-molding, which is why contractors often steer clients toward a plain strip unless pressed.
Open-plan layouts intensify the challenge because the transition is visible from multiple angles simultaneously. In a closed foyer with walls on both sides, the seam occupies a small frame of view. In an open plan, you see the seam from the kitchen island, the dining table, and the sofa, so any visual compromise multiplies. Reader question: is it ever acceptable to simply run a straight transition and call it done? Yes, if the adjacent architecture already features strong rectilinear elements, such as a built-in cabinet wall or an exposed structural beam that terminates the visual zone. Otherwise, plan for the interlocked cut.
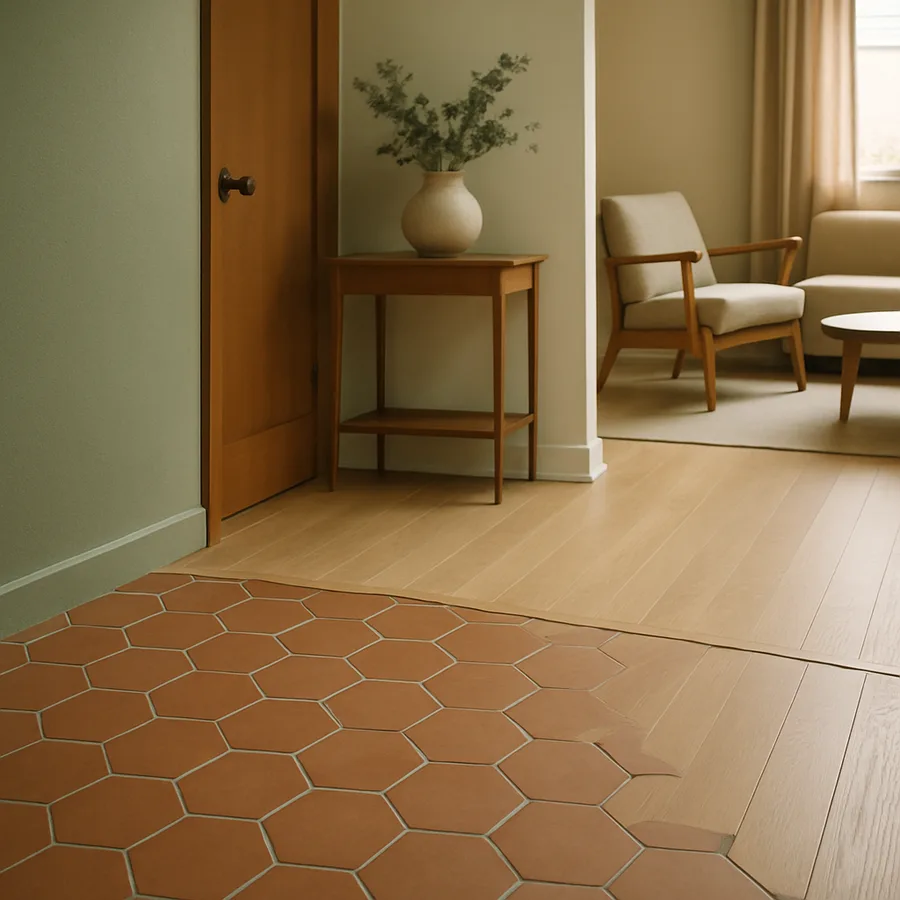
Three Layout Strategies for Interlocking Hexagons with Wood
Designers use three standard approaches to make a hex-to-wood seam look intentional. The first is the full-hex frontier, where every hexagon at the boundary is complete and the hardwood is scribed around the protruding shapes. This is the most expensive and the most visually striking. The second is the half-hex frontier, where hexagons are cut along their widest axis at the transition and the hardwood meets them along a gently serrated edge. The third is the framed transition, where a narrow strip of straight-cut tile or metal between the hex field and the hardwood creates a deliberate architectural border.
The National Association of the Remodeling Industry (NARI) reports that framed transitions are the most commonly specified option in midrange remodels because they balance visual impact with installation cost and tolerance for minor measurement errors. A framed transition uses a 1-to-3-inch border strip, often in a contrasting metal, marble, or straight-cut tile, to absorb any small misalignment between the hex field and the hardwood plank grid. For reference-grade installation detailing, consult the National Wood Flooring Association.
Height Matching: The Detail That Makes or Breaks the Transition
Two floors at different heights create a trip hazard and a visual fault line. Hardwood planks typically range from 5/8 to 3/4 inch thick, while porcelain or ceramic hex tile, once the mortar bed and backer board are factored in, often stacks to a total build-up between 5/8 and 1 inch. The Americans with Disabilities Act (ADA) limits abrupt changes in floor height to 1/4 inch, with a beveled ramp required between 1/4 and 1/2 inch. Anything above 1/2 inch needs a ramp or threshold transition piece.
The solution is height planning at the rough-in stage. A good tile contractor will calculate the total tile build-up, communicate it to the flooring installer, and select an appropriate underlayment or subfloor correction to match the two systems within 1/16 inch of each other. According to the U.S. Department of Housing and Urban Development (HUD), adult trip-and-fall incidents on uneven floor transitions account for roughly 2 million emergency-room visits annually, so getting this right is a safety issue, not just an aesthetic one. If your floors are already installed at different heights, options include a custom reducer strip milled from the same hardwood species or a narrow metal transition in a finish that coordinates with your hardware.
Choosing the Right Hexagon Size for an Open-Plan Foyer
Hex tile comes in sizes from 1-inch mosaic up to 12-inch large-format hexagons. The smaller the hex, the busier the pattern and the more dramatic the transition into smooth hardwood. Small hex works for classic or traditional homes where the foyer is a distinct zone; large-format hex reads as contemporary and integrates more seamlessly with modern wide-plank hardwood because the scale of pattern is more compatible with the plank width.
A rough rule of thumb from NKBA designers is to match the width of a single hex to approximately 30 to 50 percent of the adjacent plank width: a 5-inch hex pairs comfortably with a 10-inch plank, while a 1-inch mosaic reads as a pattern so far removed from the plank scale that you need a framed transition to harmonize them. Reader question: if you have already bought a small mosaic hex but are worried it will look choppy against wide planks, what can you do? Add a 2-inch marble or brass frame between the two fields. The intermediate element gives the eye a place to rest and turns the scale mismatch into a design decision.
Grout, Finish, and Color Coordination Across Materials
Grout color has a larger visual impact at the transition than anywhere else in the floor because it is the last line of tile the eye scans before hitting hardwood. A grout that contrasts sharply with both the tile and the wood (for example, charcoal grout on white marble hex meeting pale white oak) creates a strong graphic statement that works in contemporary spaces but can feel aggressive in traditional ones. A grout value-matched to either the tile or the wood softens the seam dramatically.
Finish coordination also matters: a high-polish marble hex next to a matte, wire-brushed hardwood will read as a style clash even if the colors align perfectly. Many designers now specify honed hex tile and a matte-finish site-applied hardwood top coat precisely to unify the sheen across the transition. For finish specifications that wear well over decades, check the Tile Council of North America finish guides alongside hardwood coating data from the NWFA.
Working With Installers: Questions to Ask Before Work Starts
The single best predictor of a clean hex-to-hardwood transition is whether the tile contractor and the hardwood installer meet on site before either material is ordered. Different trades on separate schedules is how you end up with height mismatches, wrong-direction plank runs, and grout lines that do not align with plank joints. Questions to ask both contractors together: what is the planned height of each finished floor including underlayment; who is responsible for scribing the transition; how will minor measurement variances be absorbed; and who owns the transition threshold piece if one is specified?
According to survey data from the Joint Center for Housing Studies at Harvard, remodeling disputes on multi-trade floor installations occur in approximately 12% of projects, and the majority of those disputes center on handoff details like material transitions. A written scope of work that assigns the transition explicitly to one contractor, with sign-off from the other, eliminates most of that friction. If budget allows, hire a single flooring contractor who subcontracts the tile work themselves; this concentrates accountability on one phone number. Additional scope-of-work templates are available from the National Association of the Remodeling Industry.
Conclusion
A hex-to-hardwood transition in an open plan is a high-risk, high-reward detail. Done well, it becomes a signature architectural moment that elevates an entire first floor. Done poorly, it haunts you every time you walk through the front door. The three controllables are layout strategy (full-hex, half-hex, or framed), height matching (within 1/16 inch if possible, never more than 1/4 inch without a beveled transition), and coordinated finish across tile and wood (matching sheen and complementary grout color).
Small hex reads traditional and busy; large hex reads contemporary and graphic. The adjacent hardwood plank width should sit in a 2-to-3 proportional relationship with the hex dimension, and a narrow framed border can rescue almost any scale mismatch. Polish all of these decisions in a pre-construction meeting between the tile and hardwood installers, put the agreed approach in writing, and assign accountability for the transition to a single contractor so the handoff does not fall between trades.
Budget accordingly. A custom-scribed full-hex frontier can add 6 to 10 hours of skilled labor per linear foot and may push total installation costs up by 15 to 25 percent versus a plain straight seam, but those costs are one-time and the result persists for decades. Compared with replacing an underperforming floor in three years, the upcharge is genuinely good insurance on a feature your guests will see every single day.
Planning your own open-plan foyer? Sketch the transition to scale on graph paper before you order materials, or request a digital mock-up from your designer so you can test hex size and transition style against the actual proportions of your space.
Another often-overlooked detail is the orientation of the hardwood plank run relative to the hex transition. Planks running parallel to the transition line produce a calmer visual effect; planks running perpendicular create a stronger directional pull that can either lead the eye into the next room pleasingly or fight with the hex pattern visually. Mockups in the actual space with painter's tape simulating plank direction are the only reliable way to settle this question before commit. In rooms where multiple sightlines compete, a good designer can resolve the tension with a deliberate plank-direction choice that supports the room's dominant axis of movement. Discuss this with your installer during the pre-construction walkthrough.
A practical checklist helps homeowners survive the specification phase without losing track of details. The shortlist should capture: tile species and exact SKU, tile dimension and hex size in inches, specified grout color and type (cementitious or epoxy), finish target (honed, cleft, polished), hardwood species and plank width, hardwood finish (site-applied or factory-finished, matte or satin), finished floor heights above subfloor for each material, planned transition strategy (full-hex, half-hex, or framed), and responsible trade for the transition seam. Walk this list into the pre-construction meeting and confirm each item out loud with both contractors.
A hidden cost many homeowners do not anticipate is acclimation time. Hardwood needs to acclimate to the home's interior humidity for roughly 5 to 14 days before installation, per NWFA guidelines, and tile mortar needs 24 to 72 hours of cure time before foot traffic. These schedule windows can compress a remodel timeline unexpectedly if not planned up front. Allocate an extra two weeks in your project schedule for a multi-material foyer compared with a single-material room; you will probably not need it all, but the cushion prevents the temptation to skip the scribed transition in favor of a quick T-molding when the finish deadline approaches.
One more worth-knowing detail: in open-plan rooms where the foyer tile is visible from a significant seating distance, the scale of the hex relative to the overall room matters as much as the scale of the hex relative to the hardwood. A 2-inch hex in a 24-foot open great room can read as busy chaos from the sofa, while the same hex in a compact 8-by-10 closed foyer reads as graphic charm. Larger-scale spaces generally want larger-format tile; intimate spaces tolerate and even benefit from finer pattern. Sketching sightlines from primary seating positions during the design phase avoids the post-installation realization that the pattern reads differently than the sample promised.
More Articles You May Like

Comments
Post a Comment