Cane Webbing Headboard DIY for a Boho Bedroom Refresh
If the boho bedroom had an unofficial material, it would be cane webbing. The honey-colored, open-weave rattan has graced furniture since the seventeenth century, fell out of favor in the 1990s, and staged a full comeback over the last five years as warm organic materials displaced cool minimalism. A headboard made from cane webbing stretched over a simple wood frame delivers exactly the texture, light-filtering shadow play, and hand-crafted quality that define the best boho bedrooms. The Apartment Therapy Style Index recently reported that cane finishes have appeared in 38% of its featured bedroom makeovers, up from 11% five years prior.
This guide walks through the full DIY process, including the often-skipped soak-and-shrink step that makes the difference between a taut professional finish and a saggy amateur one. Before you start, consider two questions: Does my bedroom get direct afternoon sun? (Extended UV exposure will fade natural cane over several years, so plan either a sealing coat or accept the honey-to-amber patina.) And do I have a table saw or can I have wood pre-cut at the store? Your answer determines how the rest of the weekend unfolds.
The Enduring Appeal of Cane in Modern Interiors
Cane webbing is technically the inner bark of the rattan palm, woven in open patterns that let light and air pass through. The material has been used in colonial furniture, Parisian bistro chairs, mid-century Danish cabinets, and California bohemian interiors. What unites every era of cane is the same visual quality: a patterned transparency that softens without blocking, adds texture without heaviness, and reads as handmade without looking rough.
In a bedroom context, cane performs three specific jobs. First, it introduces warm natural tone without competing with other wood finishes. Cane's honey color plays well with walnut, oak, ash, and even painted furniture, making it one of the few materials that mixes effortlessly. Second, it creates shadow texture that changes throughout the day as light moves across the room. Third, it adds acoustic softening - a little - compared to bare drywall, though less than upholstered headboards.
The World Crafts Council has recognized cane weaving as a heritage craft in several Southeast Asian countries, and supporting cane-based design projects often traces directly back to family-run workshops in Indonesia, the Philippines, and Vietnam. The American Society of Interior Designers (ASID) has repeatedly included rattan and cane among its top sustainable material picks because rattan palms grow quickly and regenerate without replanting.
The Complete Materials List for a Queen Headboard
Here is the exact list for a 62-inch wide by 42-inch tall cane headboard frame (adjust dimensions for king or full/twin sizes proportionally). Expect total spend of $140 to $200 depending on your wood choice.
- 1x4 solid wood boards (oak, walnut, or poplar) cut to make a simple rectangular frame - approximately $45 to $90
- Cane webbing, open weave pattern, 24 to 30 inches wide, enough length to cover your frame - approximately $40 to $70
- Reed spline to hold the cane in place - approximately $8
- Wood glue - approximately $6
- Staple gun with 1/4-inch staples (optional but speeds installation) - approximately $22 if you do not own one
- Wood stain and finish - approximately $25
- Router with 1/2-inch straight bit OR a chisel to cut the spline groove - borrow if possible
The soak tray is the one item people forget. Cane webbing must be soaked in warm water for 30 to 60 minutes before installation. The fibers absorb water, become pliable, and then shrink as they dry, creating the taut drum-tight finish that separates a good cane headboard from a floppy one. A large plastic storage bin or a clean bathtub both work.
Building the Wood Frame That Holds Everything Together
The frame is a simple rectangle made from four pieces of 1x4 joined at the corners. You can use pocket screws for invisible joints, half-lap joinery for a traditional look, or simple butt joints reinforced with L-brackets on the back. All three approaches work structurally.
Cut the frame pieces to your dimensions and dry-fit before gluing. Sand every surface to 220 grit, paying attention to corners where finish applications will pool if not smoothed. A slight roundover on the outer edges (using a 1/8-inch roundover bit in a router, or sanding by hand) gives the frame a softer, hand-finished quality that reads as more expensive.
Before assembling, you need to cut a groove around the inside back of the frame - this is where the cane and spline will sit. A 1/4-inch wide by 1/4-inch deep groove, set back 1/2 inch from the inner edge, works for most cane and spline combinations. This is the trickiest part of the build and benefits from a router, though a careful hand with a chisel can accomplish the same result on a single weekend project.
The Soak-and-Shrink Method That Pros Use
Here is the step where amateurs go wrong. They unroll the cane, staple it to the frame, and discover three days later that it has loosened and sagged. The fix is to soak the cane before installation so it stretches tight as it dries.
Unroll your cane webbing, submerge it fully in warm water, and let it soak for 45 minutes. The cane should become noticeably more pliable - you will be able to bend it without hearing fibers snap. Pat it with a towel to remove surface water but keep it damp.
Drape the damp cane over the frame's inner opening, hand weave or decorative pattern facing outward. Starting at the top center, press the cane into the groove you routed, then press a length of reed spline on top of the cane, securing it in place. Work from center outward on all four sides, pulling the cane snug but not strained. A wooden mallet helps seat the spline without damaging the cane.
Trim excess cane with a sharp utility knife along the outer edge of the spline. Let the piece dry fully - 24 to 48 hours in a room with normal humidity. As the cane dries, it shrinks, tightening across the frame. When fully dry, it should sound like a soft drum when tapped with your finger. This is the hallmark of a properly installed cane panel. Ask yourself: Does the surface feel taut or does it give when pressed? If it gives, you may need to resoak and reinstall.
Finishing the Frame and Sealing the Cane
Stain or finish your wood frame after the cane is installed and dried - doing it beforehand risks staining the cane. Use painter's tape to mask the cane, then apply wood stain in thin coats, wiping off excess after 3 to 5 minutes. Two coats typically deliver full color.
For the cane itself, the great debate is whether to seal. Natural unsealed cane will darken over years into a beautiful amber, but it is also more susceptible to moisture damage and surface dirt. A water-based polycrylic applied in a thin coat with a foam brush preserves the current color, adds durability, and dries clear without yellowing. The Preservation Society of Newport County - which manages historic cane-furniture collections - applies a similar conservation-grade clear coat to extend the life of its pieces.
Whichever route you choose, apply finish in a well-ventilated space and let it cure for at least 48 hours before mounting. Premature installation against bedroom walls can transfer finish to paint or trap off-gassing near the sleeping area.
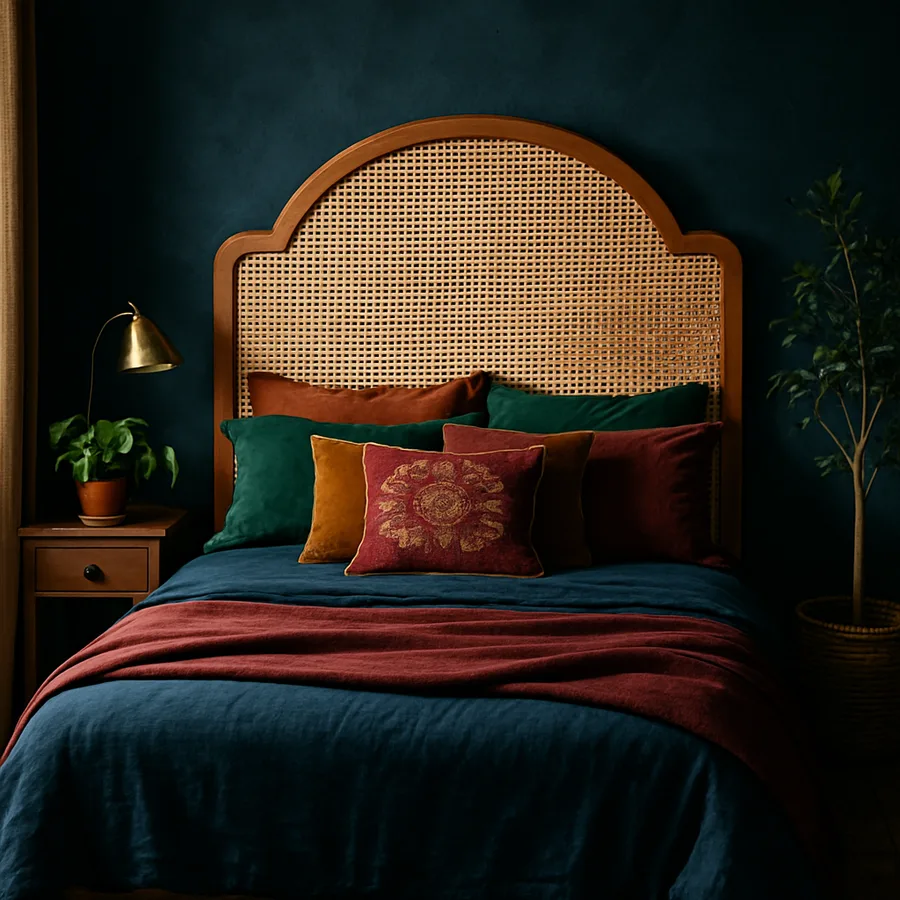
Boho Styling That Keeps the Headboard From Looking Dated
Boho style walks a fine line between layered warmth and cluttered kitsch. The headboard should feel like part of a considered ecosystem, not a single trendy element surrounded by neutrals. Layer the bed with a vintage kantha quilt or block-printed coverlet, sheets in soft cream or oat, and two or three pillows in varied textures - a mud cloth lumbar, a boucle square, an embroidered accent.
Add a single large piece of texture nearby: a wool macrame wall hanging to one side of the headboard, a vintage kilim rug at the foot of the bed, or a tall floor basket with a pampas grass arrangement. Avoid using all three - boho thrives on restraint within abundance. The House Beautiful design team consistently advises choosing one hero textile and supporting it with subtler pieces.
Lighting is where many boho bedrooms go wrong. Skip the bare bulb pendant and instead use a woven rattan pendant, a paper lantern, or a pair of ceramic table lamps with linen shades. Candles on the nightstand are appropriate if you use them safely. Plants - a trailing pothos, a large monstera, or a cluster of smaller specimens - complete the ecosystem without adding cost.
Conclusion: A Headboard That Ages Into Something Better
The cane headboard rewards patience in ways most DIY projects do not. The soak-and-shrink process cannot be rushed, the frame joinery benefits from care, and the finish coats need time to cure. What you receive for that patience is a piece of furniture that looks better at year five than it did at month one. The cane deepens from honey to amber. The wood frame takes on a soft sheen. The whole object begins to carry the story of the room it has lived in.
Compared to upholstered headboards - which compress over time and eventually show wear - a cane headboard essentially becomes more beautiful as it ages, assuming it is kept out of direct continuous sun and not abused by pets. The repairability is also better: if a single cane panel damages, you can re-soak, replace the panel, and spline it back without rebuilding the entire headboard.
If you are considering this project, source your cane from a reputable supplier - HL Bowman, Frank's Cane & Rush Supply, and Cane & Basket are three widely trusted names among serious DIYers. Order a small sample roll first to confirm the weave pattern and color match your expectations before buying the full length. Clear your weekend schedule, soak the cane before breakfast Saturday, and plan to let the piece dry overnight before touching it again.
The last question worth asking is the most practical one: Is my bedroom warm enough in tone to carry cane, or will it read as out-of-place? Cane works beautifully against white, cream, clay, sage, and warm neutrals. It struggles against cool grays, stark blacks, and heavily industrial finishes. If your palette leans warm, this project is ready for you.
Choosing Between Open Weave and Closed Weave Cane
Cane webbing comes in two primary patterns, and the choice between them affects both the look and the installation process. Open weave (sometimes called radio weave or hexagonal weave) features visible gaps in the pattern, letting light pass through and creating the classic boho transparency. Closed weave (also called fine weave or blind cane) has a tighter, more opaque pattern that reads as more formal and traditional. For a boho bedroom, open weave is almost always the right call.
Within open weave, there are further subcategories based on the size of the hexagonal openings. Standard octagonal pattern has roughly 1/4-inch openings and is the most widely available. Larger-pattern cane, sometimes called penny weave, has openings closer to 1/2 inch and reads more casual. The Craft & Hobby Association recommends standard octagonal pattern for first-time cane workers because it is the most forgiving during the soak-and-press installation process.
Before ordering, consider the scale of your frame. A small headboard paired with a large-pattern cane can look unbalanced, while a large frame with fine pattern can feel oppressive. As a general guideline, the cane pattern should be small enough that the weave reads as texture from across the room, not as distinct holes. Ask yourself while looking at samples: At six feet away, does this cane read as pattern or as punctuation? Pattern is what you want.
Alternative Installation Methods If You Do Not Have a Router
The traditional groove-and-spline method requires a router, which not every DIYer owns. Fortunately, several alternative installation methods can deliver nearly identical results with simpler tools. The first alternative is the staple method. Wrap the damp cane around the back of your frame and staple it to the reverse side, hiding the staples from view. This works well when the back of the headboard will face the wall and never be seen.
The second alternative is the sandwich method, where you build a double-layer frame - an inner frame and an outer frame - and sandwich the cane between them. Glue and clamp the two frames together with the cane pressed between them. When dry, the cane is held in place by friction rather than spline. This method delivers a cleaner front-and-back appearance but requires more wood. Cost increases by roughly 30% compared to the spline method.
The third alternative is the adhesive method, where you apply construction adhesive to a rabbeted frame and press the damp cane directly into the adhesive. This is the fastest method but the hardest to repair if something goes wrong. The American Wood Council cautions that not all construction adhesives are rated for prolonged contact with natural fibers, so choose a low-VOC water-based product and ventilate well during drying.
More Articles You May Like


Comments
Post a Comment