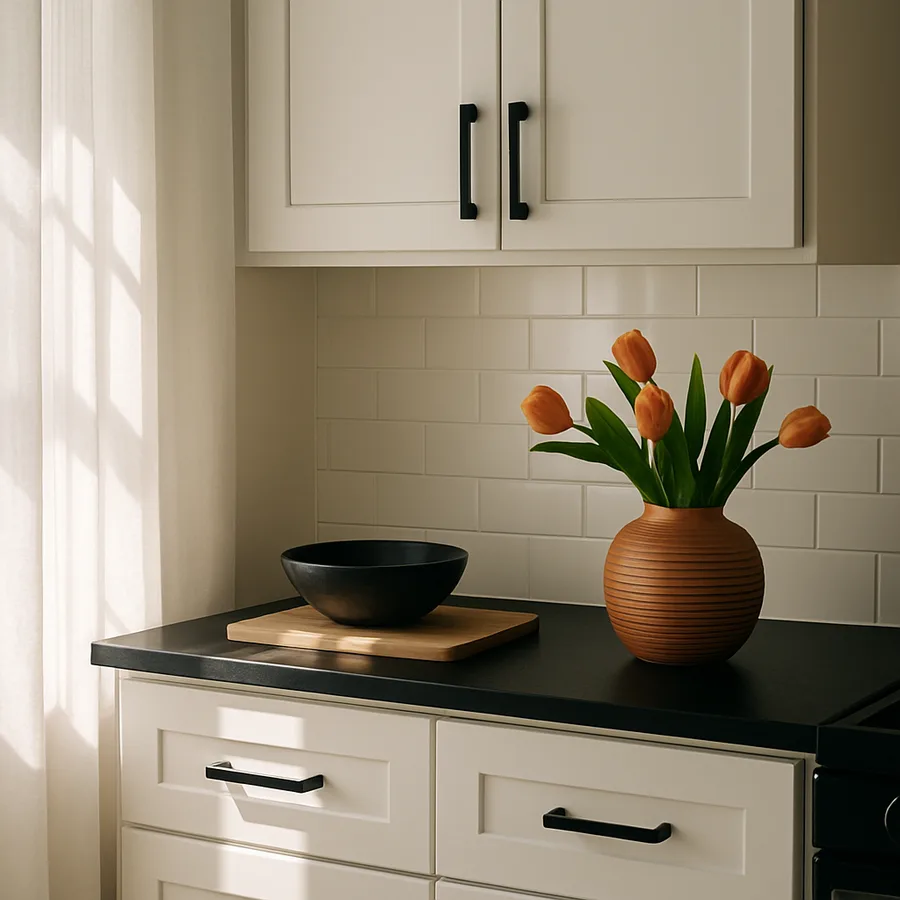
Cabinet Hardware Swaps That Modernize a Kitchen in One Afternoon
The kitchen holds a unique position in any home as the room that endures the most daily use while simultaneously serving as a reflection of personal style and hospitality. Yet full kitchen renovations routinely cost between $30,000 and $75,000 according to the National Kitchen and Bath Association (NKBA), putting comprehensive updates out of reach for many homeowners. What most people overlook is that one of the most visually impactful changes in a kitchen requires nothing more than a screwdriver, a tape measure, and a few hours of focused effort. Swapping cabinet hardware - the pulls, knobs, and handles that punctuate every door and drawer front - can shift the entire aesthetic character of a kitchen from dated to contemporary without removing a single cabinet box. This is not a compromise renovation or a stopgap measure; it is a targeted design intervention that professionals use constantly when refreshing kitchens on tight budgets and tighter timelines.
Why Hardware Carries Outsized Visual Weight
Cabinet hardware functions as the jewelry of the kitchen, and like jewelry on a well-dressed person, it draws the eye disproportionately to its size. A standard kitchen contains between 20 and 40 individual pieces of hardware across its doors and drawers, creating a repeating pattern that the brain registers instantly upon entering the room. When that pattern consists of shiny brass cup pulls from the 1990s or ornate ceramic knobs from the early 2000s, it anchors the entire kitchen to that era regardless of what else has been updated. The American Society of Interior Designers (ASID) has noted in multiple trend reports that hardware is one of the first elements consumers identify when assessing whether a kitchen feels current or outdated.
The reason hardware punches above its weight visually comes down to contrast and repetition. Each piece of hardware sits against the flat expanse of a cabinet door, creating a focal point that breaks the surface plane. When you multiply that focal point across every cabinet in the room, you create a rhythm that defines the kitchen's character as powerfully as the cabinet color or countertop material. Changing from small round knobs to long linear pulls, for instance, shifts the dominant visual line from a scattered dot pattern to a series of clean horizontals, immediately lending a more contemporary and streamlined feel to the cabinetry.
Consider how a boutique hotel kitchen or a designer showroom kitchen looks and feels. The cabinets themselves are often simple Shaker-style or flat-panel designs, but the hardware selection - typically oversized, matte-finished, and geometrically clean - elevates the entire composition. This is the principle at work: hardware acts as a style multiplier, amplifying whatever design direction it points toward. A single afternoon spent replacing every piece of hardware in your kitchen leverages this multiplier effect to deliver a transformation that visitors genuinely mistake for a full renovation.
Understanding this visual leverage is the first step toward making a confident hardware selection. You are not choosing a minor accessory; you are selecting the element that will set the stylistic tone for the most-used room in your home. That knowledge should guide both the seriousness with which you approach the selection process and the budget you allocate, because investing in quality hardware is one of the highest-return decisions available in kitchen design.
Selecting the Right Finish for a Contemporary Look
Hardware finish is the single most important decision in the swap process because it establishes the color palette and texture that will repeat across every cabinet surface. The dominant finishes in contemporary kitchen design have shifted decisively away from the polished chrome and antique brass that defined the previous two decades. Matte black has emerged as the leading choice for modern kitchens, offering a bold graphic contrast against light cabinetry and a sophisticated understatement against dark tones. According to a survey by Houzz, matte black hardware appeared in 36 percent of kitchen renovations completed in recent years, surpassing brushed nickel for the first time as the most specified finish.
Brushed gold and satin brass represent the second major trend, bringing warmth and a sense of craft to kitchens that might otherwise feel cool or clinical. Unlike the high-shine polished brass of earlier decades, today's brass finishes are deliberately muted, with a brushed or satin texture that resists fingerprints and develops a subtle patina over time. This finish pairs exceptionally well with white, navy, sage green, and natural wood cabinetry, and it bridges the gap between contemporary and transitional styles with ease. For homeowners who want their kitchen to feel current without leaning fully into an industrial or minimalist aesthetic, brushed gold hardware offers a versatile middle ground.
Unlacquered brass occupies a niche that appeals to homeowners drawn to materials that age and evolve. Unlike sealed finishes that maintain a static appearance, unlacquered brass reacts with the oils from hands and the moisture in the air, developing a living patina that darkens and varies across each piece. The result after several months of use is a warm, antiqued appearance that looks intentional and collected rather than worn. This finish works particularly well in kitchens with other natural materials - butcher block counters, open shelving displaying stoneware, exposed wood beams - where a perfectly uniform finish would feel out of place.
What finish will harmonize with the other metal tones already present in your kitchen? Look at your faucet, light fixtures, and appliance handles before committing to a hardware finish. While the rigid rule of matching all metals has relaxed considerably in contemporary design, maintaining a coherent temperature - all warm tones or all cool tones - prevents the visual noise that comes from too many competing metallic finishes. If your faucet is brushed nickel and your pendant lights are chrome, a matte black hardware swap creates a deliberate accent rather than a clash, while a polished gold selection might fight with the existing cool-toned metals.
Choosing Between Pulls, Knobs, and Mixed Configurations
The shape and scale of cabinet hardware establishes the directional energy of the kitchen. Bar pulls, also called European pulls, create strong horizontal or vertical lines depending on their mounting orientation. Horizontal bar pulls on drawer fronts and vertical bar pulls on doors is the most common contemporary arrangement, and it delivers clean sight lines that emphasize the linear geometry of modern cabinet design. The National Association of Home Builders (NAHB) includes lever and pull-style hardware in its universal design guidelines because pulls are easier to grasp than knobs for people with reduced hand strength or dexterity, making them both a style and an accessibility upgrade.
Knobs offer a more traditional profile and work beautifully in kitchens where the goal is to modernize without abandoning classic character entirely. A round or hexagonal knob in a matte finish reads as updated without the strong directional energy of a bar pull. Knobs are also the practical choice when the existing cabinet doors have a single center-mounted screw hole, since they can be installed without any additional drilling. For kitchens with raised-panel or beaded-inset cabinet doors, knobs tend to complement the ornamentation of the door profile better than the stark minimalism of a bar pull.
Mixed hardware configurations - using pulls on drawers and knobs on doors, or different pull sizes on upper versus lower cabinets - add visual interest and allow you to tailor the hardware to the ergonomic demands of each location. Larger pulls on lower cabinets and drawers make sense because these are the surfaces you interact with most frequently and often while carrying items, so a generous grip surface is practical. Smaller knobs on upper cabinets are adequate because those doors are opened less often and with an empty hand. This mixed approach also allows you to manage budget effectively, investing in higher-quality pulls where they matter most while using more affordable knobs in less prominent locations.
Before ordering, use painter's tape to mock up the pull positions on several cabinet doors. Mark the screw hole locations and step back to evaluate the proportions. A pull that looks perfectly sized on a website product photo may appear undersized or oversized once positioned on your specific door dimensions. Many hardware manufacturers offer sample programs where you can order a single piece to test in your kitchen before committing to a full set, and this small upfront investment prevents the frustration and cost of returning thirty pulls that turned out to be the wrong scale.
Measuring and Mounting for a Professional Result
The difference between a hardware swap that looks professionally installed and one that looks like a weekend project often comes down to measurement precision and mounting consistency. Center-to-center measurement is the critical dimension: it refers to the distance between the centers of the screw holes, and it must match between your existing holes and your new hardware unless you plan to drill new holes. The most common center-to-center measurements in residential cabinetry are 3 inches, 3.75 inches (96mm), and 5 inches (128mm). Measure your existing holes before shopping to narrow your options to hardware that fits without modification.
If you are changing from knobs (single hole) to pulls (two holes), or switching to a different center-to-center dimension, you will need to drill new holes. This is a straightforward process with the right tools, but it introduces two non-negotiable requirements: a drilling template and a sharp brad-point bit. A drilling template, sometimes called a cabinet hardware jig, ensures that every hole is positioned identically on every door and drawer front. Brands like the True Position Tools TP-1935 and the Kreg Cabinet Hardware Jig are purpose-built for this task and clamp securely to the door edge, eliminating the measurement variability that freehand drilling introduces. Without a jig, even small variations of a sixteenth of an inch become visible when the hardware is installed, because the repeating pattern across twenty or more doors makes any inconsistency obvious.
Filling the old holes is the finishing step that elevates the project from competent to polished. For painted cabinets, wood filler applied with a putty knife, sanded flush after drying, and touched up with matching paint renders the old holes invisible. For stained or natural wood cabinets, choose a wood filler that matches the grain color and apply it carefully, feathering the edges to blend with the surrounding surface. In some cases, particularly with dark-stained wood, the new hardware can be positioned to overlap the old hole location, hiding it beneath the pull's backplate without any filling required.
Take the time to install hardware on one door completely before proceeding to the rest. Mount the pull or knob, close the door, open it several times, and evaluate both the appearance and the feel. Is the pull comfortable in your hand? Does the door clear the adjacent cabinet when opened? Does the vertical placement look balanced relative to the door rails? Adjustments are easy to make after one installation but extremely tedious after twenty. This single-door pilot approach adds ten minutes to the project but can save hours of rework.
Budget Planning and Where to Source Quality Hardware
Cabinet hardware pricing spans an enormous range, from under two dollars per piece for basic builder-grade options to over fifty dollars per piece for artisan or designer-label hardware. For a kitchen with 30 pieces of hardware, that range translates to a total project cost between sixty dollars and fifteen hundred dollars, making budget planning an essential first step. The sweet spot for quality hardware that looks and feels premium without designer-label pricing sits between five and fifteen dollars per piece, a range offered by brands like Amerock, Hickory Hardware, Franklin Brass, and Goldenwarm. At this price point, you can expect solid construction, a durable finish, and the satisfying heft that distinguishes quality hardware from hollow, lightweight alternatives.
Online retailers have dramatically expanded the options available to homeowners and compressed the pricing relative to traditional showroom purchasing. Amazon, Build.com, and Signature Hardware carry extensive catalogs with detailed dimensional specifications and customer-submitted installation photos that show how the hardware looks in real kitchens rather than studio-lit product shots. Many online sellers offer bulk pricing discounts for orders of ten or more pieces, and free return policies make it practical to order two or three options, test them in your kitchen, and return the ones that do not work. This try-before-you-commit approach was previously available only to design professionals with showroom accounts, and it eliminates the guesswork that leads to disappointing selections.
Architectural salvage and vintage shops offer another sourcing avenue for homeowners seeking hardware with genuine character and history. Mid-century brass pulls, Victorian glass knobs, and industrial steel handles from demolished buildings carry a patina and a weight that no reproduction can replicate. Using salvaged hardware requires flexibility in design because you are working with whatever the shop has available, but the reward is a kitchen with hardware that tells a story and guarantees that no other kitchen in the neighborhood looks the same. If you go this route, buy more pieces than you need to account for any that may be damaged during cleaning or installation.
How much value do you place on the tactile experience of touching your kitchen hardware dozens of times each day? This question matters because the feel of hardware in your hand - its weight, its edge profile, the smoothness of its finish - is something you experience far more often than you consciously notice it. Inexpensive hollow-back pulls feel tinny and imprecise. Solid cast or forged pulls feel substantial and intentional. Since you will grip these pieces thousands of times over the years they serve your kitchen, the ergonomic quality of the hardware deserves the same consideration as its visual appeal.
Coordinating Hardware With Other Kitchen Elements
A hardware swap achieves its maximum impact when the new hardware enters a conversation with the other visible elements of the kitchen rather than standing in isolation. The relationship between hardware and cabinetry color is the primary pairing to consider. White and off-white cabinets are the most versatile canvas, accepting virtually any hardware finish from matte black to warm brass to cool nickel. Dark navy, charcoal, and black cabinets gain dramatic definition from brushed gold or satin brass hardware, which creates enough contrast to prevent the cabinet faces from reading as a featureless dark mass. Natural wood cabinets respond beautifully to matte black hardware, which provides graphic contrast without competing with the warmth of the wood grain.
The backsplash presents the next coordination opportunity. If your backsplash features warm-toned natural stone or terracotta-inspired tile, brass or bronze hardware reinforces that warmth and creates cohesion between the vertical and horizontal surfaces of the kitchen. A cool gray or white subway tile backsplash pairs naturally with nickel, chrome, or matte black hardware, maintaining the crisp, clean palette. Patterned cement tile or colorful mosaic backsplashes are best complemented by understated hardware in matte black or simple brushed nickel that does not compete with the tile pattern for visual attention.
Countertop edges and appliance handles represent the final layer of coordination. Stainless steel appliances dominate the residential market, and their cool metallic tone coexists peacefully with matte black hardware - the contrast is intentional and reads as designed rather than mismatched. If your appliances feature black stainless or matte black panels, matching hardware creates a cohesive threading of that finish through the room. Countertop edges in lighter materials like white quartz or butcher block provide a neutral zone between the cabinet and backsplash planes, and they generally do not influence the hardware finish choice as strongly as the cabinetry color or the backsplash material.
The goal of coordination is not rigid matching but thoughtful dialogue. A kitchen where every metal is identical can feel monotonous, while a kitchen with three or four competing metallic finishes feels chaotic. The sweet spot lies in choosing one dominant metal for hardware and one complementary metal for fixtures, then allowing those two tones to repeat in a balanced pattern throughout the room. This two-tone approach is the strategy that interior designers use most frequently, and it delivers sophistication without requiring the precision of a single-finish scheme. Have you identified the dominant and secondary metals in your kitchen, and does your hardware selection reinforce that hierarchy?
Completing the Transformation and Maintaining Results
The afternoon you dedicate to swapping your cabinet hardware marks the beginning of a visual transformation that continues to deliver returns every time you walk into your kitchen. The immediate effect is striking: a kitchen that felt tired at breakfast looks refreshed by dinner, and the total investment rarely exceeds a few hundred dollars. But sustaining that fresh appearance requires a basic understanding of hardware maintenance, which varies by finish and material. Matte black hardware shows fingerprints less than glossy finishes but can reveal water spots if splashed during kitchen work; a quick wipe with a dry microfiber cloth after cleaning the counters keeps the finish looking crisp.
Brass and gold-toned hardware require slightly more attentive care because the finish reacts differently depending on whether it is lacquered, unlacquered, or PVD-coated. Lacquered brass maintains its factory appearance for years but will eventually show wear at the grip points where the lacquer is worn through by repeated contact. PVD (Physical Vapor Deposition) coatings, used by brands like Emtek and Baldwin, are significantly more durable and resist scratching, tarnishing, and corrosion far better than traditional lacquer. Unlacquered brass is intended to patina, so maintenance consists of deciding how much patina you prefer and periodically polishing back to bright brass with a gentle metal polish if the darkening exceeds your taste.
Every hardware swap also presents an opportunity to address the cabinet doors and drawer boxes themselves. With the hardware removed during the swap, each door is temporarily free of its visual anchoring point, making it the ideal moment to clean the door faces thoroughly, touch up any chips or scratches in the paint or stain, and tighten any loose hinges. These small maintenance tasks take only a few seconds per door but are easy to overlook when the hardware is in place. Completing them while the hardware is off ensures that the new pulls and knobs are mounted to surfaces that look as fresh as the hardware itself.
The confidence that comes from successfully completing a kitchen hardware swap tends to catalyze further improvements. Homeowners who see how much impact a targeted change delivers often move on to painting the cabinet doors, replacing the faucet, upgrading the backsplash, or adding under-cabinet lighting - each of which compounds the modernizing effect of the new hardware. If you are considering any of those next steps, start a list of changes ranked by visual impact per dollar spent, and you will likely find that the hardware swap you just completed sits at the top, confirming that the afternoon was among the best investments you have ever made in your home.
Ready to start your own cabinet hardware transformation? Gather your tape measure, count your doors and drawers, and order a sample pull in your preferred finish. The entire project can move from planning to completion within a single weekend, and the result will greet you with a modernized kitchen every morning for years to come.
More Articles You May Like


Comments
Post a Comment