Soundproofing a Home Office in an Apartment With Thin Walls
Working from home in an apartment with thin walls means navigating a constant audio battlefield. Your neighbor's television bleeds through the shared wall during your morning standup. The hallway conversation outside your door punctuates your focus just as you find your flow. Your own video calls broadcast client details to anyone within earshot of your apartment's paper-thin partitions. According to a workplace survey by the International Facility Management Association, noise distraction is the number-one complaint among remote workers in multi-unit housing, outranking internet speed, desk ergonomics, and even space constraints. The challenge is real, but the solutions are more accessible and renter-friendly than most people realize. You do not need to tear down walls or install professional studio treatment to achieve a meaningfully quieter office. This guide covers the physics of apartment sound transmission, practical interventions ranked by effectiveness, and strategies for assembling a layered soundproofing approach that fits both your budget and your lease terms.
How Sound Travels Through Apartment Walls
Understanding the basic physics of sound transmission transforms your approach from guessing to targeted problem-solving. Sound travels through apartment walls in two fundamentally different ways: airborne transmission and structure-borne transmission. Airborne sound consists of voices, music, and television audio that travel as pressure waves through the air, hit your wall, vibrate it like a drum membrane, and re-radiate as sound on your side. Structure-borne sound consists of impacts and vibrations, footsteps from above, a washing machine two floors down, or a door slamming, that travel through the building's physical structure and emerge as audible sound in your room. Each type requires a different intervention strategy, and most apartment noise problems involve both types simultaneously.
Thin apartment walls are problematic specifically because they lack mass and decoupling, the two properties that stop sound transmission. A standard interior partition wall consists of a single layer of half-inch drywall on each side of a wooden or metal stud frame, with empty cavity space between. This construction weighs roughly five pounds per square foot and provides a Sound Transmission Class rating of around thirty-three, which means normal speech is audible through the wall and loud speech is clearly intelligible. For comparison, a well-built exterior wall or party wall between condominiums achieves an STC rating of fifty or above, where loud speech is inaudible and only very loud sounds like amplified music are faintly perceptible. The gap between STC 33 and STC 50 represents the difference between an office where you hear every word your neighbor says and one where you forget you have neighbors at all.
Air gaps are the silent saboteurs of apartment soundproofing. Sound follows the path of least resistance, and even a quarter-inch gap under a door or around an electrical outlet allows sound to bypass an otherwise solid wall entirely. The National Research Council of Canada demonstrated in laboratory testing that a one-square-inch hole in an otherwise perfect sound barrier reduces its effectiveness by as much as fifty percent. This means that sealing gaps and cracks is not a minor finishing touch but a foundational step that must happen before any other intervention can reach its full potential. Walking your office perimeter with a flashlight looking for visible light gaps around doors, outlets, baseboards, and ductwork identifies the worst offenders quickly.
Flanking paths are the less obvious routes sound takes to circumvent your walls. Sound can travel through shared ductwork, over the top of a wall through a continuous ceiling cavity, through back-to-back electrical outlets that share a stud bay, or through gaps where pipes penetrate the wall. In older apartment buildings with lathe-and-plaster construction, flanking through the ceiling cavity above partition walls is extremely common because the walls often stop at the dropped ceiling rather than extending to the structural floor above. Identifying your dominant flanking paths requires some detective work: press your ear against different surfaces while your neighbor's television is on, and note where the sound is loudest. That loudest point is your highest-priority treatment target.
Sealing Gaps and Closing Air Paths
The highest-impact, lowest-cost soundproofing intervention in any apartment is sealing the air gaps that let sound pour through like water through a sieve. Start with the door, which is almost always the weakest link in a home office's sound envelope. Interior apartment doors are typically hollow-core, weigh about fifteen pounds, and have visible gaps on all four sides when closed. Apply a self-adhesive silicone or neoprene door seal to the top and both sides of the door frame, compressing the seal slightly when the door closes to create an airtight contact. For the bottom gap, install a door sweep or an automatic door bottom that drops a seal when the door closes and lifts when it opens, preventing drag on carpet. These products cost under thirty dollars total, install in twenty minutes with no tools beyond a screwdriver, and are completely removable for renters.
Electrical outlets on shared walls are notorious sound leaks that most people never consider. Back-to-back outlets in adjacent apartments share the same stud bay, and the gap around the electrical box in the drywall creates a direct air path between the two units. You cannot fill the electrical box itself, but you can install a foam gasket behind the outlet cover plate that seals the gap between the plate and the drywall. These gaskets are sold in packs at any hardware store, cost a few dollars, and install in seconds by removing the cover plate, placing the gasket, and reattaching the plate. For a more thorough treatment, apply acoustic caulk around the perimeter of the electrical box where it meets the drywall, sealing the gap from inside the wall cavity. This is invisible once the cover plate is replaced.
Baseboards often conceal a gap between the bottom edge of the drywall and the floor, a construction shortcut that allows air and sound to travel between rooms and even between apartments. Run a bead of paintable acoustic caulk along the top edge of the baseboard where it meets the wall and along the bottom edge where it meets the floor. Acoustic caulk remains permanently flexible, which is important because buildings shift seasonally and a rigid seal will crack and re-open the gap within months. This caulk costs about ten dollars per tube, each tube covers roughly forty linear feet, and the result is invisible after painting. For renters who cannot caulk, a removable alternative is to press rope caulk, a putty-like cord, into visible gaps along baseboards, which peels out cleanly when you move.
HVAC registers and ductwork are flanking paths that many soundproofing guides overlook. Shared duct runs between apartments carry sound directly from one unit to another, and the register opening in your wall or floor is essentially an open window into the duct system. While you cannot block the register entirely without disrupting your heating and cooling, you can install a duct liner insert, a short section of acoustically lined flexible duct that fits inside the register boot and absorbs sound within the duct before it enters your room. These are available in standard register sizes and reduce duct-transmitted noise measurably without affecting airflow. If your building uses a central HVAC system with large returns, the return air grille may be your biggest single flanking path and deserves a lined duct insert as a priority.
Adding Mass to Thin Walls Without Construction
Once air gaps are sealed, the next layer of defense is adding mass to the wall surface that faces your primary noise source. Sound transmission through a wall decreases predictably as the wall's mass increases, a principle known as the mass law, which states that doubling the mass of a wall reduces sound transmission by approximately six decibels. In practical terms, six decibels is the difference between clearly hearing your neighbor's conversation and hearing only an indistinct murmur. Several renter-friendly products add meaningful mass to walls without permanent modification.
Mass-loaded vinyl, commonly called MLV, is a dense, flexible sheet material that weighs one to two pounds per square foot and can be hung on a wall like a tapestry, sandwiched behind a bookshelf, or attached to a removable frame. A single layer of one-pound MLV on a thin apartment wall adds roughly five to seven STC points, which translates to a noticeable reduction in speech intelligibility from the adjacent unit. MLV is available in rolls four feet wide and can be cut with scissors or a utility knife. For renters, attach it using heavy-duty adhesive strips rated for wall hanging, or build a simple wooden frame the size of the wall, staple the MLV to the frame, and lean the assembly against the wall. When you move out, the wall is untouched.
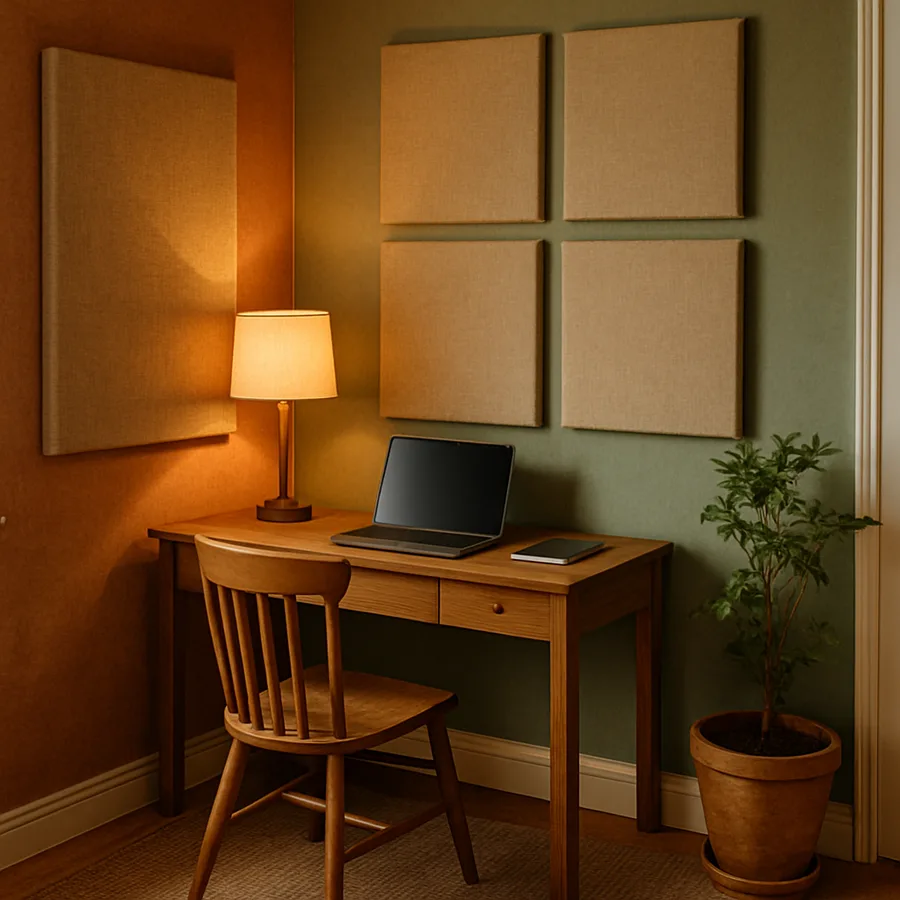
Decorative acoustic panels combine mass and absorption in a visually appealing package that doubles as wall art. Panels made from compressed mineral wool or fiberglass wrapped in fabric absorb mid-range and high-frequency sounds that sealed gaps alone do not address. A set of six panels covering approximately thirty percent of your office wall's surface area provides meaningful absorption of reflected sound within your room and adds enough mass to slightly reduce transmission through the wall. The Houzz design community showcases numerous examples of acoustic panels used as deliberate design elements, arranged in geometric patterns or covered in fabrics that complement the room's color scheme. These panels mount with picture-hanging hardware and leave only small nail holes when removed.
A floor-to-ceiling bookshelf loaded with books is one of the most effective and visually justified mass additions you can place against a shared wall. Books are dense, irregularly shaped objects that both add mass and break up sound waves through diffusion, and a full bookshelf can weigh several hundred pounds, significantly increasing the effective mass of the wall behind it. Position the bookshelf tight against the shared wall with no air gap, and fill it as completely as practical. Research from the Acoustical Society of America confirms that furnished rooms with bookshelves on shared walls consistently measure lower sound transmission than identical empty rooms, with reductions of three to eight decibels depending on shelf density and wall construction. This approach requires no modification to the wall, looks entirely intentional, and moves with you when your lease ends.
Treating Your Office for Internal Acoustic Comfort
Soundproofing is not only about keeping external noise out. The acoustic quality inside your office affects your concentration, your call audio quality, and your perception of how quiet the room feels. A room with hard, reflective surfaces like bare drywall, hardwood floors, and glass windows creates reverberation that amplifies every sound inside the room and makes external noise that does enter feel louder and more intrusive. Treating internal reflections calms the acoustic environment and makes the remaining external noise less disruptive by contrast.
Soft furnishings are the first layer of internal treatment. A heavy area rug with a thick pad underneath absorbs floor reflections and reduces the hard-surface echo that makes small rooms feel acoustically harsh. Upholstered furniture, even a single armchair, absorbs mid-frequency sound that bare walls reflect back and forth across the room. Heavy floor-to-ceiling curtains over windows provide absorption on what is typically the room's most reflective surface, and the curtain fabric's weight and pleating increase its absorptive effectiveness. These elements are already present in most decorated rooms, but their acoustic contribution is significant enough that adding them specifically for sound management is justified even in a minimally furnished office.
Ceiling treatment is the most commonly neglected surface in home office acoustics. Sound reflecting off a hard ceiling bounces down to the floor and back up again, creating a vertical echo that muddies speech clarity on calls and increases the perceived noise level in the room. Acoustic ceiling tiles designed for residential use are available in decorative patterns that attach to the ceiling with adhesive or clip-on grid systems. Even partial coverage of twenty to thirty percent of the ceiling area produces a noticeable improvement in clarity and quietness. For renters who cannot modify the ceiling, a fabric canopy or a large textile wall hanging mounted at the ceiling-wall junction provides meaningful absorption at the point where ceiling reflections are strongest.
Have you noticed that your voice sounds different in your office compared to your living room? That difference is reverberation time, the duration sound takes to decay by sixty decibels after the source stops. A typical untreated apartment room has a reverberation time of about 0.8 to 1.2 seconds, which sounds echoey and makes speech less intelligible. Treating the room with the soft furnishings and panels described above can reduce reverberation time to 0.3 to 0.5 seconds, which sounds natural and conversational. Video call platforms like Zoom and Teams apply noise cancellation algorithms that work significantly better in rooms with controlled reverberation, meaning that internal acoustic treatment improves both what you hear and what your callers hear from your microphone.
Renter-Friendly Soundproofing Products and Techniques
The constraint of a rental lease shapes every soundproofing decision, and the best solutions leave zero trace when you move out. Removable acoustic caulk and putty products, such as rope caulk and poster putty, fill gaps temporarily without bonding to surfaces. These materials peel away cleanly and cost almost nothing, making them ideal for sealing around window frames, door casings, and baseboards. Keep the packaging and product name so you can confirm the product's removability with your landlord if questions arise during a move-out inspection.
Freestanding acoustic dividers and screens provide substantial sound absorption without touching walls, floors, or ceilings permanently. These portable panels, typically three to six feet tall and two to four feet wide, use the same mineral wool or fiberglass core as wall-mounted panels but stand on their own base. Position one between your desk and the primary noise source, and it intercepts direct-path sound before it reaches you. Multiple dividers can create an L-shaped or U-shaped acoustic enclosure around your desk area that significantly reduces ambient noise levels. The General Services Administration, which manages federal office buildings, specifies freestanding acoustic panels as the standard noise mitigation solution in open-plan government offices, and the same products work identically in a home setting.
Window treatments designed specifically for sound reduction offer renter-friendly improvements over standard curtains. Acoustic curtains differ from regular heavy curtains in their construction: they incorporate a mass-loaded vinyl liner or a multi-layer quilted design that blocks significantly more sound than fabric weight alone would suggest. The best acoustic curtains reduce window-transmitted noise by ten to fifteen decibels, which is the difference between hearing street traffic clearly and hearing only a faint murmur. They hang on a standard curtain rod, look identical to high-end drapes, and move with you when you relocate. For maximum effectiveness, choose curtains that extend beyond the window frame by at least four inches on each side and puddle slightly on the floor, eliminating the air gaps that curtains mounted too narrowly or too short leave for sound to bypass.
White noise machines and active sound masking represent a different approach: rather than reducing noise, they raise the ambient sound floor so that intrusive noises are less perceptible by contrast. A broadband white noise generator set to a moderate volume fills the room with a consistent sound that masks intermittent noises like voices, footsteps, and door slams. The human auditory system is disturbed most by sudden sounds that contrast sharply with silence, and white noise eliminates that contrast. Position the machine between you and the noise source for maximum masking effect. While white noise is not soundproofing in the technical sense, it is one of the most cost-effective tools for improving perceived quiet in an apartment office and works immediately with no installation of any kind. A study by the Journal of the Acoustical Society of America found that broadband masking sound reduced reported noise distraction by over forty percent in multi-tenant office environments.
Assembling a Layered Approach on a Budget
Effective apartment soundproofing is rarely about a single dramatic intervention. It is about layering multiple modest improvements that compound into a meaningful total reduction. Think of it as a noise reduction budget where each intervention contributes a few decibels and the cumulative effect crosses the threshold from annoying to acceptable. Sealing door gaps contributes three to five decibels. Adding a bookshelf against the shared wall contributes three to eight decibels. Treating the room interior with soft furnishings and panels contributes five to ten decibels of perceived reduction through absorption. Adding white noise masking contributes another five to ten decibels of effective perceived reduction. Individually, none of these changes solves the problem. Together, they can reduce perceived noise by fifteen to twenty-five decibels, which transforms a thin-walled apartment office from unusable to genuinely functional.
Prioritize your spending by addressing the cheapest and highest-impact interventions first. Door sealing costs under thirty dollars and takes twenty minutes. Outlet gaskets cost under ten dollars and take five minutes per outlet. Rope caulk for baseboards and window frames costs under fifteen dollars and takes an hour for a full room. These three interventions totaling roughly fifty dollars seal the air paths that account for a disproportionate share of sound transmission in most apartments. Only after these gaps are sealed does it make sense to invest in heavier interventions like MLV, acoustic panels, or acoustic curtains, because those products cannot compensate for unsealed air paths any more than insulation can compensate for an open window.
For a mid-range budget of two hundred to four hundred dollars, add acoustic curtains for the window and four to six fabric-wrapped acoustic panels for the shared wall and ceiling-wall junction. These products combine mass addition with absorption and address both transmission and internal reverberation simultaneously. Arrange the wall panels asymmetrically for a decorative effect that also provides better sound diffusion than a symmetrical grid. Cover the most critical areas first, which are typically the section of shared wall directly opposite your desk and the wall behind your monitor where your microphone picks up reflections during calls.
If your budget extends to five hundred dollars or more, add a layer of mass-loaded vinyl behind your bookshelf on the shared wall. This hidden layer adds the mass that truly reduces low-frequency sound transmission, and the bookshelf conceals it completely. At this investment level, also consider replacing your hollow-core office door with a solid-core door if your landlord permits it, or at minimum adding a second layer of MLV to the door's interior surface concealed behind a decorative fabric panel. The door is almost always the weakest element in the room's sound envelope, and strengthening it yields a disproportionate return. Save all original hardware and the original door so you can restore the apartment to its original condition when your lease ends.
Conclusion
Soundproofing a home office in a thin-walled apartment is a layered process that begins with understanding how sound actually travels through your specific space and ends with a combination of sealing, mass addition, absorption, and masking that addresses each transmission path. No single product eliminates apartment noise entirely, but the compounding effect of multiple targeted interventions can reduce perceived noise by enough decibels to transform an unusable workspace into a productive one. The physics are straightforward: seal the gaps, add mass to the weakest surfaces, absorb reflections inside the room, and mask whatever remains.
The renter-friendly constraint is not the obstacle it first appears to be. Every intervention described in this guide, from door seals and outlet gaskets to freestanding panels and removable MLV frames, leaves no permanent trace on the apartment. The products move with you to your next home, providing continued value across multiple leases. The bookshelf, the heavy curtains, the area rug, and the upholstered furniture are pieces you would own regardless of their acoustic benefit, which means a significant portion of your soundproofing strategy doubles as interior design investment.
Start with the fifty-dollar gap-sealing pass and live with the improvement for a week before spending more. You may find that sealing air paths alone resolves enough noise to make your office functional, saving you hundreds of dollars on products you assumed you needed. If the remaining noise is still problematic after sealing, add interventions one layer at a time, evaluating the cumulative effect after each addition. This progressive approach prevents overspending and ensures every dollar contributes meaningfully to your acoustic comfort.
Pick up a tube of rope caulk and a door seal kit this week, and spend one evening sealing every gap in your office. That single session will show you just how much noise was entering through openings you never noticed, and it will give you the foundation on which every subsequent improvement builds.
More Articles You May Like


Comments
Post a Comment