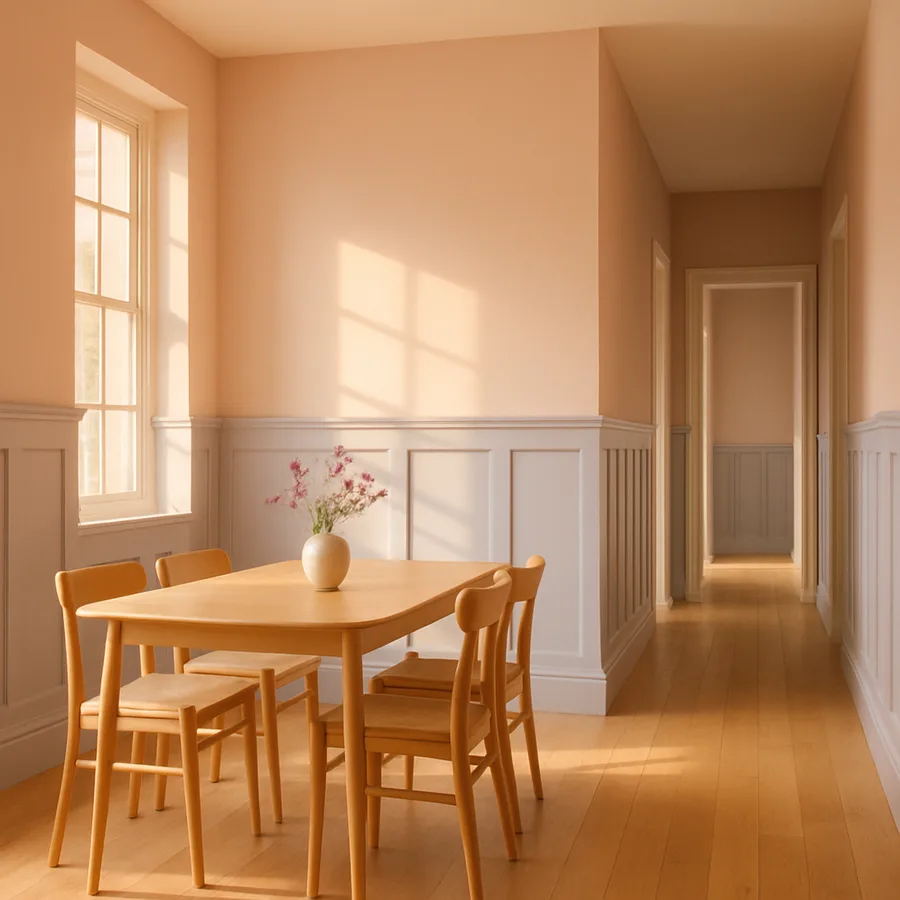
Board and Batten Wainscoting in Dining Rooms and Hallways
Understanding Board and Batten Wainscoting
Board and batten wainscoting is a wall treatment consisting of flat panels, the boards, overlaid with evenly spaced vertical strips, the battens, typically installed on the lower portion of a wall. The battens cover the seams between the boards and create a rhythmic vertical pattern that adds visual depth and architectural interest to otherwise plain drywall surfaces. Unlike more ornate wainscoting styles such as raised panel or beadboard, board and batten relies on simple geometry and clean lines, which gives it a versatility that spans from traditional farmhouse interiors to thoroughly modern spaces.
Historically, board and batten originated as a practical construction method for exterior siding. Wide boards were nailed vertically to the wall frame, and narrow battens were applied over the joints to seal gaps against weather infiltration. The technique migrated indoors as a decorative treatment, retaining its fundamental structure while shedding its weatherproofing function. Today's interior board and batten is built almost entirely from MDF, primed pine, or engineered lumber rather than the rough-sawn planks of its exterior ancestor. The American Institute of Architects (AIA) recognizes board and batten as one of the few historical building techniques that has successfully crossed the boundary from utilitarian construction to mainstream decorative application.
The appeal of board and batten in residential interiors comes from its ability to add perceived architectural substance to any room. A flat drywall wall, no matter how well painted, reads as a surface rather than a structure. Adding board and batten introduces shadow lines, material depth, and a repeating pattern that makes the wall feel built rather than merely finished. This perceived quality improvement is disproportionate to the actual cost and labor involved, which is why board and batten consistently ranks among the highest-return-on-investment wall treatments in residential design. According to a cost-versus-value analysis published by Remodeling Magazine, decorative wall treatments like wainscoting recoup between 70 and 85 percent of their installation cost at resale.
Dining rooms and hallways are particularly strong candidates for this treatment because both spaces benefit from the visual weight and formality that wainscoting provides, and neither space subjects the walls to the moisture and grease exposure that limits wainscoting options in kitchens and bathrooms. A dining room with board and batten on its lower walls immediately feels more intentional and finished, while a hallway gains the architectural rhythm needed to transform it from a utilitarian passage into a space worth noticing. These two rooms represent the ideal starting points for homeowners exploring wainscoting for the first time.
Design Decisions: Height, Spacing, and Proportions
The height of the wainscoting is the single most consequential design decision, and getting it wrong is difficult to correct after installation. The traditional rule places wainscoting at one-third of the wall height, which translates to roughly 32 inches in a room with standard eight-foot ceilings. This proportion has persisted for centuries because it creates a balanced visual division between the treated lower wall and the open upper wall. Going lower than 30 inches tends to make the wainscoting feel like a baseboard extension rather than a deliberate design feature, while exceeding 40 inches in a standard-height room can make the upper wall feel compressed and the room feel shorter.
Rooms with taller ceilings can support proportionally taller wainscoting. In a dining room with nine-foot ceilings, a 36-to-40-inch wainscoting height maintains the one-third ratio beautifully. Some designers push the treatment to two-thirds height, roughly 60 to 72 inches, which creates a dramatically different effect, enveloping the room in texture and relegating the upper wall to a narrow band near the ceiling. This taller approach works well in formal dining rooms where an atmosphere of enclosure and intimacy is desirable. The Architectural Digest portfolio includes numerous examples of both standard and tall wainscoting, and the difference in room atmosphere between the two heights is striking.
Batten spacing determines the rhythm of the pattern and should relate to the width of the wall and any existing architectural features. A spacing of 12 to 16 inches on center is the most common and visually comfortable range. Wider spacing creates a more relaxed, modern look, while tighter spacing feels more traditional and formal. Whatever interval you choose, it should divide evenly into the wall width so that the spacing appears consistent from end to end. Starting with a full-width panel at each corner and adjusting the internal spacing to fit evenly across the wall avoids the awkward narrow panels that result from arbitrary spacing applied without measuring.
Batten width itself carries visual weight. Standard battens range from one and a half inches to three and a half inches wide. Narrower battens, around one and a half to two inches, produce a more refined and contemporary appearance. Wider battens at three inches or more feel bolder and more farmhouse-traditional. The batten width should also relate to the cap rail and baseboard dimensions; battens that are wider than the cap rail look top-heavy, while battens significantly narrower than the baseboard look insubstantial. Have you measured the trim already installed in your home? Using that existing dimension as a starting reference for batten width ensures visual consistency between the wainscoting and the room's established trim vocabulary.
Material Selection and Preparation
Medium-density fiberboard (MDF) is the most popular material for interior board and batten because it is dimensionally stable, takes paint beautifully, and resists the warping and expansion that solid wood undergoes with humidity changes. Pre-primed MDF boards and battens are available at virtually every home improvement retailer, reducing preparation time and ensuring a smooth painting surface. The boards are typically half-inch-thick sheets cut to the wainscoting height, while the battens are usually strips of the same material in one-and-a-half-inch or two-and-a-half-inch widths. MDF does have a vulnerability to moisture, which makes it unsuitable for bathrooms without robust priming and sealing, but in the dry environments of dining rooms and hallways it performs flawlessly.
Primed pine and poplar lumber represent the solid wood alternatives. Pine is softer and more affordable, while poplar is harder, more resistant to denting, and takes paint with exceptional smoothness. Both species are available in the flat stock profiles needed for board and batten at most lumber yards. Solid wood provides a more substantial feel under the hand and produces a slightly crisper shadow line at the batten edges compared to MDF. However, solid wood is more susceptible to seasonal expansion and contraction, which can open gaps at joints if the wood is not properly acclimated before installation. Allow lumber to sit in the room where it will be installed for at least 72 hours before cutting and mounting, so that its moisture content equilibrates with the indoor environment.
The National Association of Home Builders recommends pre-priming all surfaces of every piece, including cut ends and back faces, before installation. This encapsulation prevents moisture absorption from the wall side, which is the most common cause of post-installation warping and paint failure. Use a quality primer-sealer rated for the material; MDF requires a primer formulated to seal its porous edges, while solid wood benefits from a stain-blocking primer that prevents knot bleed-through. Priming is the least exciting step of the project but arguably the most important for long-term performance.
Adhesive and fastener choices depend on the wall surface and the material weight. Construction adhesive applied in a continuous bead along the back of each piece provides the primary bond, while 18-gauge brad nails secure the material while the adhesive cures. The combination of adhesive and nails creates a hold stronger than either method alone and allows the use of smaller, less visible nail holes. For MDF, which is denser and heavier than pine, ensure your construction adhesive is rated for porous and non-porous surfaces, as MDF's sealed factory face can resist adhesion if the wrong product is used. Fill all nail holes with lightweight spackle after installation, sand flush, and prime again before the finish coat.
Installation Process from Start to Finish
Preparation begins with removing existing baseboard and any outlet covers or switch plates on the walls receiving treatment. Number each piece of baseboard with painter's tape on the back so you can reinstall it in the same position if it is being reused. If the existing baseboard is thin or dated, this is an excellent opportunity to upgrade to a taller, more substantial profile that integrates with the new wainscoting. Mark the desired wainscoting height on the wall at multiple points using a laser level, and snap a chalk line connecting the marks to establish the cap rail line. This line is your primary reference for every subsequent measurement.
Install the flat boards first. If using half-inch MDF panels, cut them to the height of the wainscoting minus the thickness of the cap rail and minus the height of the baseboard. Apply construction adhesive to the back in a zigzag pattern, press the panel firmly against the wall, and secure with brad nails at 12-inch intervals along the top and bottom edges and at each stud location. Butt panel edges tightly together; the battens will cover these seams, so perfection at the joints is unnecessary. What matters is that the panels are flat against the wall and their top edges align precisely with the chalk line.
Battens go on next. Starting from one corner of the wall, position the first batten vertically, tight against the corner, and check it for plumb with a level. Apply adhesive to the back, press into place, and nail at the top, bottom, and middle. Move to the opposite corner and install a matching batten there. Then measure the distance between the two corner battens and divide by your chosen spacing interval to determine the number of intermediate battens. Mark their positions along the chalk line and the baseboard line, and install each one with adhesive and nails, checking plumb on every piece. A batten that is even slightly off-plumb will be visible from across the room, so this step demands patience.
The cap rail completes the horizontal top edge. This is a flat piece, typically the same width as the battens or slightly wider, installed horizontally along the chalk line to cap the top edge of the panels and battens. Some designs add a small shelf profile to the cap rail, a quarter-round or cove molding beneath the flat cap, that creates a shadow line and a slight ledge. Others use a simple flat board for a clean, modern look. The cap rail must be perfectly level; it is the most prominent horizontal line in the installation and the first element the eye evaluates. Apply adhesive, nail into studs wherever possible, and fill and sand all nail holes before painting.
Painting and Finishing for a Professional Result
The finish coat is where board and batten wainscoting either succeeds or fails visually. Every imperfection in filling, sanding, and priming becomes visible under paint, and the repetitive vertical pattern of the battens magnifies inconsistencies because the eye naturally compares one batten to the next. Begin by filling every nail hole, seam, and gap with lightweight spackle, then sand each filled area flush with 150-grit sandpaper once dry. Run your hand across every surface feeling for bumps or ridges that your eyes might miss. A second fill-and-sand pass is often necessary at joints where MDF panels meet, as spackle shrinks slightly during drying.
Apply a coat of high-quality primer to the entire installation, covering all filled areas, cut ends, and any spots where the factory primer was scratched during handling. Allow the primer to dry fully, typically two to four hours for latex primer, then lightly sand the entire surface with 220-grit sandpaper to knock down any raised grain or dust particles trapped in the primer. Wipe down with a tack cloth before proceeding to the finish coat. This sanding step between primer and finish is what separates a professional-looking result from an amateur one, and skipping it is the most common finishing mistake in DIY wainscoting projects.
For the finish coat, use a semi-gloss or satin sheen paint in an acrylic-alkyd hybrid or high-quality latex formulation. Semi-gloss is the traditional choice for wainscoting because its slight reflectivity emphasizes the shadow lines that give board and batten its dimensional character, and it cleans easily, which matters in dining rooms and hallways where walls are subject to contact from chairs, hands, and passing bodies. The Paint Quality Institute recommends a minimum of two finish coats for trim and wainscoting, with light sanding between coats, to achieve the smooth, opaque coverage that makes the installation look permanent rather than applied.
Color choice divides into two camps. White and off-white wainscoting is the most popular and most versatile option, creating a clean backdrop that pairs with virtually any wall color above. This classic combination, white below and a saturated color above, is the reason board and batten appears so frequently in design publications; it photographs well and it works in nearly every room. The alternative is painting the wainscoting in the same color as the upper wall, which creates a monochromatic treatment that emphasizes texture over color contrast. This tone-on-tone approach feels more contemporary and works particularly well with deeper, moodier colors like forest green, navy, or charcoal, where the shadow lines of the battens create subtle dimensional variation within a single hue. The Better Homes and Gardens design team frequently showcases both approaches, noting that the two-tone treatment adds formality while the monochromatic approach adds sophistication.
Styling the Finished Space
Wainscoting in the dining room creates a natural division that simplifies wall decor decisions. The upper wall becomes a defined zone for art, mirrors, or sconces, while the wainscoting provides a textured lower band that needs nothing additional. This division reduces the visual decision-making from a full wall to a half wall, which most homeowners find liberating rather than limiting. A single large piece of art centered on the upper wall, or a pair of sconces flanking a mirror, sits naturally within the bordered space that the cap rail creates. The American Society of Interior Designers notes that rooms with wainscoting tend to require fewer decorative accessories because the wall treatment itself provides the visual complexity that bare drywall lacks.
Dining chair rails and wainscoting cap rails serve a dual function when their heights align. If your dining chairs will be positioned against wainscoted walls, setting the cap rail height at or slightly above the top of the chair back prevents the chairs from damaging the upper wall surface. This practical alignment is the historical origin of the chair rail itself, a protective molding installed at chair-back height to prevent furniture from scuffing plaster walls. Maintaining this functional relationship in your design ensures the wainscoting serves its original protective purpose alongside its decorative one.
Hallway wainscoting benefits from the addition of hooks, small shelves, or narrow picture ledges mounted into the upper wall zone above the cap rail. These functional additions take advantage of the architectural framework the wainscoting establishes, creating organized landing spots for coats, keys, and family photographs. The cap rail itself can serve as a subtle ledge for very small items, though this depends on its width and profile. A hallway that combines board and batten with a row of matching hooks above the cap rail becomes a genuine mudroom alternative for homes that lack a dedicated entry utility space.
Lighting interacts powerfully with board and batten wainscoting. Wall sconces mounted on the upper wall cast light downward across the batten surfaces, creating pronounced shadow lines that dramatize the vertical pattern. This effect is particularly striking in hallways lit primarily by sconces rather than overhead fixtures. The deeper the battens project from the wall surface, the more dramatic the shadow effect. Sconces with warm-toned bulbs, in the 2700K to 3000K color temperature range, further enhance the warmth and texture of painted wood surfaces. Consider your lighting plan as an integral part of the wainscoting design rather than an afterthought, because the interplay between light and shadow is a significant part of what makes this wall treatment visually compelling.
Conclusion: A Weekend Project with Lasting Impact
Board and batten wainscoting occupies a rare position in home improvement: it is genuinely achievable as a weekend DIY project, yet it delivers a visual impact that reads as professional renovation. The materials are affordable, the tools required are basic, and the techniques involved, while demanding care, do not require specialized training. A homeowner with a miter saw, a brad nailer, a level, and a willingness to sand thoroughly can transform a dining room or hallway in two focused days of work.
The design decisions, height, spacing, batten width, and finish, deserve more deliberation than the installation itself. Spend time with painter's tape on the wall, marking proposed batten positions and cap rail height, before purchasing a single piece of lumber. Live with the tape for a few days and observe how the proposed proportions interact with your furniture, your lighting, and your daily movement through the space. This low-cost, fully reversible planning step prevents the most common regret in wainscoting projects: discovering after installation that the height or spacing feels wrong in the lived experience of the room.
The return on this investment extends beyond aesthetics. Board and batten wainscoting protects wall surfaces from the scuffs, dings, and marks that dining rooms and hallways inevitably accumulate. It increases perceived home value in the eyes of prospective buyers. And it provides a finished architectural backdrop that simplifies every future decorating decision in the room, because the walls themselves are already doing significant visual work. Few home improvements offer this combination of low cost, manageable difficulty, and outsized impact.
Measure your dining room or hallway this evening, sketch a rough layout with your preferred batten spacing, and visit your local home improvement store this weekend to price the materials. For most rooms, the total material cost falls between $150 and $400, a modest outlay for a transformation that will improve every day you spend in the space. The tools you need are likely already in your garage, and the skills you need are patience, precision, and a steady hand with a paintbrush.
More Articles You May Like


Comments
Post a Comment