Pegboard Inside Cabinet Doors For Lid Storage Organization
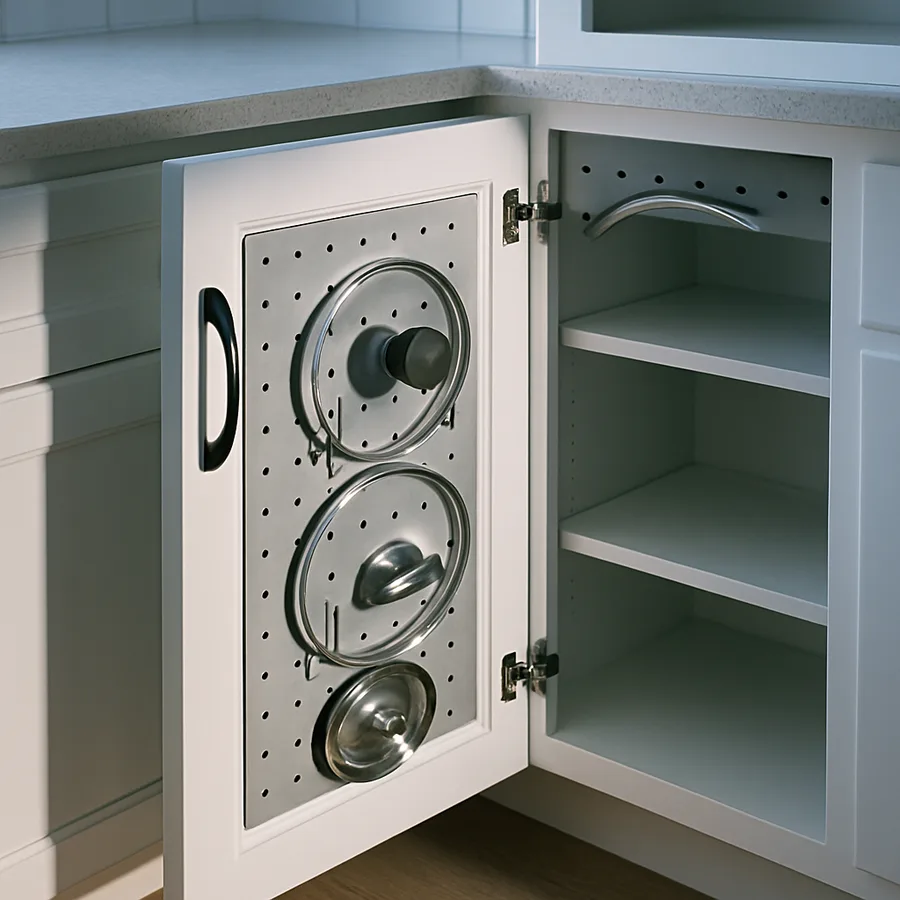
Pot lids occupy a strange place in the kitchen taxonomy. They are flat, they are bulky, they nest poorly, and they multiply silently. Most homes end up with one of two coping strategies: a chaotic pile inside a base cabinet that collapses every time you reach for a lid, or a wire rack solution that almost works but always rattles. A pegboard mounted to the inside of a cabinet door is the third option, and once you live with it for a few months, the other two start to feel embarrassing.
The idea is simple. A pegboard panel, fixed to the inside face of a cabinet door, hosts movable pegs sized to cradle lids vertically. Lids hang by their handles, knobs, or rims. They become visible, individually accessible, and silent. The execution, however, requires some judgment: material selection, door clearance, peg geometry, weight distribution, and hinge compatibility all matter more than the Pinterest version of this project suggests. Get them right and the result feels custom and inevitable. Get them wrong and you end up with a sagging door and a panel of useless pegs.
Why Inside-Door Pegboard Solves The Lid Problem Specifically
Vertical lid storage in pull-out drawers and dividers works well for matched sets but breaks down across mixed cookware. The pegboard approach is geometry-agnostic: a tiny Lodge skillet lid, a wide stockpot lid, and a saute pan lid can all share the same panel, each occupying exactly the pegs that fit. There is no wasted vertical column and no fixed slot width to game.
Inside-door real estate is also the most underused storage surface in a typical kitchen. The National Kitchen and Bath Association (NKBA) has estimated, in published efficiency studies, that the inside faces of base and upper cabinet doors represent roughly 12 to 18 percent of total cabinet surface area, and that under 5 percent of that surface is actively used in most homes. Pegboard installations convert that dead surface into prime, eye-level access without consuming any shelf volume.
Acoustically, pegboard plus felt-padded pegs is the quietest lid storage solution available. Wire racks rattle, drawer dividers clack, stacked lids slide and crash. A snug peg against a padded face does not move and does not make noise. For households where the kitchen is open to a living area, this acoustic advantage compounds the ergonomic one.
There is also a workflow argument that often gets overlooked. Lids stored on the inside of the cabinet door that already holds the matching pots create a single-motion retrieval: open the door, grab the pot with one hand, lift the lid off its peg with the other. Drawer-based lid storage forces a separate motion in a separate location. Over thousands of cooking events, that ergonomic improvement is real even if it sounds trivial.
Choosing The Right Pegboard Material
Four pegboard materials dominate the inside-door application, and they are not interchangeable.
Hardwood pegboard (usually 1/4 inch baltic birch or maple) is the premium choice. It looks intentional, holds peg holes with minimal wear, and accepts finish to match cabinetry. Quality hardwood pegboard typically weighs 1.2 to 1.6 pounds per square foot. Drilled hole spacing of 1 inch on center is the most flexible, though 1.5 inch spacing reads cleaner and works for most lid collections.
Wegner-style pegboards in white oak or walnut, sold by specialty retailers, have made this approach mainstream in the past five years. They are expensive ($90 to $250 per panel) but visually striking when the cabinet is opened. The aesthetic effect of a beautifully finished pegboard inside a quietly anonymous cabinet exterior is genuinely surprising the first time you see it, and it has become a signature move in furniture-grade kitchen design.
Tempered hardboard pegboard is the budget option: $15 to $30 for enough material to cover several doors. It is lighter than hardwood and accepts paint well. The trade-off is hole wear: pegs work loose over time, particularly with heavier lids. Acceptable for light-duty applications and rentals.
Steel pegboard with magnetic or clip-in pegs offers the strongest load capacity and the cleanest industrial look. Häfele and several European cabinet brands offer these as accessory panels. Weight is the issue: a 24-inch steel panel can add 4 to 6 pounds to a cabinet door, which stresses hinges.
HDPE or thermoformed plastic pegboard is the lightest option and the easiest to clean. Visually it reads as utilitarian, which works in pantries but feels out of place in a furniture-grade kitchen. Plastic pegboards also have the lowest hole-retention strength, which limits the size of lid they can hold without peg pull-out.
Did you know hinge ratings constrain everything?
Most concealed hinges from Blum are rated for cabinet doors weighing 11 to 22 pounds, depending on the specific model and door height. Adding 6 pounds of pegboard and 8 pounds of lids to a door that already weighs 12 pounds can exceed the hinge rating, leading to sag within months. Verify the hinge specification before committing to a heavy steel pegboard installation. Three-hinge installations, or hinges from Blum's CLIP top BLUMOTION heavy-duty range, can typically handle the load if specified correctly.
Layout, Peg Geometry, And Weight Distribution
A pegboard panel is only as useful as its layout. The most common mistake is hanging lids randomly and discovering that the door no longer closes because the lids project past the cabinet face frame.
Measure the inside-door clearance first. From the door's inside surface to the nearest obstruction inside the cabinet (typically a shelf edge or the face-frame stile), most installations have between 1.5 and 2.5 inches of usable depth. Lid handles often project 1 to 1.5 inches, so the math gets tight quickly. Glass lids with tall knobs are the constraint that decides whether this project is feasible in your specific cabinet.
Peg geometry matters more than peg count. Two pegs at the bottom (cradling the lid's lower rim) plus one peg at the top (capturing the knob or handle) is the canonical three-peg layout per lid. It is stable, silent, and visually clean. Some installations use a single horizontal dowel for the knob and rely on gravity for the rim, but this configuration shifts during door movement.
Distribute weight low and center. The hinges feel torque, not just weight, so a 5-pound lid mounted near the top of the door applies more leverage to the upper hinge than the same lid mounted near the bottom. Häfele's hinge specification documents include published torque tolerances that are worth reading once.
Color-code or zone the panel if you have many lids. Group lids by pot type (saucepans on the left, skillets on the right, lids for the Dutch oven and stockpot at the bottom where their weight belongs). This sounds fussy but pays back every single time you cook: visual scanning to the right zone takes a fraction of a second compared with scanning a randomly populated panel.
Installation Sequence That Avoids The Common Pitfalls
The installation itself is the easy part if done in the right order, and a chronic source of frustration if rushed.
Start by removing the cabinet door entirely. Working with the door on a flat surface is dramatically easier than reaching into a cabinet, and it is the only way to drill accurate, perpendicular peg holes. Mark the hinge cup positions before removal so reinstallation goes smoothly.
Lay out the pegboard panel on the door with painter's tape, simulating the lid positions before any holes are drilled. Open the cabinet, place the panel, and confirm that the door still closes with the largest lid in its intended position. If clearance is tight, mount the panel lower on the door rather than centered. Adjust the peg layout to keep tall-knob lids near the bottom where the door swing arc has slightly more interior clearance.
Use threaded inserts or T-nuts for any peg likely to bear significant load. Wood-on-wood peg friction loosens over time, particularly with daily use. Threaded hardware costs a few dollars and adds decades to the installation's useful life.
Pad the pegs. A small felt or silicone bumper at the peg tip eliminates the click of lid against wood. The American Society of Interior Designers (ASID) has consistently flagged ambient kitchen noise as one of the most under-appreciated factors in livability ratings, and small acoustic details like this disproportionately affect daily satisfaction.
Reinstall the door, adjust the hinges to compensate for the added weight, and confirm that the door swings, holds, and closes the way it did before. If the door now sags or fails to stay open at 90 degrees, the hinges need upgrading before lids go on the panel.
Live with the panel empty for a day before loading it. Open and close the cabinet a few dozen times. Listen for any rub or rattle. The empty panel is the best diagnostic for installation problems; adding lids only masks the issues. If everything still feels right after a day, load the lids in their planned zones and you are done.
Quick Reference
Use this section to decide whether and how to proceed.
- Best material for furniture-grade kitchens: 1/4 inch baltic birch pegboard, oiled or finished to match the cabinet interior.
- Best material for rentals or pantries: tempered hardboard pegboard, painted to match the cabinet color.
- Avoid steel pegboard on doors where hinge load is already near specification, or on doors taller than 30 inches without confirming hinge ratings.
- Peg layout per lid: two pegs cradling the rim, one peg capturing the knob or handle. Pad every peg with felt or silicone.
- Verify clearance: measure door-to-shelf depth, then measure the tallest lid knob. Subtract. If under 1/2 inch margin, the project is not feasible in that specific cabinet.
- Hinge check: consult the published rating for your hinge model, weigh the door plus pegboard plus all anticipated lids, confirm you are within specification.
- Zoning: group lids by pot type or size. Heaviest lids at the bottom of the panel to minimize hinge torque.
- Tools: drill press or guided hand drill for perpendicular holes, painter's tape for mockup, threaded inserts for high-load pegs.
For published hinge ratings and accessory panels, see Häfele and Blum. For broader kitchen storage planning that accounts for cabinet door usage, the published efficiency frameworks from NKBA provide the most useful structure.
Pick one cabinet door this weekend, measure its clearance, and prototype a pegboard panel with painter's tape and the actual lids you own. Twenty minutes of mock-up will tell you whether this is the right solution for your specific kitchen before you spend a dollar. If the prototype works, expand the approach to a second and third cabinet over the following month. By the end of a season your lid problem is permanently solved and one of the most-overlooked surfaces in your kitchen has become one of its most useful.
More Articles You May Like



Comments
Post a Comment