GFCI Outlet Replacement For Bathroom And Kitchen Safety
The small test and reset buttons on a bathroom outlet are easy to ignore, but the device behind them quietly performs one of the most important safety functions in your home. A ground-fault circuit-interrupter, or GFCI, monitors the current flowing out on the hot conductor and returning on the neutral. If it detects even a tiny mismatch, on the order of five milliamps, it assumes that current is leaking through an unintended path, such as a person standing on a wet floor, and it shuts off the circuit in milliseconds.
That speed is the difference between a startling shock and a fatal one. GFCIs do wear out, however, and they are required in more locations than many homeowners realize. Replacing them is well within the reach of a careful do-it-yourselfer, but only when the work is done with the circuit verified de-energized and with attention to a few details that the average instruction insert glosses over. This guide walks through code requirements, the tools you actually need, a clean replacement procedure, and how to verify the new device performs correctly.
What A GFCI Does And Why It Matters In Wet Areas
Standard outlets and breakers protect against overcurrent and short circuits, but not against ground faults, which are the leakage currents that flow when a person becomes part of the electrical path. A hair dryer dropped in a sink, a coffee maker with a cracked cord on a wet counter, or a curling iron with a frayed plug can all create that scenario. A GFCI is designed specifically for these conditions and trips long before the current reaches a dangerous level for the human body.
The Electrical Safety Foundation International notes that GFCIs have prevented thousands of electrocutions since they were first required in residential bathrooms in the early 1970s. The Consumer Product Safety Commission estimates that GFCIs have cut the number of household electrocutions by more than half over the past several decades. Those are not numbers you can ignore when deciding whether to take an existing receptacle seriously.
Bathrooms and kitchens are wet locations or near-wet locations, which dramatically increases the chance of an unintended path to ground through a person. That is why the National Electrical Code singles them out. If you are buying or remodeling a home and find ordinary outlets in these rooms, that is a clear sign the wiring has not been updated to current standards.
Where The Code Requires GFCI Protection
The National Electrical Code, published by the National Fire Protection Association, has steadily expanded GFCI requirements over decades. In a modern home, GFCI protection is required for all 125 volt, single-phase receptacles serving bathrooms, kitchens, garages, unfinished basements, crawl spaces, outdoor areas, laundry areas, and within six feet of any sink, tub, or shower. Newer code cycles have extended protection to dishwashers, laundry equipment, and some specific dwelling-unit appliance circuits.
Local jurisdictions adopt the NEC at different paces, so the exact code in force in your town may be a few years behind the latest published edition. Even when local rules trail the code, retrofitting GFCIs in wet areas is almost always allowed and almost always a good idea. If you have older homes with two-wire ungrounded circuits, you can legally install a GFCI in place of a two-prong outlet and label it "No Equipment Ground," which provides shock protection without requiring a full rewire.
Have you walked through your home counting outlets within six feet of water? Most homeowners are surprised by how many fall within that radius. Take ten minutes with a tape measure and make a list before you start buying parts. The list will tell you whether you need two devices or twelve.
Worth understanding too: the six-foot rule is measured around the obstacle, not in straight line. An outlet on the opposite side of a half-wall is still within six feet of the sink if the cord could physically reach the water. That nuance trips up many homeowners measuring with a tape and missing the obvious cord-routing path a child or a curious pet might create. When in doubt, err toward protecting the outlet. There is no penalty for installing extra GFCI protection, but the cost of skipping a marginal location can be catastrophic.
Tools And Materials For A Clean Replacement
You do not need a truck full of equipment to replace a GFCI, but a few specific tools make the job dramatically safer and easier. Start with a non-contact voltage tester and a separate plug-in outlet tester with a GFCI trip button. The two work together: the non-contact tester confirms the wires inside the box are dead before you touch them, and the plug-in tester verifies the new device is wired correctly and trips on demand after installation.
Beyond testers, you want a quality flat-head and Phillips screwdriver, a pair of linesman pliers, a small set of wire strippers calibrated for 12 and 14 AWG copper, and electrical tape. A flashlight or headlamp is essential since you will turn off the circuit you are working on. If your boxes are crowded, a pair of needle-nose pliers helps tuck conductors back into place.
Choose your receptacle deliberately. For most kitchens, the small-appliance circuits are 20 amps, so you want a 20 amp GFCI receptacle wired with 12 AWG conductors. Bathrooms are usually on dedicated 20 amp circuits in modern homes but may be 15 amps in older construction. Verify the breaker rating before buying. Many quality GFCIs are also tamper-resistant, satisfying NEC requirements that aim to prevent objects from being inserted into the slots.
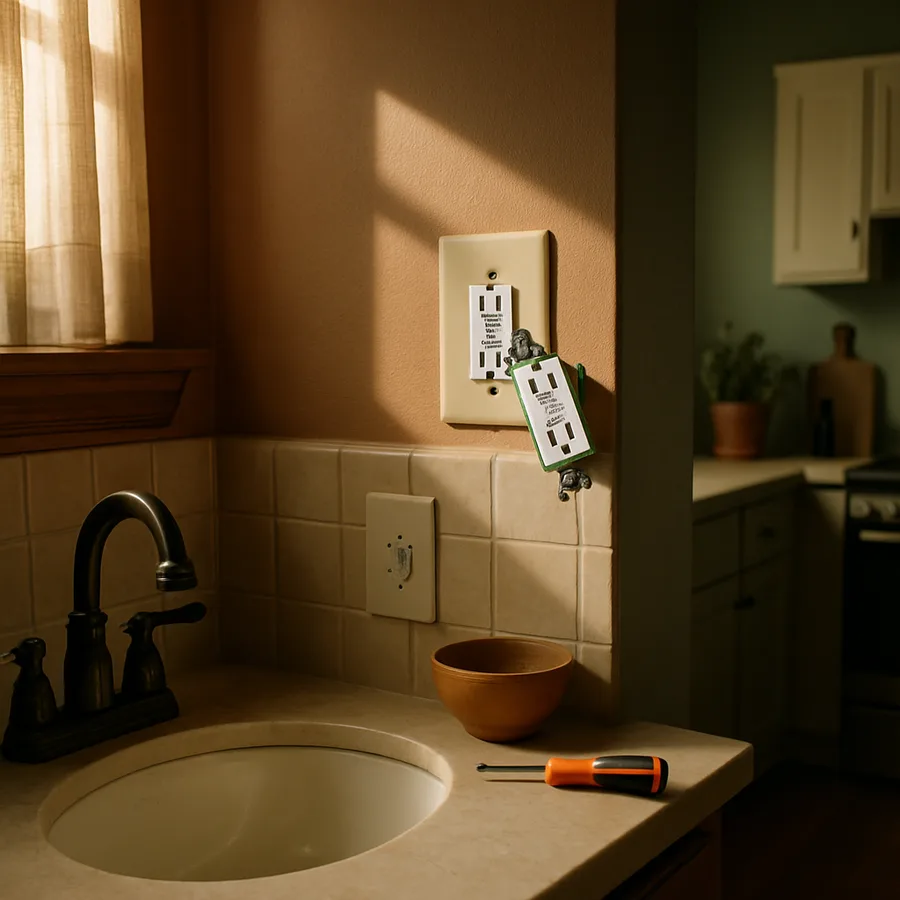
Step-By-Step Replacement Procedure
Start by identifying the breaker that controls the circuit you intend to work on. Turn it off and verify the outlet is dead using a lamp or a plug-in tester. Then use a non-contact voltage tester at the outlet itself before removing the cover plate, after removing the plate, and again after pulling the receptacle out of the box. Verifying at three points greatly reduces the chance that a shared neutral or mislabeled breaker bites you.
Remove the cover plate and the two screws holding the receptacle in the box. Gently pull the device forward and note how it is wired. Most outlets have a line set of conductors bringing power in and may or may not have a load set sending power downstream to other outlets. GFCIs handle this distinction explicitly, with separate terminals labeled LINE and LOAD. Wiring the line conductors to the load side is the most common mistake, and the result is a GFCI that appears live but does not trip.
Connect the incoming hot and neutral to the LINE side, and any downstream conductors to the LOAD side. Connect the bare or green ground to the green screw. Tighten all terminals firmly, fold the conductors neatly into the box, secure the device with its mounting screws, and reinstall the cover plate. Restore power at the breaker and use the plug-in tester to verify correct wiring and GFCI operation.
Common Wiring Mistakes And How To Avoid Them
Beyond the line and load mix-up, several other mistakes appear repeatedly in residential GFCI installs. Loose backstabbed connections, where conductors are pushed into spring-loaded holes on the back of the device, are a frequent source of intermittent failure and overheating. Always use the screw terminals on the side of the receptacle. Hook each conductor clockwise around the screw so tightening pulls the wire tighter, not looser.
Reversed polarity is another classic mistake. The hot conductor goes to the brass screw and the neutral to the silver screw. Reversing these can damage equipment plugged into the outlet and can cause some test routines to give misleading results. The plug-in outlet tester will indicate reversed polarity with a specific light pattern.
Crowded boxes also cause trouble. GFCI receptacles are deeper than standard ones, and a 1.5 inch deep box originally sized for a 2-wire connection may not have room for a modern GFCI with both line and load conductors. If conductors are crammed, consider installing a deeper old-work box or moving the GFCI protection to the breaker by installing a GFCI circuit breaker in the panel.
Some installers wire the device perfectly but skip the post-installation test. Always press the test button after closing up the box, not before, because vibration during installation can occasionally cause an internal contact to shift. A GFCI that tests fine on the bench but fails in the wall is exactly the kind of bug that real-world conditions surface. Building the test step into your closing routine is the simplest way to catch it before the device is forgotten behind a cover plate for a decade.
Testing, Labeling, And Ongoing Maintenance
Once installed, press the test button on the GFCI. The reset button should pop out and the outlet should lose power. Verify with a plug-in tester or a small lamp. Press reset to restore power. If anything is plugged into a downstream outlet that should also lose power, test those as well. This confirms the load side is wired correctly and that downstream protection is real, not theoretical.
Label any downstream outlets with the small "GFCI Protected" stickers usually included in the box. This is required by code when the GFCI controls outlets that are not themselves obvious. It is also helpful for anyone troubleshooting later, especially if a refrigerator or freezer is on a downstream outlet that has tripped during a vacation.
The National Electrical Manufacturers Association recommends testing GFCIs monthly with the built-in test button. Modern GFCIs include a self-test feature, but the manual test is still the gold standard. Have you actually tested every GFCI in your home this month? Walking through with a timer and pressing the test button on each device takes only a few minutes and tells you a lot about the state of your safety devices.
Older GFCIs from the 1980s and 1990s can develop a sneaky failure mode where the test button still pops the reset, but the actual ground-fault detection circuitry has degraded. A plug-in tester with a dedicated GFCI trip button bypasses the manual test path and applies a real fault current, which is the definitive check. If a GFCI passes the manual button but fails the plug-in trip test, it's time to replace it. Devices manufactured after the mid-2000s include internal self-test logic that catches this drift automatically and locks the receptacle into a tripped state if it can no longer protect, but older devices have no such safeguard and rely entirely on a homeowner who remembers to test.
Keep a small inventory sheet listing every GFCI in your home with its install date and last test result. This sounds excessive for a small device, but in a typical house there are six to twelve GFCIs scattered across kitchens, bathrooms, garages, basements, and outdoor areas, and a year passes quickly. The list also helps when you sell the house, because buyer inspectors routinely flag aging or non-functional GFCIs as items requiring attention before closing.
Conclusion
GFCI outlets are one of the great quiet successes of residential electrical safety, transforming kitchens and bathrooms from places of preventable tragedy into routine spaces where electricity and water can coexist without serious risk. Replacing aging GFCIs and adding protection where none exists is an inexpensive upgrade with a clear, evidence-backed reduction in shock and electrocution hazard. The work itself is approachable for a careful homeowner, provided you treat live electrical work with the seriousness it deserves.
The most common failure mode is not a dramatic mishap but a slow degradation: the test button still pops but the trip threshold drifts, or the indicator light fails, or the device sits in a faulted state that the homeowner has learned to ignore. Routine monthly testing catches these cases early. Pair that habit with a clear inventory of every GFCI in your home and a willingness to replace any that fail the test, and you will keep the protection layer healthy for decades.
If you find this work intimidating, hire a licensed electrician for the first installation and watch carefully. Most are happy to walk you through the steps, point out box conditions, and recommend specific brands they have had success with. Then, the next time a GFCI begins to feel stiff or flickers a status light, you will be ready to handle it yourself. Either way, take a few minutes this weekend to test every GFCI in your home and confirm the safety net is still there when you need it.
More Articles You May Like


Comments
Post a Comment