
Cabinet Toe Kick LED Lighting Step By Step Installation
Cabinet Toe Kick LED Lighting Step By Step Installation
Toe kick lighting is one of the most transformative low-cost upgrades a homeowner can add to a kitchen renovation. The narrow recess beneath base cabinets is normally a dark dust trap, but a thin run of LED tape light turns it into a floating glow that reads as luxury at a fraction of the cost of a full cabinet refresh. The National Kitchen and Bath Association notes that layered lighting is now a top-three feature requested in remodels, and toe kick fixtures are the easiest layer to add after the cabinets are already set.
This guide walks through a complete installation from planning to power-up. You will measure the run, choose the right LED density, pull a low-voltage feed from a nearby outlet, mount the strip with a diffused channel, and test the circuit before you replace the toe kick face. The whole job takes a careful homeowner roughly three to four hours and costs between one hundred and two hundred dollars in materials. Have you ever stepped into a dim kitchen at night and reached blindly for the switch? Toe kick lighting solves exactly that problem.
Why Toe Kick Lighting Matters In A Modern Kitchen
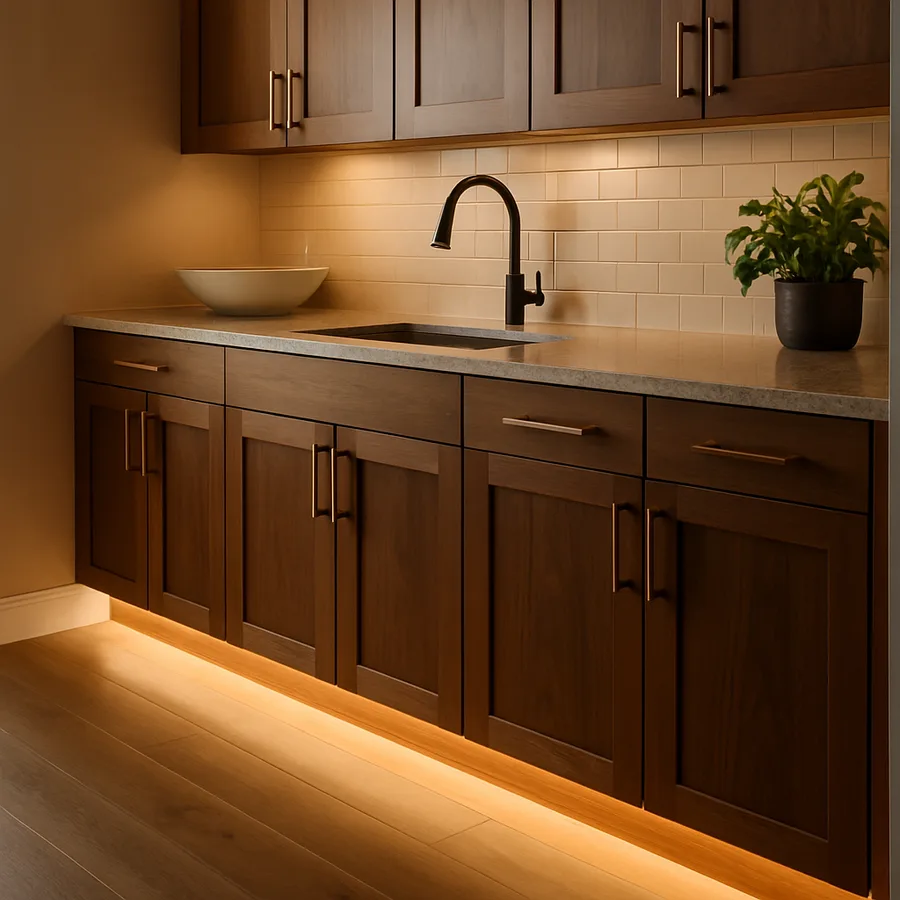
The toe kick recess sits between three and four inches tall and roughly three inches deep. That void is invisible from a standing eye line, which makes it the perfect place to hide a light source. When the strip is recessed properly, you see only a clean wash of light spilling onto the floor, never the diodes themselves. The effect mimics architectural cove lighting, which the Illuminating Engineering Society identifies as a high-comfort technique because the eye sees reflected light rather than a hot point source.
Beyond aesthetics, toe kick lighting acts as a true safety layer. A soft three percent output through the night gives you enough visibility to reach the refrigerator without flipping on the harsh overheads that wake the rest of the house. According to the American Lighting Association, dedicated nightlight circuits reduce middle-of-the-night kitchen falls in older adults, and toe kick strips are a discreet way to deliver that function without an obvious plug-in puck.
The third reason this layer matters is resale visibility. Real estate agents repeatedly cite layered kitchen lighting in their staging notes, and a glowing toe kick photographs beautifully in twilight listing shots. Floating cabinets are a continuing trend in luxury kitchens, and toe kick LEDs are the cheapest way to fake the look without rebuilding the base structure.
Tools And Materials You Will Need
Gather everything before the first cut so you do not stop midway with the toe kick removed. You will need a quality 24-volt LED tape light rated at least IP20 for the kitchen environment, an aluminum mounting channel with a frosted lens, a Class 2 driver matched to your total wattage, and a low-voltage dimmer. For tools, plan on a multimeter, wire strippers, a tape measure, a utility knife, a cordless drill with a half-inch spade bit, and a small level.
Avoid the cheapest no-name strips. Look for an LED density of at least sixty diodes per meter, a color rendering index above ninety, and a binned color temperature between 2700K and 3000K for kitchens. ENERGY STAR guidance on residential lighting recommends warm white tones in food preparation spaces because they keep skin tones and produce appearance natural. A higher CRI also makes a real visual difference when the light spills onto a hardwood floor or a tile grout line.
- LED tape light, 24V, 24 watts per five meter reel, 2700K
- Frosted aluminum channel cut to run length
- 60-watt Class 2 LED driver
- Low-voltage rotary or in-wall dimmer
- 22 AWG two-conductor wire for extensions
- Wago lever-nut connectors, butyl-backed mounting tape
Step One Through Three Measure Plan And Pull Power
Begin by measuring the total linear footage of your toe kick run. Most kitchens fall between twelve and twenty-two feet, which is well within a single five-meter reel. Skip the sink base if the cabinet sits over a plumbing wall, because moisture and food spatter will eventually find any seam. Sketch the path on paper, marking corners where the strip will need to be cut and rejoined with a corner clip.
Next, identify your power source. The cleanest option is to tap a switched circuit from an existing under-cabinet feed if one exists. If not, pull a discreet line from the nearest unswitched outlet inside a base cabinet, route it down through a half-inch hole in the cabinet floor, and bring it forward to the toe kick void. Always confirm the circuit at the panel with a multimeter before opening any junction. The National Electrical Code section 411 governs low-voltage lighting systems, and your Class 2 driver provides the required isolation so the LED side never carries line voltage.
Test the run dry before you commit to adhesive. Plug the driver into the outlet, connect the strip with temporary clips, and verify that the full length lights evenly. A dim tail at the end of the run means voltage drop, and you will need to feed both ends or split into two parallel runs from the driver. Did your strip flicker at low dim? Swap the dimmer for a forward-phase low-voltage model rated for LED loads.
Step Four Through Six Mount Wire And Diffuse
Cut the aluminum channel to length using a fine-tooth hacksaw, then deburr the ends. Pre-drill mounting holes every twelve inches and screw the channel to the underside of the base cabinet frame, set back roughly half an inch from the front face of the toe kick. This setback is critical because the light needs to wash the floor in front of the cabinet, not glare straight back at the kick board.
Peel the adhesive backing on the LED strip in six-inch sections as you press it into the channel, keeping the diodes facing down and the lead wires routed toward your driver location. Resist the temptation to bend the strip sharply at corners. Instead, cut at the marked scissor lines and rejoin with two-conductor solderless clips or, for a more reliable joint, solder twenty-four-gauge wire bridges and seal with heat shrink. The Department of Energy estimates that quality LED strips deliver up to fifty thousand hours of life, but only when junctions are mechanically sound.
Snap the frosted lens into the channel last. The diffuser is what separates an amateur installation from a finished result. Without it you will see a chain of bright dots on the floor. With it, you see a continuous ribbon of light. Diffusion matters more than diode count when the strip is mounted at floor level.
Wiring The Driver And Dimmer Safely
The driver is the heart of the system and the component that most homeowners underbuy. Calculate your total wattage by multiplying the strip wattage per foot by your run length, then add a twenty percent safety margin. A sixteen-foot run of a five-watt-per-foot strip needs roughly eighty watts of capacity from the driver, so size up to a one hundred watt unit rather than running the driver at the ceiling of its rating. An undersized driver runs hot, hums audibly under dimming, and dies in under a year.
Mount the driver inside a vented base cabinet, never inside a sealed toe kick void where heat cannot escape. Connect the line-voltage side to a junction box if hardwired, or simply plug it into a switched outlet if you chose a plug-in design. On the low-voltage side, match polarity carefully. Reverse polarity will not damage the strip in most cases, but it will prevent the run from lighting until corrected.
For dimming, choose a low-voltage dimmer compatible with your driver. Triac dimmers work with most forward-phase drivers, while ELV dimmers pair with reverse-phase drivers and deliver smoother low-end control. The American Lighting Association recommends testing the dim curve before final installation because some pairings flicker below twenty percent output, which is exactly the range you want for nighttime use.
Troubleshooting And Long Term Care
Most failures trace back to three causes: heat, moisture, and bad connections. If a section of the strip dims or shifts color over time, check whether the channel is venting properly. Aluminum channels act as a heatsink and they are not optional on runs longer than eight feet. If a section goes completely dark, suspect a solder joint or a clip that has loosened from vibration. Pull the diffuser, wiggle each junction, and watch for the failure point.
Clean the diffuser every few months with a microfiber cloth and a drop of dish soap. Kitchen toe kicks accumulate a surprising amount of cooking grease aerosol, and a hazy lens loses ten to fifteen percent of its output. Have you noticed your toe kick lighting looking dimmer than it did at install? It is almost always the lens, not the diodes.
Plan for replacement at year ten. Even premium strips lose roughly thirty percent of their initial lumens by the fifty-thousand-hour mark, per Department of Energy lifetime testing, and replacement strips have become dramatically cheaper. Save the channel and driver, swap only the tape, and the second installation takes thirty minutes instead of an afternoon.
Smart Control And Integration With Whole Home Lighting
A modern toe kick installation does not have to live as an isolated dimmer on the wall. Pairing the low-voltage driver with a smart switch or a hub-connected dimmer turns the strip into a programmable scene that responds to the time of day and the activity in the room. The American Lighting Association reports that smart residential lighting adoption has more than doubled in the last five years, and toe kick zones are among the most popular candidates for automation because the desired output level changes dramatically between morning, evening, and overnight use.
Practical scenes are easy to build. A morning preset can bring the toe kick to thirty percent as the overhead recessed lights ramp up alongside it, giving the kitchen a warm pre-dawn glow without harsh contrast. An evening preset can take the toe kick to fifteen percent while the overheads sit at sixty percent, creating a layered ambient look for dinner prep. An overnight preset can hold the strip at three percent from midnight to dawn, acting as a low-glare path light for late visits to the refrigerator. The Department of Energy estimates that scene-based residential lighting reduces total energy use by ten to twenty percent compared with manual switching.
If you are building a new smart home, specify a low-voltage smart driver from the start rather than retrofitting a smart dimmer onto a standard driver. Smart drivers communicate directly with the LED load and produce smoother dim curves than smart switches paired with dumb drivers. Have you ever set a perfect dim level on a smart bulb only to watch it flicker through the bottom of its range? The driver mismatch is almost always the cause, and a properly specified low-voltage system avoids the problem entirely.
Conclusion
A toe kick LED installation rewards careful planning more than expensive parts. The cabinetry was already set when you began, so the entire job is about respecting the small geometry of the recess, the heat profile of the driver, and the polarity of the low-voltage feed. Take the time to dry-fit the run before you commit any adhesive, and you will avoid the most common rework headaches. The result is a quiet luminous baseline that makes the rest of the kitchen feel intentional.
The cost-to-impact ratio of this upgrade is hard to beat. For under two hundred dollars in materials and an afternoon of careful work, you add a layered lighting effect that designers charge thousands of dollars to specify in new builds. The strip pulls only a few watts at full output and pennies on dim, so the operating cost over a decade is negligible. Pair this layer with quality undercabinet task lighting and a dimmable overhead ambient layer, and your kitchen will perform beautifully at every time of day.
If you are planning a broader kitchen refresh, install the toe kick lighting before the new flooring goes down. Routing the driver feed is far easier when the toe kick boards are off and the subfloor is exposed, and you can hide the line in a way that simply is not possible after the floor is finished. Treat this as the very first lighting decision in your project, not the last.
Ready to start your installation? Pull out a tape measure tonight, sketch your run on the back of an envelope, and order your strip and channel this week. Reference the National Kitchen and Bath Association design guidelines for layered lighting principles, review IES recommended practice for residential interiors for lumen targets, and consult the American Lighting Association for dimmer compatibility lists before you buy.


Comments
Post a Comment