Wall Niches Built Into Drywall for Display Vignettes
A small recessed niche cut into a drywall wall can completely transform a hallway, entry, or bedroom corner. It turns a flat plane into a built-in display, draws the eye to a specific object or composition, and adds architectural depth to a room without consuming any floor space. Unlike a floating shelf or a console table, a wall niche feels permanent, intentional, and quiet. It is the kind of detail that visiting guests notice without quite knowing why the space feels considered. For homeowners with empty stretches of drywall begging for character, a niche is one of the most cost-effective interior upgrades available.
This guide covers how to plan, frame, finish, and light a wall niche that reads as professionally built. We will walk through choosing the right wall and location, the basic framing inside a stud bay, the finish details that separate an amateur cut-in from a refined architectural feature, the lighting options that turn a niche into a focal point, and the styling principles that keep the niche from becoming visual clutter. Whether you are working in new construction or retrofitting into existing drywall, the same principles apply with adjustments for accessibility and demolition.
Choosing the Right Wall and Location
Not every wall accepts a niche gracefully. The best candidates are interior partition walls with simple 2x4 framing, no electrical or plumbing runs, and adequate stud bay depth for the planned recess. Hallways, dining rooms, dressing rooms, primary bedrooms, and powder rooms all tend to offer good niche walls. Exterior walls and walls bordering bathrooms or kitchens often have insulation, vapor barriers, or service runs that complicate or prevent a niche cut.
Stud bay depth determines what is possible. A standard interior 2x4 wall offers about 3.5 inches of recess depth, which is enough for shallow display vignettes of art, small ceramics, candles, and books. A 2x6 wall offers 5.5 inches, comfortable for fuller arrangements and small sculptural objects. Walls with plumbing chases or HVAC runs offer less than the nominal depth and may not work at all. The first step in planning is always to scan the wall with a stud finder that detects pipes and wires, and ideally a small inspection camera through a discreet pilot hole, before committing to a niche location.
Location within the wall matters as much as which wall you choose. The standard rule of thumb places the niche at eye level for an average adult, which is roughly 60 to 65 inches from the floor to the center of the niche. Niches placed higher read as architectural and decorative; niches placed lower work for seated rooms and become a more intimate feature. Have you stood in the room and held a piece of cardboard at various heights to test where the niche should land? That five-minute test consistently reveals the right location more reliably than any drawing or rendering.
Framing the Niche Inside a Stud Bay
The simplest niche fits entirely within a single 14.5 inch wide stud bay, the standard space between studs spaced 16 inches on center. A niche of this width does not require any structural modification beyond cutting the drywall, since the existing studs continue to carry the wall's load. The framing work inside the bay involves only horizontal blocking pieces at the top and bottom of the niche, which provide nailing surfaces for the niche back and finished returns.
For wider niches that span two or three stud bays, the framing becomes more involved. The studs interrupting the niche must be cut and capped with horizontal headers above and sills below, with king studs or cripple studs framing the edges of the new opening. This is similar in principle to framing a small window opening, and the structural rules from the International Residential Code for wall openings apply. Most jurisdictions allow openings up to 4 feet wide in a non-load-bearing interior partition wall without special engineering, but always verify with your local building department before cutting structure.
The back panel of the niche is typically half-inch drywall or quarter-inch underlayment plywood, screwed to the back side of the opposite wall finish. In retrofit installations, this means screwing through the existing wall structure to the drywall on the far side; if the far side of the wall is finished and visible, this approach does not work and the niche must be a back-panel-only design that does not penetrate to the other side. Returns at the top, bottom, and sides of the niche are also half-inch drywall or wood panels, mitered or butted at the corners depending on the desired finish detail.
Cutting Into Existing Drywall Without Damage
Retrofitting a niche into an existing drywall wall requires careful demolition that leaves the surrounding wall surface clean and the underlying framing accessible. The standard approach is to first mark the exact niche dimensions on the wall surface, then verify with a stud finder that the marks align cleanly with stud bays and avoid all electrical, plumbing, and HVAC runs.
The cut itself uses an oscillating multi-tool with a fine drywall blade or a sharp utility knife scored multiple times. A drywall saw can also work but tends to produce ragged cuts that are harder to finish cleanly. Cut just inside the marked lines so the final niche frame can be built precisely to the planned dimensions, with any small irregularities hidden behind the niche return or trim. Always wear a dust mask and eye protection during cutting; older drywall in homes built before the late 1970s should be tested for asbestos before any disturbance, per EPA asbestos guidance.
Once the opening is cut, vacuum debris from the stud bay, inspect the framing for any damaged or unusual conditions, and confirm that the planned niche dimensions still work given what you can now see. Surprises do happen: a previously unknown plumbing vent, a fire-blocking horizontal stud, or insulation that needs to be relocated. Plan for one or two surprises and budget an extra day in the schedule for resolution. Have you thought through what to do if you discover a service run inside the planned niche space? A small relocation by a licensed electrician or plumber typically adds $200 to $600 and a half-day to the project but rarely kills the design entirely.
Finish Details That Make the Niche Feel Built-In
The finish work is what separates a credible architectural niche from a clumsy hole in the wall. Three details deserve careful attention: the corner treatment, the back wall finish, and the bottom shelf or sill.
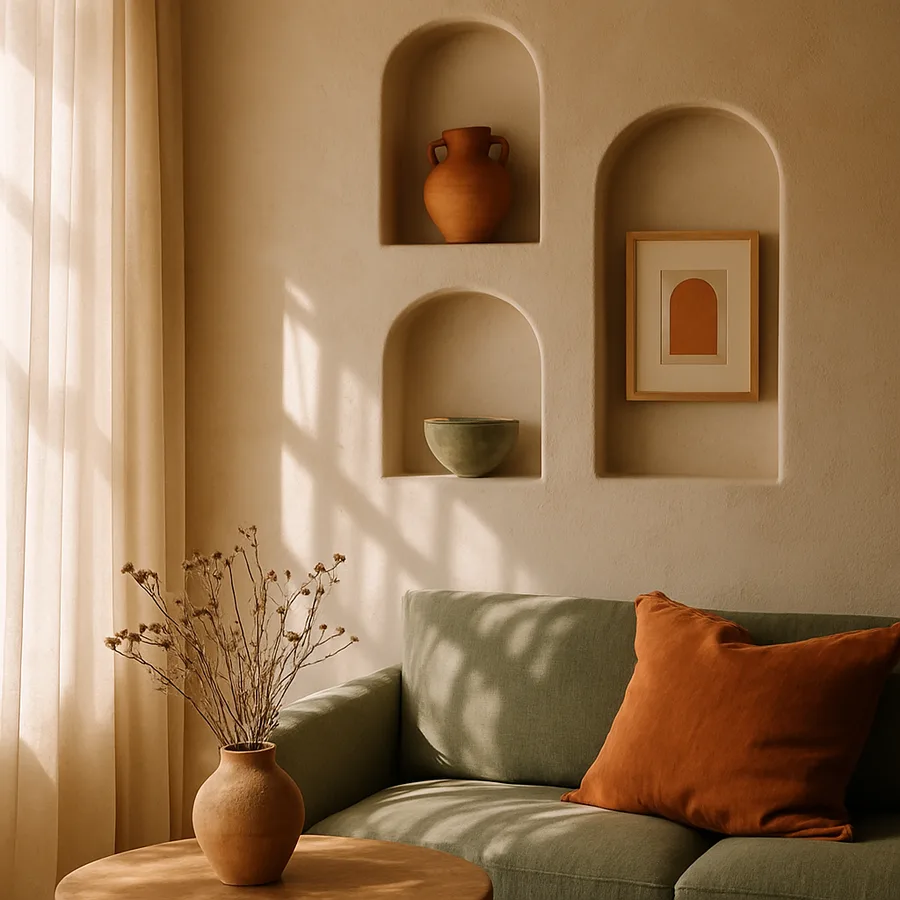
Corner treatment splits into two main approaches. Square corner bead on the outer perimeter of the niche, where the niche return meets the room face, gives a crisp, modern, minimal look with no trim. The drywall is finished to a clean 90 degree corner using metal or plastic L-bead, taped and mudded smooth. This approach reads as contemporary or transitional and pairs well with rooms that have minimal or modern trim language elsewhere. Trim casing wrapped around the niche perimeter reads as traditional, formal, or Craftsman depending on the profile chosen. A quarter inch reveal between casing and wall surface adds a small shadow line that elevates the detail.
Back wall finish offers an opportunity to introduce contrast and depth. The simplest approach paints the back wall the same color as the surrounding room, letting the niche read as pure architecture. Painting the back wall in a contrasting color, often a deeper tone of the room paint or an entirely different accent, makes the niche pop as a focal point and frames whatever is displayed inside it. Wallpapering the back wall introduces pattern and texture; a single piece of grasscloth, a fabric panel, or a patterned wallpaper creates an instant gallery feel. Wood-paneling the back wall, often with shiplap or beadboard, references traditional architectural detailing and works particularly well in entries, dining rooms, and bedrooms.
The bottom shelf or sill is where the niche meets gravity. A simple drywall return painted to match works fine for very shallow niches displaying flat artwork. For niches displaying objects with weight, a solid wood or stone shelf sized to the niche dimensions reads as substantial and durable. Quarter-sawn white oak, walnut, or marble are common choices that age beautifully. The shelf typically protrudes a quarter inch or so beyond the niche return, casting a small shadow line that grounds the detail visually.
Lighting the Niche for Display Impact
A niche without lighting is functional. A niche with thoughtful lighting becomes a designed feature. The lighting choices fall into three categories: downlighting from the top, uplighting from the bottom, and ambient illumination from the room.
Top downlighting is the most common and most flattering for displayed objects. A small LED strip or puck light is recessed into the top return of the niche, casting light downward onto whatever is displayed below. Modern LED strip lighting with a high color rendering index (CRI 90 or higher) reproduces colors accurately and works well for ceramics, art, and photographs. The fixture should be hidden from view by a shadow lip or trim detail at the front edge of the top return so only the light, not the source, is visible from normal viewing positions.
Power for niche lighting can run from a wall switch (preferred for visual cleanliness, requires running cable inside the wall during framing), from a low-voltage transformer in an adjacent closet or cabinet (works well in retrofit), or from a discreet plug-in cord routed down to the nearest outlet (simplest but visible). The National Electrical Code requires that any in-wall wiring be installed by a licensed electrician and that fixtures be rated for the application. Reference materials from NFPA on the NEC provide detailed code information for residential applications.
Color temperature dramatically affects how the niche reads. A warm 2700K to 3000K LED gives the niche a museum-like glow that flatters most objects and feels welcoming. A cooler 3500K to 4000K reads as more contemporary and crisp but can feel sterile in residential contexts. Avoid anything cooler than 4000K for residential niches; the light starts to feel commercial rather than refined. Dimming capability adds significant value, allowing the niche to be a soft accent during evening relaxation or a brighter focal point during entertaining.
Styling Niches Without Visual Clutter
A perfectly built niche styled poorly still falls flat. The visual rules for niche display follow established principles that interior designers have refined over decades. The most important rule: display fewer objects than you think you should. A niche with three carefully chosen items reads as composed and intentional. The same niche stuffed with eight items reads as cluttered and unfocused.
The classic styling formula uses three objects of varying heights, with the tallest object roughly two-thirds the height of the niche and placed slightly off-center. A medium object sits in the foreground at about half the height of the tallest, and a small object grounds the composition at about one-third the height. The objects should differ in shape and texture as well as height: a tall vase, a stack of books, and a small sculptural piece read as a complete vignette. Three identical items in a row read as merchandised rather than designed.
Have you considered seasonal rotation as part of the niche's role? A niche that holds the same objects year-round can become invisible to homeowners after a few months, even when guests still notice. Rotating the contents two to four times a year, swapping a winter sculpture for spring flowers and a summer ceramic for fall foliage, keeps the niche fresh and engaged with the home's living rhythm. Maintain a small storage shelf for niche-rotation objects, and the entire feature stays alive over years rather than becoming a static decoration.
One final consideration: scale. A small 12 by 18 inch niche begs for one or two refined objects. A larger 24 by 36 inch niche can hold a fuller composition or a single substantial object. Mismatching scale, by stuffing a small niche with too many objects or leaving a large niche almost empty, creates visual unease that homeowners feel without being able to articulate. Test your styling with a quick photograph, since the camera reveals visual problems that the eye glosses over in person, and adjust until the photograph looks like a magazine vignette rather than a cluttered shelf. Consider scheduling a consultation with an interior designer if you want a styling refresh that captures the niche's full potential.
Conclusion
A built-in wall niche is one of the most architecturally effective and budget-friendly interior upgrades available to homeowners. The total cost of a single well-built niche, including framing, finish, lighting, and styling objects, typically lands between $300 and $1,200 depending on size, complexity, and finish choices. Compared to almost any other interior renovation, the visual impact relative to cost is exceptional, transforming a flat wall into a designed feature that draws the eye and adds genuine character.
The keys to a successful niche are wall selection, careful framing, refined finish work, thoughtful lighting, and disciplined styling. Choosing a wall with adequate stud bay depth and no service runs avoids the most expensive complications. Framing the niche with proper headers, sills, and a flat back panel produces a clean opening ready for finish. Finish details, particularly corner treatment, back wall paint or paper, and a substantial sill shelf, separate amateur work from professional results. Integrated lighting elevates the niche from architectural detail to designed feature, and conscious styling maintains that feature's visual life over years.
For homeowners considering a niche, the most useful next step is a careful walk through every potential location with stud finder, tape measure, and a piece of cardboard sized to the planned niche. The combination of physical testing and quiet observation reveals which walls are candidates, which heights work, and which rooms benefit most. From there, a conversation with a finish carpenter or remodeling contractor about framing approach, finish style, and lighting integration brings the design into reality. Most niches are a 2 to 4 day project from cut to paint-ready surface, plus another day or two for paint, final electrical, and styling.
The final test of a successful niche is simple: months after installation, do guests still notice it without being prompted, and do you still enjoy the way it looks during a quiet morning coffee or a late evening passing through the hallway? A niche that passes both tests has earned its place permanently in the home. Contact a licensed contractor or finish carpenter this week to begin scoping your niche project, and you can be looking at a beautifully built display vignette within a month of the first phone call. The architectural depth that a single well-placed niche brings to a home is consistently larger than its modest cost would suggest, and the daily pleasure of a well-styled niche compounds over the years you live with it.
More Articles You May Like


Comments
Post a Comment