String Lights on Patios: Hanging Patterns That Look Intentional
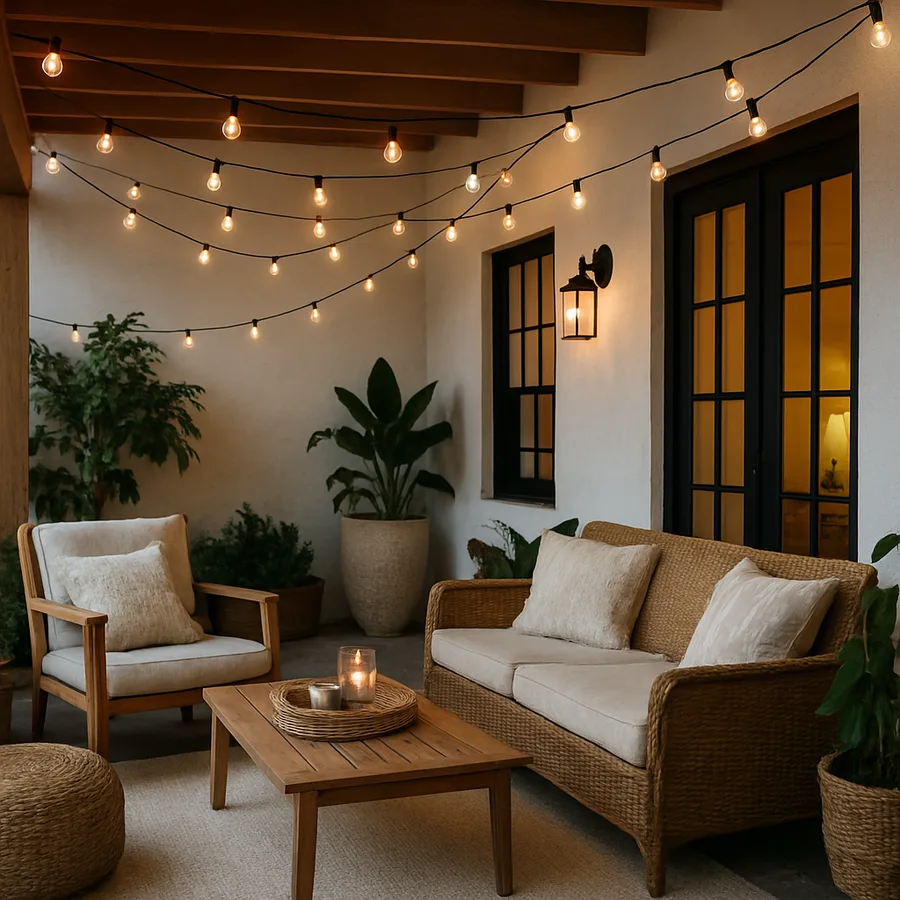
Why Most Patio String Light Installations Look Wrong
String lights are the single most affordable way to transform an ordinary patio into an inviting evening gathering space, yet the majority of residential installations look hastily thrown together rather than thoughtfully designed. The typical approach involves buying a strand or two of lights, draping them loosely from whatever attachment points happen to exist, and hoping the result looks charming. What actually happens is sagging cables that hang at inconsistent heights, bulbs clustered too closely in some areas and too far apart in others, and a visual randomness that reads as temporary and unfinished rather than warm and intentional. The difference between string lights that elevate a patio and string lights that diminish it comes down to planning, proper hardware, and understanding the geometric patterns that create visual order without looking rigid or overdesigned.
Professional landscape lighting designers approach string light installations with the same spatial awareness they bring to architectural lighting, and the results justify that discipline. Every successful string light installation starts with a deliberate pattern that creates visual rhythm across the patio space, uses consistent mounting heights that maintain clean sight lines, and incorporates enough structural support to prevent the sagging that makes even expensive lights look cheap. The International Landscape Lighting Institute (ILLI) includes string light design in its residential certification curriculum because the demand for professionally installed patio lighting has grown to represent approximately 22 percent of all residential landscape lighting projects, up from less than 8 percent a decade ago.
The good news is that the techniques professionals use are not complicated or expensive. They require measuring your space, choosing a pattern that fits its proportions, installing the right mounting hardware, and running the light strands with consistent tension. A homeowner who approaches the project with a plan and spends an extra hour on proper mounting hardware will achieve results that look professional and stay that way through years of weather exposure. The lights themselves are the least important part of the equation; the pattern, the mounting, and the tension are what separate an installation you are proud to show off from one you quietly take down after a single season.
Before selecting a hanging pattern, you need to understand your patio's geometry and the attachment opportunities it presents. A patio bounded by the house wall on one side and open on three sides requires a different approach than one enclosed by walls on two sides with a pergola overhead. The available mounting surfaces, the distances between them, the ceiling height or open sky above, and the specific areas where you want the brightest illumination all constrain which patterns work and which ones will fight the space. Grab a tape measure and sketch your patio's footprint with dimensions before making any purchases, because this simple preparation step prevents the frustration of discovering mid-installation that your light strands are too short, your mounting points are too far apart, or your chosen pattern does not fit the proportions of your actual space.
The Zigzag Pattern: Dynamic Energy for Rectangular Patios
The zigzag pattern runs string lights back and forth across the width of a rectangular patio, creating a series of parallel diagonal lines that fill the overhead space with light while adding visual movement and energy. This pattern works best on patios that are longer than they are wide, typically with a length-to-width ratio of at least 1.5 to 1, because the diagonal runs need enough width to create a meaningful angle without becoming nearly horizontal. Each pass of the light strand connects to alternating sides of the patio at evenly spaced anchor points, and the consistent spacing between anchor points on each side is the detail that makes the pattern look intentional rather than random. Anchor spacing of four to five feet on each side produces zigzag angles that read as dynamic and energetic, while wider spacing of six to eight feet creates a more relaxed, gentle pattern with shallower angles.
Mounting the zigzag pattern requires anchor points along two parallel edges of the patio. The house wall provides one edge, where screw-in hooks, adhesive-mounted clips, or under-eave brackets create solid attachment points at consistent heights. The opposite edge needs freestanding support, which typically means wooden posts, metal poles, or the columns of a pergola or shade structure. If no structure exists on the open side, dedicated string light poles sunk into the ground or mounted in weighted bases provide the necessary anchor points. These poles should stand at least eight to nine feet tall to maintain comfortable headroom beneath the lowest point of each zigzag span, and they should be spaced to match the anchor point spacing on the house wall side so the zigzag angles remain consistent along the entire patio length.
The critical technical detail for a clean zigzag is managing cable tension so that every span maintains approximately the same amount of sag. Zero sag creates a rigid, tent-like appearance that looks mechanical rather than inviting, while too much sag drops the lights into head-bumping territory and makes the pattern read as droopy rather than dynamic. A sag depth of 12 to 18 inches below the anchor point height across a typical 12-to-15-foot span produces the sweet spot where the lights look gracefully draped while maintaining enough clearance for people to walk beneath them comfortably. Achieving consistent sag across multiple spans requires starting your installation from one end and working systematically to the other, adjusting the tension at each anchor point as you go rather than stringing the entire length and attempting to adjust everything afterward.
How many light strands does a zigzag pattern require for a typical patio? A 12-by-20-foot patio with anchor points spaced every five feet on each side needs five zigzag spans, and each span across a 12-foot width with sag is approximately 13 to 14 feet of strand length. Including the short connecting runs between zigzag attachment points, the total strand length comes to approximately 75 to 85 feet. Buying a single 100-foot commercial-grade strand or connecting multiple shorter strands with weatherproof connectors covers this pattern with comfortable margin for adjustment. The Houzz lighting idea galleries feature hundreds of zigzag installations that demonstrate how this pattern adapts to different patio sizes, and browsing these images with your own patio dimensions in mind helps you visualize the final result before you commit to hardware placement.
The Perimeter Pattern: Clean Framing for Any Shape
The perimeter pattern runs string lights around the outer edges of the patio, creating a glowing border that frames the space and defines its boundaries with light. This is the most architecturally clean pattern because it follows the existing geometry of the patio rather than imposing a new geometry across it, which means it complements the space rather than competing with it for visual attention. Perimeter lighting works with any patio shape, including irregular, L-shaped, and curved layouts that resist the straight-line requirements of zigzag and parallel patterns. The lights trace the roofline, fence top, railing, or structural edge of the patio and create an illuminated outline that is elegant, unobtrusive, and effective at establishing the sense of a defined outdoor room without filling the overhead space with cables.
The perimeter pattern produces a different quality of light than overhead patterns because the bulbs are positioned at or near the edges of the space rather than distributed across it. The center of the patio receives less direct illumination, which creates a softer, more ambient atmosphere with gentle shadows that many people find more relaxing and intimate than the even brightness of an overhead pattern. This lighting character makes perimeter installations particularly well-suited for patios used primarily for evening conversation, cocktails, and relaxed dining where mood matters more than task visibility. If your patio needs brighter illumination for cooking, reading, or detailed activities, the perimeter pattern works well as an ambient layer supplemented by focused task lighting from directed fixtures rather than as the sole light source.
Mounting hardware for perimeter installations is typically simpler than overhead patterns because the lights follow existing structures rather than spanning open space. Cup hooks screwed into fascia boards, fence rails, or post tops at 12-to-18-inch intervals provide secure attachment points that hold the strand close to the structure and prevent wind-induced movement. For masonry walls, concrete screws with hook heads or adhesive-mounted cable clips create clean attachment without mortar drilling. The National Electrical Manufacturers Association (NEMA) classifies outdoor string lights as temporary decorative lighting when not permanently wired, but recommends using UL-listed or ETL-certified products rated for wet locations regardless of installation permanence, because the connection points and sockets are exposed to rain, sprinkler water, and condensation in any outdoor mounting position.
A common enhancement to the basic perimeter pattern adds a single strand running diagonally across the patio from corner to corner, or from the house wall to the far corner of the seating area, creating an accent line that draws the eye into the space while maintaining the clean framing of the perimeter strands. This accent line should be a different height than the perimeter strands, either slightly higher or slightly lower, to create visual depth and prevent the installation from reading as a flat plane of lights at a single elevation. The diagonal accent also provides some illumination over the center of the patio that pure perimeter lighting lacks, making it a practical compromise for patios that need slightly more functional light output without the full overhead coverage of a zigzag or canopy pattern.
The Canopy Pattern: Overhead Warmth for Large Spaces
The canopy pattern fills the entire overhead space with parallel runs of string lights, creating a luminous ceiling effect that bathes the patio in warm, even light from above. This is the most dramatic and transformative pattern, capable of making even a plain concrete slab feel like an outdoor dining room, and it is the pattern most commonly associated with the romantic string light installations seen at restaurants, wineries, and destination wedding venues. The canopy requires more light strand length and more anchor points than other patterns, but the immersive quality of the result justifies the additional investment for large patios that serve as primary entertaining spaces where the lighting needs to match the scale and ambition of the events hosted beneath it.
Creating a canopy pattern requires parallel anchor points along two opposing edges of the patio, with light strands running from one side to the other at consistent spacing. The spacing between parallel runs determines the density of the light canopy: closer spacing of two to three feet creates a dense, luxurious ceiling of light, while wider spacing of four to five feet produces a more open, airy effect that uses fewer strands and feels less enclosed. For most residential patios, three-to-four-foot spacing strikes the balance between visual impact and cost efficiency. A 14-by-18-foot patio with strands running across the 14-foot width at 3.5-foot intervals needs approximately five parallel runs, totaling about 80 feet of light strand including the short drops to anchor points at each end.
The structural demands of a canopy pattern are greater than other patterns because the combined weight of multiple parallel strands pulling on the same anchor structure adds up significantly. Each strand of commercial-grade string lights with medium-base sockets weighs approximately one pound per ten feet when including the bulbs, which means a five-strand canopy across a 14-foot span adds roughly seven pounds of sustained load to each supporting edge. This weight is manageable for pergola beams, substantial fence structures, and purpose-built poles set in concrete, but it can overwhelm lightweight trellises, thin fence boards, or temporary poles that were adequate for a single zigzag strand. Before installing a canopy pattern, verify that both supporting edges can handle the cumulative load without bowing, leaning, or pulling fasteners out of their mounting surfaces.
Have you noticed how the best restaurant patio lighting creates a sense of enclosure without actual walls? The canopy pattern achieves this psychological effect by defining the vertical boundaries of the outdoor room with light. Your brain interprets the illuminated plane above as a ceiling, and that perceived ceiling transforms the open patio from an undefined outdoor area into a contained room with a discernible overhead boundary. According to environmental psychology research published by the Environmental Design Research Association (EDRA), people report feeling 40 percent more relaxed and 25 percent more socially comfortable in outdoor spaces with defined overhead elements compared to identical spaces open to the sky, even when the overhead element provides no physical shelter. String lights arranged in a canopy pattern trigger this spatial perception powerfully because they combine overhead definition with warm light, both of which are instinctive comfort signals that our brains associate with safe, inhabited spaces.
Hardware, Bulbs, and Technical Execution
The mounting hardware you choose determines whether your string light installation stays taut and attractive for years or gradually sags, pulls loose, and deteriorates into the droopy mess you were trying to avoid. Stainless steel screw hooks rated for outdoor use are the most reliable anchor hardware for wood structures, and they should be sized large enough to accept the light strand's cable without pinching. A hook opening of at least half an inch accommodates most commercial string light cables while allowing easy removal for maintenance or seasonal storage. For spanning distances greater than 15 feet between anchor points, a separate support cable of galvanized or stainless steel wire tensioned between the anchor points carries the weight of the light strand and prevents the electrical cable from bearing structural loads it was not designed to handle. The light strand clips or zip-ties to the support cable at regular intervals, which maintains consistent spacing and prevents the strand from sliding to the low point of any sag in the support cable.
Bulb selection affects appearance, energy consumption, and replacement costs over the installation's lifetime. LED Edison-style bulbs with visible filament elements have become the default choice for residential patio installations because they produce the warm amber glow associated with traditional incandescent string lights while consuming 80 to 90 percent less electricity and lasting 15,000 to 25,000 hours compared to 1,000 to 2,000 hours for incandescent equivalents. The warm color temperature of 2200K to 2700K is critical for outdoor ambiance; avoid LED bulbs rated above 3000K because they produce a cooler, whiter light that lacks the romantic warmth that makes string lights emotionally appealing. The Architectural Digest outdoor lighting guides consistently recommend LED bulbs in the 2200K range for patio installations, noting that the slight amber tint at this color temperature creates a candlelight quality that higher temperatures cannot replicate.
Electrical safety for outdoor string light installations centers on proper circuit protection and weatherproof connections. All outdoor string light circuits should be powered through a GFCI-protected outlet that will interrupt the circuit instantly if moisture causes a ground fault, and this protection is required by the National Electrical Code for all outdoor receptacles. Connection points between multiple light strands should be wrapped with weatherproof electrical tape or enclosed in waterproof junction covers to prevent water intrusion that can cause corrosion, short circuits, or shock hazards. Running the power cord across foot traffic areas requires a cord cover rated for outdoor use, and burying the cord in a shallow trench with a protective conduit is the permanent solution for installations where the power source is across a walkway from the patio.
Timer and dimmer controls elevate a string light installation from a simple on-off system to a nuanced lighting layer that adapts to different occasions. A programmable outdoor timer ensures the lights activate at dusk and deactivate at a set time without daily manual intervention, and modern astronomical timers that automatically adjust on and off times as sunset shifts through the seasons eliminate the need for seasonal reprogramming. Dimmer-compatible LED string lights paired with an outdoor-rated dimmer allow you to set full brightness for active entertaining and lower the output to a soft glow for quiet evenings, which extends bulb life and reduces the glare that can make full-brightness string lights visually harsh at close range. The combination of a timer for automatic operation and a dimmer for intensity control gives you the responsiveness of a professionally managed lighting system at a fraction of the cost.
Achieving a Professional Result on a Homeowner Budget
The total cost of a well-executed patio string light installation falls well within the reach of most homeowner budgets when the materials are chosen wisely and the labor is self-performed. A complete installation for a 12-by-16-foot patio in a zigzag or canopy pattern requires approximately 100 feet of commercial-grade LED string lights at $40 to $80, mounting hooks and hardware at $20 to $40, a support cable and tensioners at $15 to $30 if spans exceed 15 feet, and a programmable outdoor timer at $15 to $25. The total materials cost of $90 to $175 produces an installation that rivals the $800 to $1,500 a professional landscape lighting company would charge for the same result. The difference is your willingness to spend a Saturday afternoon on a ladder with a tape measure and a drill, which is a reasonable trade for most homeowners who enjoy hands-on home improvement.
The installation sequence that produces the best results follows a specific order that prevents backtracking and rework. First, install all anchor hardware at the measured positions, verifying consistent heights with a laser level or long spirit level before mounting any light strands. Second, if your spans exceed 15 feet, install and tension the support cables between anchor points, adjusting until each cable has identical and minimal sag. Third, attach the light strand to the first anchor point and run it to the second, allowing the strand to find its natural drape before fastening it at the far end. Fourth, work back along the strand, clipping it to the support cable at regular intervals and fine-tuning the tension until the sag matches your target depth. Fifth, connect the power, test all bulbs, and replace any that arrived dead or damaged before putting away the ladder. This methodical approach takes two to four hours for most residential installations and produces results that look like they belong.
What separates a string light installation that looks intentional from one that looks accidental? Three things, and only three: consistent spacing between mounting points, consistent sag depth across all spans, and clean cable management where the power feed connects to the decorative strand. Nail those three details and any pattern will look professional. Miss any one of them and even the most expensive lights will look like an afterthought. The spacing creates rhythm, the consistent sag creates visual order, and the clean cable management eliminates the untidy transition zone where a utilitarian extension cord meets the decorative strand, which is the detail most homeowner installations get wrong because they run out of patience during the final steps.
Take your patio from functional daylight space to magnetic evening destination by committing to a specific pattern, buying the right hardware, and dedicating one focused afternoon to an installation you will enjoy every warm evening for years to come. Measure your patio tonight, choose the pattern that fits its proportions, and order your materials this week so you are ready to install before the next stretch of perfect weather arrives. The investment is modest, the skills required are basic, and the transformation in how your outdoor space looks and feels after dark is genuinely dramatic.
More Articles You May Like


Comments
Post a Comment