Modern Backyard Studio Plans Under 200 Square Feet for Permits
The 200 square foot threshold is one of the most consequential numbers in residential design that almost no homeowner has heard of. In many North American jurisdictions, an accessory structure that stays under that footprint qualifies for a faster, simpler, and significantly cheaper permitting path than a building that crosses it. The International Code Council publishes the model residential code that most municipalities adopt, and Section R105.2 of the IRC has long allowed a permit exemption for one-story detached accessory structures used as tool and storage sheds, playhouses, and similar uses, provided the floor area does not exceed 200 square feet. Many jurisdictions extend that exemption with conditions to small studios and offices when no plumbing is involved.
That single line of code has shaped an entire category of backyard architecture. Designers, kit manufacturers, and prefab builders have spent the last decade refining floor plans that maximize what a thoughtful owner can do inside 199 square feet. This guide walks through what those plans look like, why the 200 square foot ceiling forces better design, and the technical decisions that determine whether a small studio feels generous or cramped.
Why The 200 Square Foot Ceiling Is A Design Gift
It is easy to read a square footage cap as a constraint, but experienced residential designers tend to see it as a forcing function. A building under 200 square feet cannot waste space on circulation, awkward angles, or oversized furniture. Every linear foot of wall has to do real work, and that discipline produces interiors that often feel more considered than rooms three times the size.
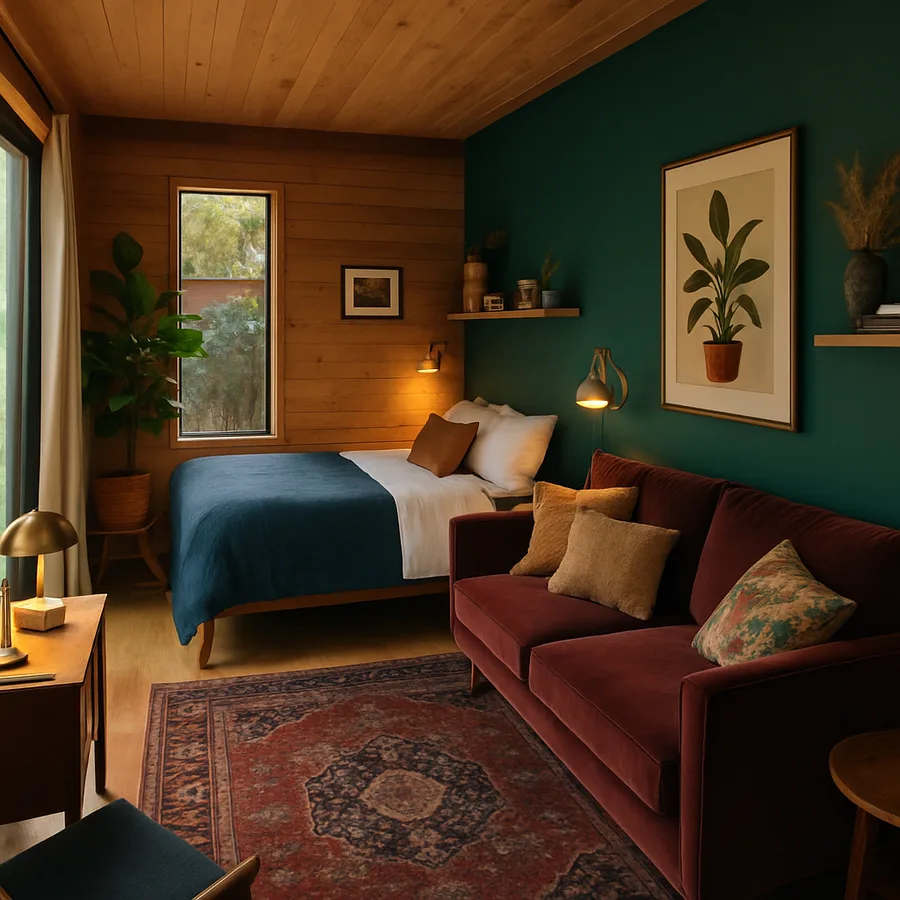
The most successful plans share a few characteristics. They use a simple rectangular footprint, typically 10 by 20, 12 by 16, or 14 by 14, which simplifies framing and minimizes wasted material. They place the door and primary glazing on long walls rather than gable ends, which preserves uninterrupted wall length for built-in storage and seating. They locate any mechanical or electrical equipment on a single dedicated wall, leaving the other three walls free for use.
Ceiling height is the other lever. A backyard studio with a flat eight-foot ceiling will feel like a small bedroom, while the same footprint with a vaulted ceiling rising to 12 or 14 feet at the ridge will feel like a chapel. Many code-compliant designs use a single shed roof slope from a 9 foot front wall to a 12 foot rear wall, which delivers dramatic interior volume without complicating the structure. The American Institute of Architects publishes residential design resources that consistently rank ceiling volume above floor area as a driver of perceived spaciousness in small buildings.
Reading Your Local Code Before You Draw A Single Line
The 200 square foot exemption is a model code provision. Your local jurisdiction may have adopted it as written, modified it, ignored it entirely, or layered additional restrictions on top. Before you commit to a footprint, you need to read three specific documents: your local building code, your zoning ordinance, and any homeowner association covenants that apply to your lot.
The building code tells you what construction triggers a permit. Many jurisdictions exempt a 200 square foot building from a structural permit but still require electrical, plumbing, and mechanical permits the moment you add wiring or a heat source. A few jurisdictions exempt only true storage uses and treat any conditioned occupiable space as requiring a full permit regardless of size. The International Code Council maintains a public-facing knowledge base that helps you interpret the model code language your local authority adopted.
Zoning is a separate and equally important conversation. Setback requirements, lot coverage limits, building height restrictions, and use restrictions all live in the zoning ordinance, and these apply regardless of building size. A typical suburban lot might require 5 feet from a side property line and 10 feet from the rear, with a height cap of 12 to 15 feet for accessory structures. If you live in a designated historic district or a strict HOA, additional rules about exterior materials, roof shape, and color may apply.
Floor Plan Strategies That Make 199 Square Feet Feel Generous
The interior layout of a backyard studio matters more than the exterior. Three plan types dominate the well-designed end of the category, and each one suits a different use.
The long-wall studio places the door and main window on a long wall, with a continuous run of millwork along the opposite long wall. That millwork can hold a desk on one end, open shelving in the middle, and a daybed or storage bench on the other end. This plan suits a writer, designer, or musician who wants a single uninterrupted volume.
The split-zone studio divides the interior with a half-height storage element or a freestanding wardrobe, creating two loosely defined zones in a single open plan. The front zone holds a workspace; the back zone holds a sleeping or relaxation area. This plan works well as a guest cabin or a hybrid office and overnight retreat.
The compact-tower studio uses a smaller footprint of around 10 by 12 feet but pushes ceiling height to its legal maximum and adds a sleeping loft above a low ceiling kitchenette or storage zone. This plan suits dense urban backyards where footprint is precious but height is permitted. Two reader questions to think about: how much of your time in the space will you spend at a desk versus moving around, and do you need to host an overnight guest more than a few times per year?
Building Envelope and Energy Performance
A studio under 200 square feet may avoid full structural permitting, but it still has to perform as a habitable space if you plan to use it that way. The thermal envelope is the biggest single driver of comfort and operating cost, and it deserves the same attention you would give to a primary residence.
Walls in 2x6 framing at 16 inches on center deliver enough cavity depth for R-21 batt insulation or R-23 mineral wool. A continuous one-inch layer of rigid polyiso on the exterior adds another R-6 and breaks the thermal bridges at every stud, which significantly improves real-world performance. The roof should hit R-30 minimum in cold climates, achievable with closed-cell spray foam in shallow rafter bays or with batt insulation in deeper truss bays.
Air sealing is where most small buildings fail. Every penetration through the envelope, including electrical boxes, plumbing stubs, and ventilation ducts, needs to be sealed with caulk, gasketed boxes, or specialized tape. The U.S. Green Building Council publishes air-sealing best practices for small structures, and field studies consistently show that a careful air-sealing pass can cut conditioning loads by 20 to 30% compared to a baseline build with no special attention to leakage.
Windows deserve their own paragraph. A small studio benefits from one or two larger windows rather than several small ones; large windows feel more generous, deliver more daylight, and create stronger connections to the garden. Specify double or triple-pane low-e glazing with a U-factor below 0.30 in cold climates, and consider a fixed picture window paired with a smaller operable awning or casement for ventilation. The cost premium for high-performance glazing is recovered in comfort and energy savings within a few years of typical use.
Power, Lighting, and Mechanical Systems Done Right
Even a studio that fits within the structural permit exemption will need an electrical permit in most jurisdictions. A licensed electrician should pull that permit and design the branch circuits according to the current cycle of the National Electrical Code. For a studio under 200 square feet, a 30 to 40 amp subpanel fed from the main service handles the typical load profile of lighting, receptacles, a small mini-split, and a few small appliances.
Receptacle placement deserves more thought than most builds give it. The NEC requires receptacles spaced so that no point along a wall is more than six feet from an outlet, but practical use suggests denser placement near desks, beds, and seating areas where you actually plug things in. A 20-amp circuit dedicated to a desk wall lets you run a monitor, a laptop charger, a small printer, and a desk lamp without nuisance trips. A second 20-amp circuit for a coffee station or kettle keeps high-draw items off the work circuit.
For climate control, a 9,000 BTU ductless mini-split handles a well-insulated studio under 200 square feet in nearly any North American climate. Look for SEER2 ratings above 20 and HSPF2 ratings above 9 for cold-climate performance. Mount the indoor head high on the wall opposite the primary seating area to avoid drafts on the back of your neck. Ventilation is satisfied by a small bath-style exhaust fan running continuously on low, supplemented by operable windows in mild weather.
Finishes, Furniture, and the Long-Term Use Plan
The finish package determines whether your studio becomes a daily-use space or a project that sits empty after the novelty wears off. The most successful interiors in this category share a few traits: a restrained material palette, generous built-in storage, and furniture sized for the actual room rather than scaled-down versions of pieces meant for a primary residence.
For floors, engineered hardwood or luxury vinyl plank with a wear layer of at least 20 mil handles foot traffic, occasional moisture, and the dragging of furniture without showing damage. For walls, painted drywall is the cheapest path, but a single accent wall in vertical wood paneling or lime plaster adds warmth that pays off every time you enter the room. Ceilings benefit from one of two strategies: keep them flat and white to maximize light reflection, or expose the rafters and finish them in a clear-sealed wood for a craftsman feel.
Furniture should be chosen at the same time as the millwork, not after. A built-in daybed under a window, a wall-mounted desk that folds flat when not in use, and a single comfortable lounge chair will furnish most studios more successfully than any quantity of standalone furniture. The American Society of Interior Designers consistently emphasizes the value of integrated furniture planning in small spaces, and the difference between a studio designed around its furniture and one furnished as an afterthought is immediately legible.
Conclusion
Designing a backyard studio to fit under the 200 square foot threshold is one of the most cost-effective architectural moves a homeowner can make. The faster permit path saves weeks of waiting and thousands of dollars in fees and consultant time. The smaller footprint reduces material costs, foundation work, and mechanical sizing, which compounds into a project budget that is genuinely accessible for most homeowners.
A well-designed studio in this size class typically costs between $25,000 and $55,000 turn-key when built by a quality contractor with permitted electrical and mechanical systems, with prefab options sometimes coming in lower. That is comparable to a mid-range bathroom remodel and dramatically cheaper than a full home addition of similar usable area. The real value, of course, lies in what the space enables: a quiet workspace separated from the household, a creative studio that does not have to be cleaned up at the end of every session, or a guest room that frees the primary residence from accommodating overnight visitors.
The discipline of designing within a tight footprint also produces better buildings than larger projects often manage. When every square foot has to justify itself, the resulting interiors tend to feel more curated, more efficient, and more pleasant to spend time in than rooms with the luxury of waste. Owners who go through the process consistently report that they use the space far more than they expected and that the constraints they initially worried about turned into the design choices they now love most.
Ready to begin? Call your local building department this week and ask three specific questions: what is the structural permit threshold for accessory structures, what setback rules apply to your lot, and does your jurisdiction require electrical and mechanical permits for a small habitable studio. With those three answers, you can sit down with a designer or contractor and develop a plan that hits the threshold and delivers a space you will use for decades.
More Articles You May Like


Comments
Post a Comment