Limewash Wall Paint for Old World Plaster Look on Drywall
Walk into any well-restored European farmhouse and the walls almost speak before the furniture does. Soft cloudy whites, faintly pigmented umbers, surfaces that catch raking morning light and dissolve into shadow at dusk. That depth is not paint; it is centuries of lime plaster slowly carbonating into walls a meter thick. Most American homes will never have lime plaster, but a properly executed limewash on standard drywall can produce a startlingly convincing illusion of that aged, mineral surface, often for a fraction of the cost of skim-coated plaster.
The trick is understanding that drywall is not a natural substrate for traditional limewash. Without intervention, the lime simply will not bond. The good news is that with the right primer system, mixing approach, and brushwork, drywall becomes a perfectly capable canvas for the look. This guide walks through the full method, from primer selection to the final glaze pass, with attention to the small details that separate "wall painted by an enthusiast" from "wall that looks like it has always been there."
Why Drywall Needs Special Treatment for Limewash
Authentic limewash bonds chemically to mineral substrates such as brick, stone, and lime plaster. Modern drywall presents two problems: the paper face is organic rather than mineral, and most existing wall paint creates a sealed acrylic film that lime cannot grip. Apply traditional limewash directly and you will end up with a powdery, uneven coat that rubs off on clothing within weeks.
The solution is a bridge: a mineral-bonding primer specifically designed to create a porous, alkaline-friendly surface that mimics the chemistry of plaster. Several manufacturers, including Romabio, Bauwerk, and select Sherwin-Williams mineral coating partners, sell such primers. They contain fine silica or mineral aggregates that give the limewash physical and chemical anchor points. Skipping this step is the single most common reason DIY limewash on drywall fails.
Have you ever painted a wall and felt that something was off but could not name it? That feeling is often the absence of texture variation, which traditional plaster has in abundance and standard drywall does not. The good news is that limewash itself contributes most of the visual texture; the substrate just needs to be prepared honestly. Once primed correctly, drywall will accept limewash beautifully and hold it for decades.
Choosing the Right Limewash Product for Interior Walls
Not all products marketed as limewash are equivalent. Authentic limewash contains slaked lime and water, sometimes with mineral pigments, and nothing else. Acrylic-modified versions are easier to apply and more durable in some respects but lack the depth, breathability, and patina behavior of the real thing. For an interior wall pursuing the old world look, the trade-off almost always favors authentic mineral limewash.
Brand recommendations vary, but reputable interior limewash makers include Romabio Classico, Bauwerk Color, Pure & Original, and Portola Paints' lime-based line. Most ship a pre-mixed product that requires only thinning with water and stirring before use. According to the Master Painters Institute, mineral coatings of this category typically have lifespans of 20 to 40 years on properly prepared interior surfaces, which compares favorably to the 7 to 10 year repaint cycle for conventional latex.
Coverage is generally lower than acrylic paint; expect roughly 100 to 150 square feet per gallon per coat depending on dilution. Plan for two coats minimum and order extra. Limewash is hard to color-match across batches, so buying enough material upfront prevents a frustrating shopping trip mid-project. Better Homes & Gardens recommends ordering 25 percent more than your square footage suggests to allow for blending touch-ups and unexpected variations.
Surface Preparation and Priming the Drywall
Begin with clean, sound drywall. Repair any nail pops, dings, and seam imperfections with lightweight joint compound, sand smooth, and dust thoroughly. Existing painted walls require a deglossing scuff with a fine sanding sponge to break the surface tension of the old paint. Wash with a TSP substitute to remove kitchen grease, hand oils, and any cleaning product residue that could interfere with primer adhesion.
Apply your mineral primer with a high-quality synthetic brush and a short-nap roller. Work in manageable sections, brushing first to push primer into corners and along edges, then back-rolling for uniformity. Two coats are common; the goal is a uniformly toothy, slightly chalky-feeling surface that will eagerly accept the limewash. Let the primer cure per the manufacturer's instructions, typically 12 to 24 hours, before proceeding.
If your walls have heavy texture from a sprayed orange peel or knockdown finish, consider whether to skim them flat first. Heavy texture under limewash reads as inauthentic; old world plaster has subtle, irregular relief, not regular machine-applied stippling. The National Association of Home Builders notes that interior wall texture preferences swing on roughly 15 to 20 year cycles, and the current direction is firmly toward smoother, more handcrafted-feeling surfaces. A skim coat is extra work but transforms the final result.
Mixing, Tinting, and Color Strategy
Open your limewash bucket and stir thoroughly with a paint paddle on a low-speed drill. The pigment settles aggressively, so this is not a step to rush. Add water gradually to reach the consistency of whole milk for the first coat. Most premixed limewashes ship slightly thicker than ideal application consistency to extend shelf life and reduce shipping weight.
For color, start with a base white and tint conservatively. Mineral pigments are intensely concentrated; a teaspoon of raw umber pigment can shift a gallon of white limewash dramatically. Mix pigment into a small slurry of water first, then add gradually to the main batch, stirring and testing on a sample board. Popular old world palettes include warm chalky whites, sun-faded ochres, soft terracotta blush, smoky sage, and weathered linen.
One designer technique worth borrowing: mix two slightly different tints of the same base color, then alternate them across the wall during application. The micro-variation reads as natural patina rather than uneven brushwork. Architectural Digest has highlighted this layered approach in profiles of designers working in the modern Belgian and Provence-inspired styles, where limewashed walls carry the room with quiet authority. Plan your color before you load a brush; uncertainty leads to overworking, and overworked limewash loses its luminous quality.
Brushwork, Movement, and Building the Old World Effect
Load a high-quality natural bristle limewash brush generously, tap off excess, and apply with loose, irregular crosshatched strokes. The single most important rule is to avoid working in straight lines. Brick walls forgive linear strokes; smooth drywall reveals them mercilessly. Move in figure eights, X patterns, and gentle curves. Vary brush pressure to create subtle pooling and dragging, which mimics the irregularities of hand-applied plaster.
Work in sections of roughly three to four feet, blending wet edges as you go. The first coat will look thin and patchy; this is correct. Many beginners panic and apply too much material, which kills the depth that makes limewash beautiful. Allow the first coat to dry overnight before evaluating. The dramatic shift from wet appearance to cured appearance is part of the medium's charm.
For the second coat, slightly reduce the dilution (closer to heavy cream) and continue with the same crosshatched, irregular strokes. Work into corners and along trim with a smaller brush, feathering edges so transitions are invisible. To enhance the old world effect, designers sometimes add a third "glaze coat" of very dilute limewash tinted slightly darker, applied with a damp sea sponge or rag in selected areas to suggest age and shadow. This step is optional but transformative.
Living With Limewash and Long-Term Care
Cured limewash on drywall is more delicate than latex paint. It is not a high-traffic finish for hallways with active dogs and small children, though it is perfectly suited to living rooms, dining rooms, primary bedrooms, libraries, and powder rooms. Surveys by the Paint Quality Institute indicate that homeowners who choose specialty mineral finishes are willing to accept somewhat lower durability in exchange for visual character, but it helps to set expectations honestly.
Spot cleaning is straightforward: a barely damp microfiber cloth handles fingerprints, and a magic eraser used very gently lifts most scuffs without burnishing. Avoid harsh cleaners, abrasive pads, and any product containing acid (which dissolves the lime crystal structure). For high-touch zones such as switch plate surrounds, some homeowners apply a discrete coat of compatible mineral fixative; ask your limewash supplier for the specific product they recommend.
Touch-ups blend remarkably well, especially within the first few years before significant patina has developed. Keep a labeled jar of leftover limewash from your original mix; even a small amount allows seamless touch-up of dings and chips. Every decade or so you may want to refresh the entire wall with a thin glaze coat, which restores brightness without erasing the accumulated character. This long, slow maintenance rhythm is part of what makes the finish feel like an heirloom rather than a coating.
Conclusion
An old world plaster look on modern drywall is no longer the exclusive province of high-end designers and specialty plaster contractors. With the right mineral primer, an authentic lime-based product, and a willingness to embrace the slower rhythm of mineral coatings, any patient homeowner can produce walls that feel as if they were applied by a craftsman a century ago. The materials are humble, the technique is learnable, and the results outlast almost any conventional paint job by a wide margin.
The key shift is psychological as much as practical. Limewash is not a paint that you apply, walk away from, and judge that night. It is a slow medium that reveals itself over days and matures over years. The first coat will look uneven; the second will look better; the cured wall a month later will look like nothing you have ever painted before. Trust the process and let the chemistry do most of the work.
Are you ready to give one wall a try before committing to a whole room? Pick a feature wall behind a bed or sofa, prep it carefully, and apply two coats of limewash over the right primer. Live with it for a season and see how the light treats it. Most homeowners who try limewash on a single wall end up rolling out the rest of the house, one room at a time, because nothing else feels quite as alive on the surface.
Take the first step today. Order a quart of authentic interior limewash, a small can of compatible mineral primer, and a quality natural bristle brush. Block out a quiet weekend, follow the steps above, and prepare to see your drywall transformed into something that looks borrowed from a Tuscan farmhouse. The walls will quietly reshape the entire feel of the room.
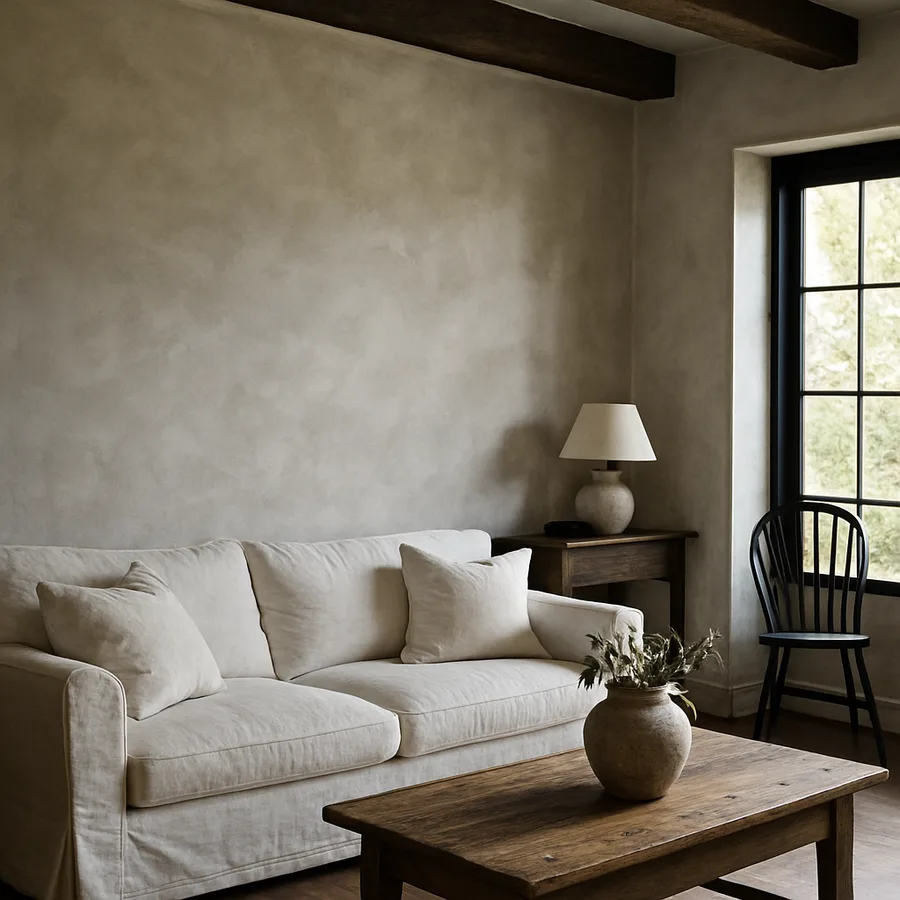
One question worth thinking through before you commit to a full room is how the limewash walls will interact with your existing furnishings. Old world plaster walls have a quiet, slightly low-saturation quality that flatters most natural materials but can clash with high-gloss synthetics, glossy lacquered furniture, or aggressively contemporary metallic finishes. If your room is full of brushed nickel, polished chrome, or shiny black lacquer, you may find the limewash creates a visual disconnect rather than the cohesive farmhouse atmosphere you imagined. Designers working in this idiom typically pair limewashed walls with aged brass, unlacquered hardware, raw linen, vintage rugs, and natural wood furniture in oak, walnut, or pine. None of this is mandatory, but it is worth honestly evaluating your room's existing palette and deciding whether the walls are the right starting point or whether furniture and lighting updates should happen first.
Beyond aesthetics, the practical economics of limewash deserve a moment of attention. The premium pricing of authentic mineral limewash compared to standard interior latex (often two to three times more per gallon) is offset by the significantly longer service life. A well-applied limewash on properly primed drywall can easily reach 20 to 25 years of useful appearance with only minor refresh work, while standard latex typically demands a full repaint every 7 to 10 years in active rooms. Run the numbers across two decades and the economic case for limewash often becomes favorable, especially if you value not having to live through the disruption of repeated repaint projects. The atmosphere is the primary reason to choose this finish, but the underlying value proposition is more compelling than initial sticker shock suggests, and the longer maintenance interval is itself a meaningful quality-of-life benefit.
More Articles You May Like


Comments
Post a Comment