Garden Shed Office Conversion With Insulation and Power Run
The shift toward distributed work has turned the humble garden shed into one of the most ambitious renovation projects a homeowner can take on without pulling permits for a full addition. According to the National Association of Home Builders (NAHB), accessory structure inquiries to remodelers rose by roughly 38% between 2021 and 2024, driven almost entirely by demand for outdoor offices and creative studios. A converted shed can deliver the privacy of a separate building, the proximity of a backyard footpath, and the budget profile of a mid-range bathroom remodel. The catch is that a comfortable, all-season workspace requires a thermal envelope, a properly designed power run, and a finish package that does not feel like you are working inside a tool storage unit. This guide walks through the conversion in the order an experienced contractor would tackle it.
Assessing The Existing Shell Before You Touch A Single Stud
A successful conversion begins with an honest structural audit. Most off-the-shelf garden sheds are built with 2x4 studs at 24 inches on center, single-pane windows, and a thin OSB sheathing that was never intended to support an interior finish, let alone insulation and drywall. Before you order materials, walk the perimeter and check the rim joists, sole plate, and corner posts for rot or insect damage. A four-foot level laid across the floor will tell you whether the building has settled; anything more than a half-inch of slope across the room will compromise furniture placement and door swings.
Pay close attention to the roof pitch and rafter spacing. Sheds built before 2015 often used 2x4 rafters at 24 inches on center, which leaves little room for the cavity insulation needed for a working office. If you find that geometry, you have two options: fur down with 2x2 sleepers to deepen the cavity, or switch to closed-cell spray foam, which delivers higher R-value per inch but adds cost. The International Code Council publishes the IRC chapters most local jurisdictions adopt for accessory structures, and many municipalities now require a minimum of R-30 in the roof and R-15 in the walls for any conditioned outbuilding.
Finally, evaluate the foundation. A shed sitting on skids or concrete blocks is fine for storage but will telegraph every footstep into your video calls. Pier footings, a poured slab, or a properly designed gravel pad with treated runners are the three foundations worth keeping. If your existing shed sits on bare ground, plan to lift, level, and re-set it before any interior work begins. Have you checked whether your local jurisdiction treats a converted shed as a habitable space requiring a frost-depth foundation?
Designing The Power Run From The Main Panel To The Subpanel
The single most consequential decision in a shed conversion is how you bring electricity to the building. A standard double-duplex receptacle on a single 15-amp circuit is enough to power a laptop and a desk lamp, but it will trip the moment you plug in a space heater, monitor, and small refrigerator at the same time. The right approach for any office larger than a closet is a dedicated subpanel fed from the main service.
For a 200 to 300 square foot office, a 60-amp subpanel with six to eight breaker positions is the sweet spot. That gives you room for two general-purpose 20-amp circuits, a dedicated mini-split circuit, a lighting circuit, and a future-proofing slot for an EV charger if your shed sits near the driveway. The feeder run from the main panel should be #6 copper or #4 aluminum in direct-burial conduit at least 18 inches below grade, per National Electrical Code (NEC) Article 300.5. Many electricians prefer 24 inches of cover in regions with frost heave or active landscaping.
The branch-circuit layout inside the office should follow the same logic as a small kitchen. Group receptacles so that high-draw equipment, like a laser printer or a portable AC unit, lives on its own circuit, and keep the lighting on a separate breaker so a tripped outlet does not plunge the room into darkness. GFCI protection is required for any receptacle within six feet of a sink, and AFCI protection is required for nearly all habitable-space circuits under current NEC interpretations. A licensed electrician should pull the permit and inspect the work; the National Fire Protection Association publishes the NEC and offers homeowner-friendly summaries of the most current cycle.
Insulating Walls, Roof, and Floor For Year-Round Use
An uninsulated shed in a temperate climate swings from 40 degrees to 110 degrees Fahrenheit across a single year, and the relative humidity inside can vary from 20% to 90%. That environment is hostile to monitors, books, and human concentration. A proper thermal envelope is what separates a hobby shed from a true office.
For walls, the most cost-effective approach is R-15 mineral wool batts in 2x4 cavities, with a continuous one-inch layer of rigid polyiso on the exterior if you are also re-cladding the building. Mineral wool outperforms fiberglass for sound attenuation, which matters when your office sits ten feet from a neighbor's HVAC condenser. In the roof, closed-cell spray foam at R-6.5 per inch hits R-30 in just under five inches of cavity depth, and it doubles as an air barrier. If your rafter bay is shallow, a hybrid of two inches of spray foam plus mineral wool batts is a popular workaround.
The floor is the most overlooked surface. A shed sitting on piers should have its joist bays insulated to R-19 minimum, with a vapor-permeable but rodent-resistant mesh stapled to the underside of the joists. If the shed sits on a slab, two inches of XPS rigid foam under a sleeper system gives you both thermal break and a level subfloor. According to research summarized by the U.S. Green Building Council, a properly air-sealed and insulated small structure can cut conditioning loads by more than 60% compared to an uninsulated baseline. That is the difference between a 6,000 BTU mini-split running constantly and the same unit cycling gently in the background.
Climate Control, Ventilation, and Indoor Air Quality
Once the envelope is tight, you need to think carefully about how air moves through the space. A sealed 200 square foot office occupied by one adult and a couple of devices will see CO2 levels climb past 1,200 parts per million within an hour if there is no fresh air introduction. The American Society of Heating, Refrigerating and Air-Conditioning Engineers (ASHRAE) Standard 62.2 recommends roughly 7.5 cubic feet per minute of outdoor air per occupant plus a baseline rate tied to floor area. For a small office, that translates to a continuous-running bath fan or a small energy recovery ventilator (ERV).
For heating and cooling, a 9,000 to 12,000 BTU ductless mini-split covers most shed offices in climate zones 3 through 5. Look for a unit with a SEER2 rating of 20 or higher; the efficiency premium pays back quickly because the unit will run for thousands of hours per year. Mount the indoor head high on a wall opposite the desk so conditioned air does not blow directly on your neck during long calls. The condenser should sit on a small pad at least three feet from any window or vent intake.
Indoor air quality also depends on what you bring into the space. Off-gassing from new flooring, paint, and cabinetry can push VOC concentrations to uncomfortable levels in a small sealed room. Specify low-VOC finishes, water-based polyurethane, and formaldehyde-free insulation wherever possible. The American Society of Interior Designers publishes guidance on healthy material selection that translates well from large commercial projects to small residential outbuildings.
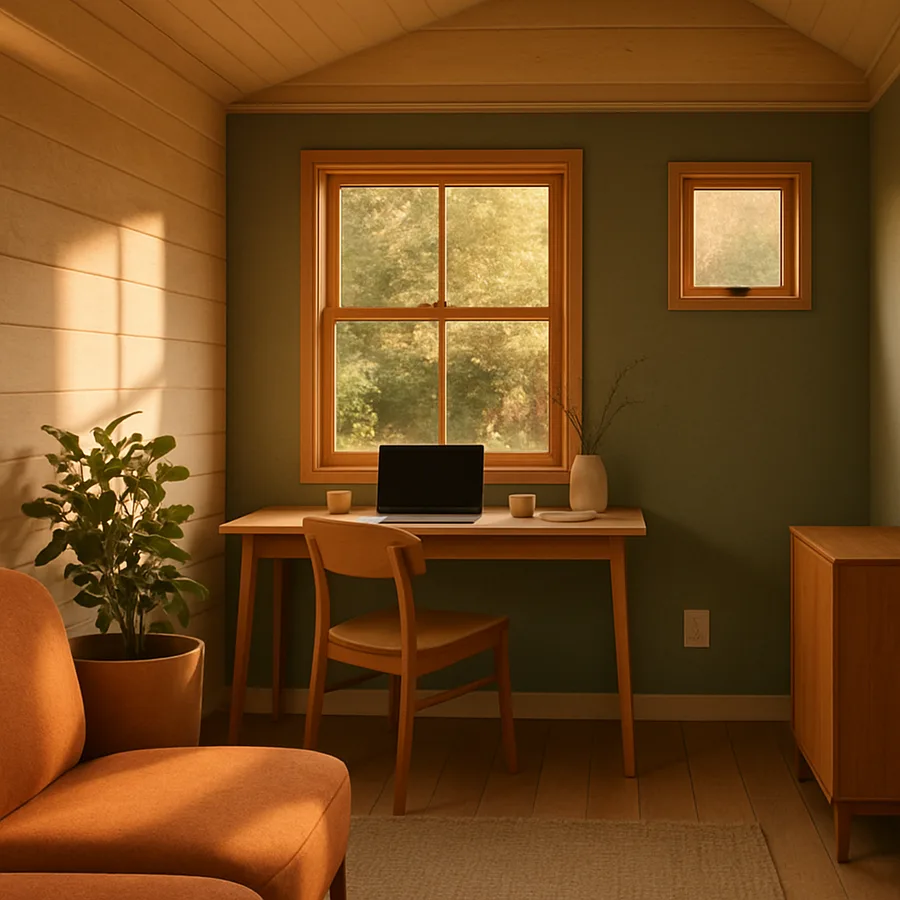
Interior Finishes That Make A Shed Feel Like A Studio
The line between a glorified storage building and a place you actually want to spend eight hours is drawn at the finish stage. A few well-chosen materials can elevate a 10x12 box into a serene workspace.
Start with the walls. Drywall is the cheapest and most paintable option, but plywood paneling in birch or maple delivers a warmer aesthetic and stands up to wall-mounted shelving without blocking. A common compromise is to drywall three walls and use a single accent wall of vertical shiplap or wood paneling behind the desk. Ceilings benefit from the same treatment; a tongue-and-groove pine ceiling stained a light tone reflects more daylight than painted drywall and adds visible texture to video calls.
Flooring should be durable, quiet, and warm underfoot. Engineered hardwood over a cork underlayment is the gold standard, but luxury vinyl plank with a 20-mil wear layer gets you 80% of the experience at half the cost. Avoid carpet in a shed office; humidity swings encourage mold growth at the seams, and dust accumulation is a problem in any building with limited ductwork.
Lighting deserves its own design pass. Aim for three layers: a flush-mount or pendant for ambient light, a desk lamp for task work, and indirect cove or wall-wash fixtures to eliminate the cave-like quality that small rooms develop after sunset. Color temperature should land between 3500K and 4000K for daytime work, and dimmable LEDs let you ramp down for evening sessions. Two reader questions worth asking yourself: how much daylight does your shed receive at the dimmest hour of the workday, and is your desk oriented so a window sits beside you rather than directly in front of or behind your camera?
Permitting, Codes, and The Conversations You Need To Have With Your City
The legal status of a converted shed varies wildly from one jurisdiction to the next. Some municipalities treat any structure under 120 square feet as exempt from permits, while others require a full set of stamped drawings the moment you add a single electrical receptacle. The safest first step is a phone call to your local building department before you spend a dollar on materials.
Common triggers for full permitting include adding plumbing of any kind, installing a permanent heating system, exceeding a square footage threshold, or wiring a subpanel. Setback requirements typically demand at least five feet from a side or rear property line, and many neighborhoods have homeowner association rules that further restrict outbuilding height, roof pitch, and exterior color. The American Institute of Architects maintains a public-facing knowledge base on accessory structures that can help you frame the conversation with your local officials.
If your shed will be used as a rental space, an Airbnb suite, or a registered home business with client visits, you will likely face a separate set of zoning requirements covering parking, accessibility, and occupancy. These conversations are easier when you bring a simple site plan and a one-page narrative describing how the space will be used. Plan for a four to eight week permit timeline in most suburban jurisdictions and longer in dense urban cores.
Conclusion
Converting a garden shed into a working office is one of the most rewarding small-scale projects a homeowner can undertake, but it rewards careful planning more than enthusiasm. The order of operations matters: assess the shell, plan the power run, build the envelope, condition the air, and finish the surfaces in that sequence. Skipping or reversing any step usually means tearing out work you just paid for. Treat the project the way a contractor treats a guest house, and the building will perform like one.
The financial case continues to improve. A well-executed conversion costs between $15,000 and $35,000 depending on finishes and runs, which is a fraction of a comparable site-built addition and adds documented resale value when the work is permitted and inspected. NAHB cost-versus-value data consistently shows that flexible work-from-home spaces carry higher returns than single-purpose rooms, and that trend has only strengthened since 2022. The shed in your backyard is, in most cases, the cheapest path to a real second workspace you will own outright.
Beyond the spreadsheet, there is the daily quality-of-life argument. A short walk across the lawn separates work from home in a way no upstairs bedroom door ever quite manages. Morning sun on a south-facing window, the soft hum of a mini-split, and the absence of household interruptions reset the rhythm of a remote workday. If you have been postponing the project because the codes felt opaque or the wiring felt intimidating, consider this a nudge to start the conversation with a licensed electrician this week.
Ready to start? Sketch your existing shed footprint to scale, list the equipment you actually plan to use, and call your local building department to confirm the permit threshold. With those three pieces in hand, you can sit down with a contractor or electrician and get a firm bid in under an hour. The project that has been sitting in your imagination is closer to breaking ground than you think.
More Articles You May Like


Comments
Post a Comment