Garage Ceiling Hoist Pulley Systems for Bicycles Up High
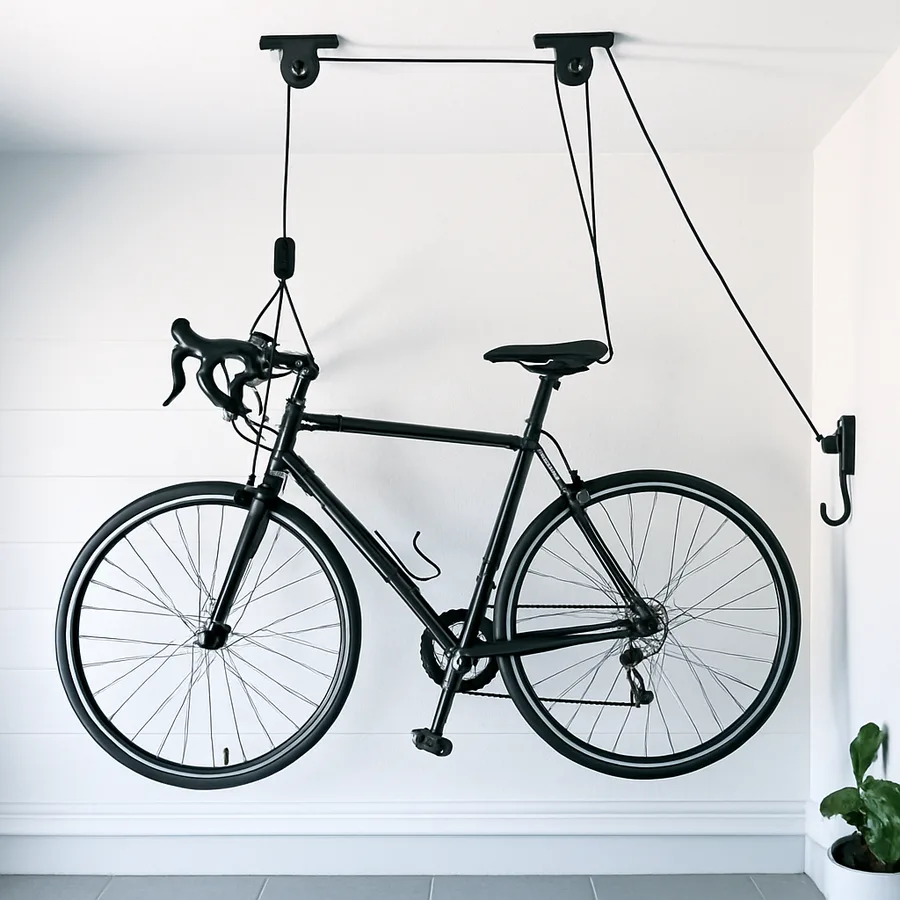
A garage with three bikes, a workbench, two cars, and the seasonal storage of a typical American family is not actually a garage, it's a parking lot for stuff with a thin layer of vehicles on top. The single largest unused volume in almost every residential garage is the air between roughly seven feet and the ceiling, and the bicycles are usually the most awkward thing leaning against the walls below. A ceiling hoist pulley system solves both problems at once: it lifts bikes into the unused vertical space and gives you back the floor and wall area where you actually need to move.
This guide walks through the full picture of bike hoists, from the basic mechanical advantage of a pulley system to the specific load math you need to do before you screw anything into a ceiling joist. It compares manual rope hoists with motorized lifts, reviews the safety considerations the cheaper systems often gloss over, and gives you the practical install steps for getting bikes ten or eleven feet off the ground without ever dropping one on a car. By the end you'll know whether a hoist is right for your garage and which of the half-dozen common designs fits your specific situation.
How Bicycle Ceiling Hoists Actually Work
The standard residential bike hoist is a four-pulley system that uses simple mechanical advantage to make a heavy bike easy to lift. Two pulleys are mounted to the ceiling, two are attached to the bike (usually one to the seat post or saddle and one to the handlebars), and a single rope threads through all four with a cleat or lock mechanism on the wall to hold the bike in the raised position. The doubled rope geometry means you only have to pull half the bike's weight to lift it, and the four-point geometry keeps the bike level rather than letting it tilt nose-down or nose-up during the lift.
For a typical hybrid bike at thirty pounds, that means roughly fifteen pounds of pull force at the rope, which almost any adult can manage easily for the seven or eight feet of lift involved. For a heavier mountain bike at thirty-five pounds, it's seventeen-and-a-half pounds of pull. For an electric bike at fifty to seventy pounds, you're now at twenty-five to thirty-five pounds of pull, which is meaningful but still manageable for most adults, though e-bike weight is often where homeowners start looking at motorized lifts instead.
The locking cleat is the safety-critical piece of the whole system. A horn cleat or jam cleat holds the rope under tension and prevents the bike from descending unless you actively release it. Never substitute a simple knot for a proper cleat, knots in nylon or polypropylene rope creep under load and can release without warning. The U.S. Consumer Product Safety Commission has documented multiple incidents involving improperly secured ceiling storage falling on vehicles or people, and the consistent failure mode is improper hardware rather than the pulley mechanism itself failing.
Manual Rope Hoists vs Electric Lifts
The cheapest manual rope hoists run twenty to forty dollars on Amazon and big-box hardware stores, and for storing a single adult bike at eight to ten feet of lift, they work perfectly well. The mechanism is simple, there's nothing to break, and a typical install takes under an hour. The trade-off is the manual labor itself: you have to physically pull the rope every time, which gets old fast if you ride three or four times a week and hate the daily routine of lift-and-cleat.
Electric ceiling lifts change the experience considerably. A 110-volt motor mounted to the ceiling does the lifting on a single button press, which means a bike goes up or comes down in maybe twenty seconds with no physical effort. The motorized units typically lift one hundred to two hundred fifty pounds and cost roughly three hundred to seven hundred dollars depending on capacity. Some are dedicated bike lifts; others are general-purpose motorized platforms that can lift bikes, kayaks, roof boxes, or anything else you'd want overhead.
The motorized systems are obviously more capable but also introduce new failure modes. The motor can burn out (most are rated for residential duty cycles, which means short occasional use rather than continuous), the cable can fray, and the limit switches that stop the lift at the top and bottom of travel can fail. Family Handyman has covered both manual and motorized garage lift installations in detail, and their consistent recommendation is to inspect the cable monthly on motorized units and replace it at the first sign of fraying. Read their detailed reviews at familyhandyman.com.
Ceiling Joist Strength: The Math You Cannot Skip
This is the section every cheap online product description glosses over, and it's the single most important part of the entire installation. A ceiling joist in a typical wood-framed garage is sized for the dead load of the ceiling drywall, the live load of the attic above (often twenty pounds per square foot if it's storage-rated, ten if it's not), and a safety factor. Bolting a hundred-pound bicycle hoist to a single joist concentrates that load at one point, which is a different and more demanding load case than the joist was originally designed for.
For a typical two-by-six joist on sixteen-inch centers spanning twelve feet, the International Residential Code allows roughly fifty pounds per square foot of total load. A point load of fifty to one hundred pounds suspended from the bottom of that joist is generally fine for a single bike at the joist's mid-span, but two or three hoists clustered close together on the same joist can exceed the design load quickly. The conservative guideline most engineers offer: any single point load over seventy-five pounds, or any group of point loads totaling more than one hundred fifty pounds within a four-foot section, deserves a quick review with a structural engineer or a building inspector.
Always lag-screw or through-bolt into solid joists, never just into ceiling drywall, and never into furring strips or ceiling tiles. Use a stud finder to locate the joist, then confirm with a small pilot hole, drywall anchors are not load-rated for overhead suspension and will fail. The U.S. Bureau of Labor Statistics tracks occupational injuries from falling overhead loads, and the consistent finding across both residential and commercial settings is that the failure point is almost always the connection to the structure rather than the lift mechanism itself.
Layout, Spacing, and the Garage Door Clearance Problem
The most common mistake in garage hoist installation is forgetting about the garage door. A standard sectional overhead garage door, when fully open, sits roughly seven inches below the ceiling along a horizontal track that extends ten to fifteen feet back into the garage. Anything you mount in that zone, including a bike on a hoist, will get hit by the door every time it opens. Before you mount a single bracket, fully open the garage door and stand in the garage looking up. The clear ceiling area behind the door's open position is where hoists can go; the area covered by the open door panels is off-limits unless you have unusually high ceilings.
For a typical garage with eight-foot ceilings, that limits hoist placement to roughly the back third of the garage. For a garage with nine- or ten-foot ceilings, you have considerably more flexibility because the open door sits higher relative to a hanging bike. Hoists also need clear vertical space below them, a bike hanging at eleven feet of ceiling height takes up roughly four to five feet of vertical space, which means the bottom of the hanging bike is at six or seven feet, just above an adult's head.
Spacing between hoists matters too. Bikes are roughly six feet long when hung horizontally, and adjacent hoists need at least a foot of clearance to avoid the bikes touching. Hung perpendicular to the ceiling joists, you can fit one bike per joist on sixteen-inch centers, but the bikes will be tightly packed. A two-bike-per-joist-bay layout with thirty-two inches of spacing is more comfortable to use day-to-day. Have you measured your ceiling-to-door clearance and joist spacing yet, or are you still guessing?
E-Bike Weight, Cargo Bike Geometry, and the Heavy-Duty Use Case
Standard residential bike hoists are rated for roughly fifty to seventy-five pounds, which covers essentially every traditional bicycle made. The category that breaks that math is the electric bicycle. A typical commuter e-bike weighs forty to sixty pounds; a heavier cargo or mid-drive e-bike can hit seventy to ninety pounds; a full-size e-cargo bike (the long ones designed to carry kids and groceries) routinely weighs ninety to one hundred twenty pounds. Lifting any of these on a sub-fifty-pound-rated manual hoist is a bad idea on day one and a worse idea after the rope has aged.
For e-bikes, look specifically for hoists rated at one hundred pounds minimum, with steel cable rather than rope, and steel construction throughout the pulley housings. Several manufacturers now make purpose-built heavy-duty bike hoists with two hundred-pound capacities and braided steel cable, typically costing eighty to one hundred fifty dollars. The motor-assist option becomes much more attractive at this weight class, pulling sixty pounds of mechanical-advantage-reduced load is a workout, and the electric lift removes that strain entirely.
Cargo bikes introduce a separate problem: geometry. Long-tail cargo bikes can be eighty to ninety inches long, which exceeds the span of most consumer hoist systems and may not fit between standard ceiling joists at all. The honest answer for most cargo bike owners is that ceiling storage isn't the right solution; a wall-mounted vertical hook or a dedicated cargo bike floor stand serves the use case better. The U.S. Department of Transportation has tracked the rapid growth of e-bike and cargo bike ownership over the past several years, and storage solutions for the category are still catching up to the diversity of bike geometries on the market.
Installation Walkthrough and Safety Inspection Routine
A typical manual hoist install for a single bike takes about ninety minutes from opening the box to riding away on a now-empty floor. Start by laying out the install on the ceiling with painter's tape, marking the two ceiling anchor points based on the bike's wheelbase. Locate the joists with a magnetic or stud-detecting finder and adjust the layout so both anchors land in solid wood. Drill pilot holes one size smaller than the lag screw shaft to avoid splitting the joist, then drive the lag screws with a socket wrench until the anchor flange is snug against the ceiling.
Thread the rope through the pulleys per the manufacturer's diagram, this is the step where most installers go wrong, since the rope path is non-obvious and getting it wrong means the bike either doesn't lift evenly or doesn't lock. Test the system multiple times with no bike attached, watching how the lower pulleys descend and confirming the cleat holds tension without slipping. Only then attach the bike with the included straps, lift it carefully while a helper steadies the bike, and cleat off at the desired height.
The ongoing safety routine takes maybe two minutes a month. Inspect the rope or cable for fraying, abrasion, or any sign of UV degradation. Tug-test each ceiling anchor for any sign of pull-out or loosening. Confirm the cleat still holds the rope without creep over a few minutes of standing pressure. If anything looks suspicious, take the bike down before you investigate further. A failed garage hoist is the kind of preventable accident that's easy to dismiss until it happens to your hood or your child.
Conclusion
A bicycle hoist is one of the highest-leverage garage upgrades you can make, both literally and figuratively. The mechanical advantage of a four-pulley system makes a heavy bike feel light, the vertical storage opens up the most underused space in the entire garage, and the cost is genuinely modest for the floor and wall space you reclaim. The basic manual systems work, work well, and have been used by homeowners for decades; the newer motorized systems remove the only real friction (having to actually pull the rope) at a meaningful but not unreasonable cost premium.
The mistakes that turn this from a satisfying upgrade into a disappointing or dangerous one are almost all on the install side. Mounting into drywall instead of joists, ignoring the garage door opening clearance, exceeding the rated capacity by clustering multiple hoists too close together, and substituting knots for proper cleats, these are the failure modes that show up over and over in incident reports. Each is preventable with about thirty minutes of planning before you put a single screw in the ceiling.
For the typical homeowner with two or three traditional bikes and an eight- or nine-foot garage ceiling, a pair of basic manual hoists in the back third of the garage will give you back enough floor and wall space that the project pays for itself in livability within a week. For the electric-bike or cargo-bike owner, the math points harder toward a heavier-duty motorized system or, in some cases, a different storage approach entirely. Match the system to the bikes you actually own rather than the average bike the product description assumes.
Ready to lift your bikes off the floor? Spend twenty minutes this weekend with a stud finder and a tape measure, sketch the ceiling layout including your open garage door clearance, and you'll know before you spend a dollar exactly which system fits your space. The garage you wish you had is mostly a matter of using the air above your head, and the bikes are the easiest place to start.
More Articles You May Like



Comments
Post a Comment