Dressing Room Layout With Vanity and Full-Length Mirror Built In
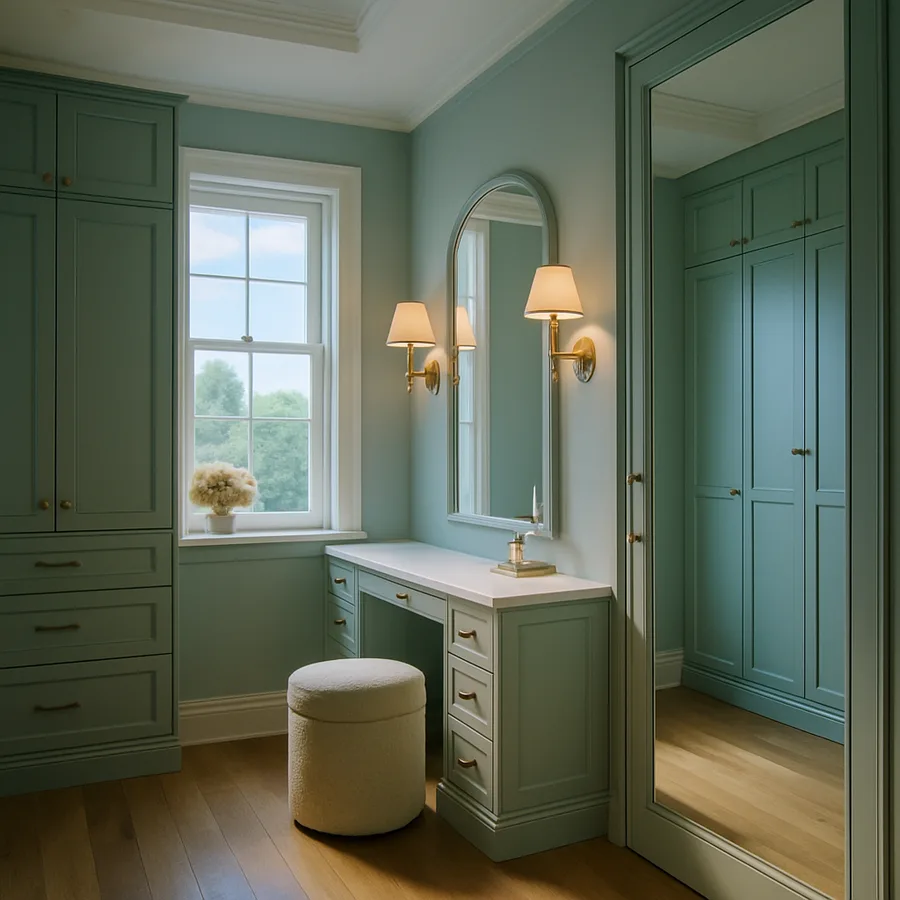
The dressing room is no longer the exclusive territory of historic estates or luxury new construction. As primary suites have grown and homeowners have rethought how mornings actually work, the dressing room has reemerged as one of the most practical room types in residential design. The National Association of Home Builders has tracked a steady rise in dressing rooms appearing on builder plans, particularly in the upper-mid market, where buyers increasingly request a dedicated space between the bedroom and bathroom that handles dressing, grooming, and outfit assembly in one calm environment.
Designing a successful dressing room layout with vanity and full-length mirror built in is more demanding than people expect. It is a small room, but it carries the storage logic of a closet, the lighting requirements of a bathroom, the seating ergonomics of a salon, and the visual demands of a finished living space. Get the dimensions wrong and the room feels cramped. Get the lighting wrong and you will second-guess every outfit. This guide walks through the layout decisions in the order I make them with clients, with concrete dimensions, sourcing notes, and the lessons that only show up after a few completed projects.
Setting the Footprint and the Three Zone Plan
Most successful dressing rooms organize around three functional zones: storage, vanity, and dressing. The storage zone holds hanging garments, drawers, and shelves. The vanity zone is the seated area for makeup, hair, and grooming. The dressing zone is where you stand to put on outfits, evaluate them in the full-length mirror, and adjust details. These three zones can occupy three walls in a U-shape, two walls in an L, or stretch along a single wall in narrow rooms.
Minimum room dimensions for a fully featured dressing room start at roughly 7 feet by 9 feet, which gives you a 24-inch deep storage wall, a 24-inch deep vanity wall opposite, and a 36-inch wide central aisle for dressing and pivoting. A 9 by 11 dressing room is the comfortable working size, and 10 by 14 reaches the luxurious end before the room starts to feel like wasted space. Going smaller than 7 by 9 is possible, but you sacrifice either the seated vanity or the full-length mirror, which defeats the point of dedicating a separate room.
The American Society of Interior Designers has long emphasized that small rooms reward layout discipline more than large rooms do, because every inch is doing work. ASID publishes residential planning guidance that puts circulation first in any small-room design, and dressing rooms are no exception. Plan the aisle before you plan the cabinetry, and the room will feel right.
Vanity Dimensions, Seated Ergonomics, and Storage Below
The vanity is the heart of a dressing room and deserves precise specification. Standard makeup vanity counter height is 30 inches, which is six inches lower than a kitchen counter and four inches lower than a bathroom vanity. The reason is seating ergonomics. At 30 inches, a standard 18-inch upholstered stool puts your forearms parallel to the counter, your shoulders relaxed, and your face roughly centered with a wall-mounted or counter-top mirror. At 34 inches, you reach up to apply makeup, which is fatiguing.
Counter depth should be 18 to 22 inches, which is shallower than a bathroom vanity. Deeper counters force you to reach for products at the back. Knee clearance under the counter should be at least 24 inches wide and 18 inches deep, with no drawer fronts encroaching on knee space. Drawers can flank the knee well on both sides and rise above as a hutch. The hutch holds taller items like styling tools, perfume, and decorative pieces, and it provides backing for sconce lighting at face level.
The National Kitchen and Bath Association recommends drawer organization rather than open storage for cosmetics, because open shelving collects dust and fades products under direct light. NKBA publishes specific drawer-divider guidance for grooming spaces that translates directly to dressing room vanities. Plan for at least four drawers in the vanity zone with custom dividers, and you will use every inch of them.
Lighting the Vanity Without Creating Shadows
This is the section where most dressing rooms fail and you can rescue yours with careful planning. The single most common lighting mistake is placing recessed downlights overhead at the vanity. Downlights cast shadows under the brow, nose, and chin, which is exactly the opposite of what you need for makeup application. The light needs to come from the front, at face height, and ideally from both sides to cancel side shadows.
The professional standard is a pair of vertical sconces flanking the mirror, mounted approximately 60 to 66 inches above the floor, with shades that diffuse rather than direct the light. Bulbs should produce 800 to 1,200 lumens combined and a color temperature of 2,700 to 3,000 Kelvin, with a Color Rendering Index above 90 to ensure cosmetics appear true to color outside the room. Hollywood-style mirrors with integrated bulbs work as well, provided the bulbs use frosted globes rather than clear filaments.
General room lighting should be separate, dimmable, and warmer than the vanity light. A 2,400 to 2,700 Kelvin overhead fixture creates atmosphere without competing with vanity task lighting. Architectural Digest has covered the rise of layered lighting in dressing rooms extensively, with most premium projects using at least three lighting zones: vanity task, ambient, and accent. Architectural Digest regularly features dressing room lighting plans in its primary suite features.
The Full Length Mirror and Where to Place It
The full-length mirror is the second non-negotiable feature of a real dressing room. Its placement is more nuanced than buyers realize. The ideal location is on a wall perpendicular to a window or natural light source, so daylight bounces onto the body without throwing direct glare at the eyes. The mirror should be at least 16 inches wide and 60 inches tall, with the bottom edge 6 to 8 inches off the floor. Wider is better if the wall allows, because a 20-inch wide mirror lets you see both shoulders without leaning.
Built-in placement options divide into three families. Family one is the inset wall mirror, framed by trim that matches the cabinetry, which reads as architectural. Family two is the door-mounted mirror, fitted to the inside or back of a closet door so it disappears when not in use. Family three is the freestanding leaner mirror, anchored to the wall for safety but visually independent. Each has trade-offs. Inset is the most refined and the most expensive. Door-mounted is the most space-efficient. Leaner is the most flexible and the easiest to swap.
One detail that improves every full-length mirror placement is a small mirror-light combination overhead, set to wash light down across the body when needed. A 2-foot LED bar at 3,000 Kelvin, switched independently, reduces the under-chin shadow that ceiling lights create when you stand close to the mirror. This single fixture is the difference between a mirror that flatters and a mirror that frustrates.
Storage Layout, Shoe Strategy, and the Drawer-to-Hanging Ratio
Storage in a dressing room differs from a primary closet because the room handles outfit assembly, not just garment parking. You need staging space, which means a counter or island top where you can lay out an outfit before putting it on. Built-in islands with a 24 by 48 inch top, drawers below, and an upholstered cushion on top double as a dressing bench and an assembly surface. Even a small dressing room benefits from a 12-inch deep wall ledge or peninsula for the same purpose.
The drawer-to-hanging ratio matters more in dressing rooms than in plain closets. A typical wardrobe inventory is roughly 60 percent hanging and 40 percent folded, but in dressing rooms, where folded organization is precious, designers often weight the build to 50/50. Plan for at least 12 to 16 drawers in a 9 by 11 room, with the bottom three drawers reserved for shoes if you do not have a separate shoe wall. Pull-out shoe trays at 30 inches deep are the most efficient shoe storage by floor area.
The Container Store has published organizing guidance showing that the average shoe collection has grown roughly 35 percent over the last decade, which has tipped many dressing room designs toward dedicated shoe walls. The Container Store recommends accounting for both current shoe count and projected growth when sizing shoe storage. Have you actually counted your shoes recently? Most clients are surprised by the number, and the dressing room layout should reflect that reality, not the figure they remember from a decade ago.
Mechanical Systems, Ventilation, and Climate Control
A dressing room is a small enclosed space with hot lights, hair tools, and natural-fiber storage. That combination demands proper ventilation and climate. The room should be served by the home's HVAC, with a supply register sized for the volume and a return path through an undercut door or a transfer grille. Closed dressing rooms without return paths develop temperature and humidity issues that damage stored garments.
Humidity targets matter for natural-fiber storage. The American Home Furnishings Alliance recommends 40 to 55 percent relative humidity for wool, leather, and silk garments. AHFA publishes care standards that closet and dressing room designers should review before final mechanical sizing. In humid climates, a small dehumidifier or a dehumidifying refrigerant coil tied into the system can be worth the investment for premium wardrobes.
Electrical needs are often underestimated. Plan for at least one duplex receptacle on the vanity counter, one inside a vanity drawer for hair tools and chargers, one under the island for steamer storage, and ground-fault protection where required by code. Hair tool circuits draw heavily, and a vanity that shares a circuit with overhead lights can trip during use. Have you ever had a hair dryer dim the lights in your bathroom? The dressing room version of that problem is fixable in the planning stage and miserable to retrofit later.
Conclusion: Build the Room Around How You Actually Get Dressed
A successful dressing room design starts with a faithful audit of how you actually move through your morning routine. Where do you sit, where do you stand, what do you reach for, and in what order. The room layout should follow that sequence rather than a generic template. The strongest dressing rooms I have specified all share this trait. The owner can describe their morning routine, and the cabinetry mirrors that description almost step for step.
Spend on the elements you touch every day. The vanity drawer slides, the sconce lighting, the full-length mirror, and the seating ergonomics will define your experience of the room more than the cabinet finish or the floor selection. Skimp on the elements that are decorative. A modest dressing room with excellent lighting and well-organized drawers will outperform a lavish dressing room with poor lighting and oversized but unstructured storage every time.
Plan for change. Adjustable shelves, modular drawer dividers, and replaceable hanging rod heights let the room evolve as your wardrobe and routine change. The dressing room you build at forty will not match the dressing room you need at sixty, and the smartest builds anticipate that without forcing a future renovation.
If you are at the planning stage and unsure whether your space supports a dressing room, lay out the three zones at scale on the floor with painters tape. Walk through the room, sit at the vanity, stand in the dressing zone, and judge whether the circulation feels generous. Have a partner walk through the space at the same time to test whether two people can move comfortably during shared morning routines, since dressing rooms are often used by couples and the layout has to absorb that reality.
Whatever footprint you commit to, build for change. Hang rods at multiple heights, use modular drawer hardware that accepts new dividers, plan the lighting on dimmers so atmosphere can adjust, and keep at least one wall flexible for future shelving or rod additions. Your wardrobe will evolve, your routine will evolve, and the dressing room that anticipates change will keep working long after a more rigid design has stopped serving you. Take the time to plan the layout right the first time, and your mornings will quietly improve for the rest of your time in the home.
More Articles You May Like



Comments
Post a Comment