Bathroom Vanity Sconces Mounting Height Beside vs Above Mirror
The single most common mistake in bathroom lighting is sconces in the wrong place. Sometimes they sit too high and cast a heavy shadow under the eyes. Sometimes they cluster too close to the mirror and produce a hot spot on the wall instead of even light on the face. Sometimes there is just one fixture on top, and every shave or skincare routine becomes a struggle against your own shadow. The fix is not more lumens or fancier bulbs. The fix is geometry.
Designers and lighting engineers have known the right answer for decades. The National Kitchen and Bath Association (NKBA) publishes detailed mounting guidance for vanity sconces, the Illuminating Engineering Society (IES) publishes the photometric reasoning behind it, and yet the same mistakes keep showing up in renovation after renovation. This guide walks through the height numbers, the spacing rules, the lumen targets, the bulb choices, and the side-vs-above debate that determines whether your morning routine feels like a hotel suite or a hardware store aisle.
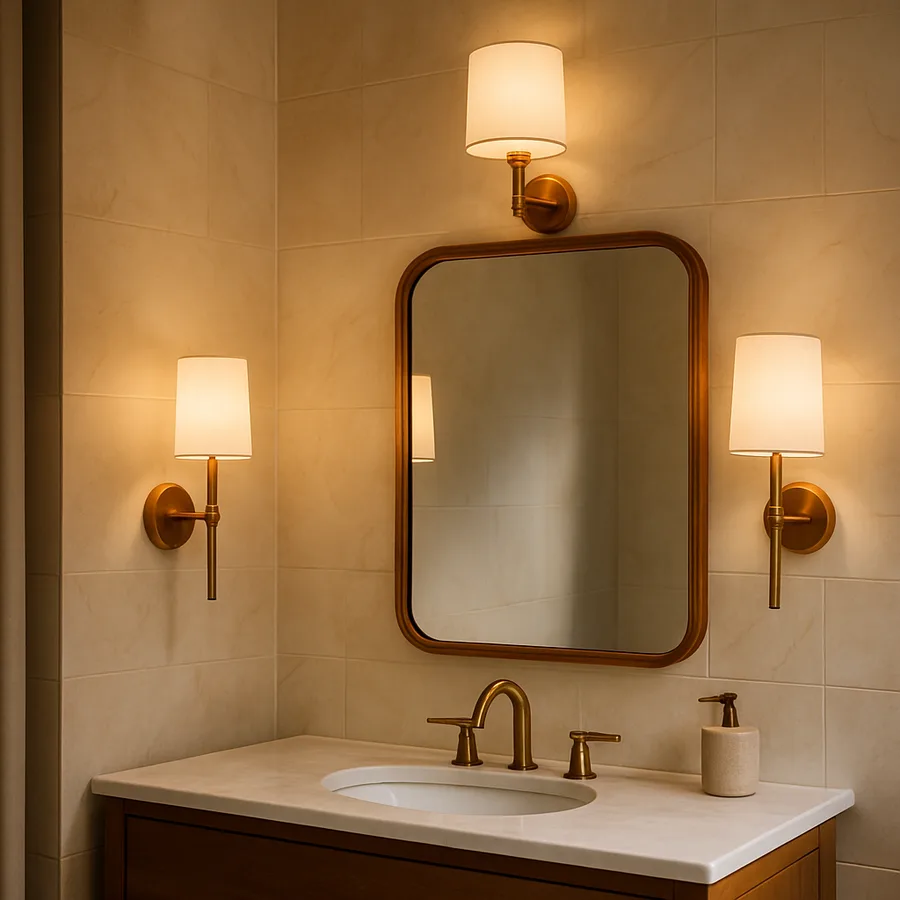
The Core Geometry: Why Side-Mounted Wins
Light on a face has one job: to wrap evenly around the features without casting hard downward shadows. Top-mounted lighting creates exactly the wrong effect. Light coming from above pools under the brow ridge, the nose, and the chin, leaving the eye sockets, upper lip, and jawline in shadow. This is the raccoon-eye effect, and it is why bathroom selfies often look unflattering. Side-mounted light corrects it almost entirely.
The reasoning is simple. When light sources sit at roughly eye level on either side of the face, the face is illuminated from the front-left and front-right, filling shadows that any single source would create. This is the same logic stage and film lighting designers apply with key and fill lights. In a bathroom, the mirror itself is the focal point and the sconces become the key plus fill, working in mirror image. The result is even illumination with no harsh shadows on the face.
Industry surveys back this up. According to a 2024 American Lighting Association design report, side-mounted vanity lighting produced a 42% improvement in self-reported grooming task ease compared to single top-mounted bath bars in a controlled study of remodeled primary bathrooms. The same report found that homeowners who had installed side sconces during a renovation were significantly more likely to describe their bathroom as "spa-like" or "high-end" than those with top-mounted bars only.
Have you ever wondered why luxury hotels almost always use side sconces, even when the mirror is large enough that a top bar would seem more practical? It is not about square footage. It is about how the light hits the guest's face the moment they look in the mirror. That single first impression determines whether the room feels generous or cheap, and it is set entirely by sconce placement.
Exact Mounting Heights for Side Sconces
The NKBA recommends mounting side sconces with the centerline of the fixture at 60 to 65 inches above the finished floor (AFF). This range is calibrated to the average user's eye level when standing at a vanity. The center of the light source ends up at roughly the level of the user's nose or upper lip, which is where you want the brightest illumination to land for grooming and skincare tasks.
If your household includes users of significantly different heights, split the difference. A mounting centerline of 62 inches works well for most adult ranges. If the primary user is unusually tall or short, adjust accordingly. The goal is for the brightest part of the fixture to sit roughly between the chin and the eyes when the user is in their normal standing position, with the mirror in front of them.
Side sconces should be spaced so that the inside edges sit roughly 28 to 36 inches apart, centered horizontally on the sink. Wider spacing dilutes the cross-fill effect; narrower spacing risks the fixtures touching or visually crowding the mirror frame. If the mirror is wider than the sink (as in a single mirror over a double vanity), the sconces should align with each individual sink, not with the edges of the mirror. The face is the subject, not the mirror.
For wet-rated installations near a shower or tub, the National Electrical Code (NEC) imposes specific zone requirements for fixtures within 3 feet horizontally and 8 feet vertically of a tub or shower threshold. Most vanity sconces sit outside these zones, but if your vanity is unusually close to the tub, confirm that the chosen fixture carries the appropriate damp or wet rating and that the install meets NEC Article 410 requirements.
When Above-Mirror Mounting Is the Right Call
Side mounting is the default, but it is not the only option, and there are situations where above-mirror lighting is the better answer. The most common case is when the wall flanking the mirror is too narrow, the mirror runs the full vanity width, or there is a window where one sconce would have been. In those cases a single horizontal fixture or bath bar above the mirror becomes the only practical layout.
If you are mounting above the mirror, the centerline of the fixture should sit roughly 75 to 80 inches AFF, with the bottom of the fixture clearing the top of the mirror by 2 to 6 inches. The fixture should match the width of the mirror as closely as possible without exceeding it; an oversized bath bar reading wider than the mirror creates an uncomfortable visual proportion that many designers compare to wearing a hat that is too large.
To compensate for the inherent shadow problem of top-mounted lighting, choose a fixture with a downward-facing diffuser rather than upward-facing exposed bulbs. Frosted glass shades, fabric shades, or linear LED bars with milky diffusers all spread light downward and forward, partially filling the under-eye shadows that bare bulbs would create. This is one place where the cheap chrome bath bar with bare globes is genuinely the wrong product, regardless of cost.
You can also combine top-mounted with side-mounted in a single bathroom. A backlit mirror plus a single decorative sconce above can deliver excellent face lighting from the mirror itself (which acts as a diffuse panel) while the top sconce becomes purely decorative. According to the American Lighting Association, layered approaches that combine ambient, task, and accent lighting are now the dominant pattern in renovated primary bathrooms, with 67% of new installs in 2024 using three or more distinct lighting layers.
Lumen Targets and the Right Bulb
The amount of light matters as much as the placement. The IES recommends a target of 1,600 to 2,400 lumens of total task light at the vanity, distributed across whatever combination of fixtures you choose. For a pair of side sconces, that means each fixture should deliver roughly 800 to 1,200 lumens. A single above-mirror bath bar should deliver close to the upper end of the range, since it has to cover the entire face from a less efficient angle.
Color rendering matters more in a bathroom than almost anywhere else in the home. CRI of 90 or higher is the minimum for accurate skin tone, and CRI 95+ is preferable. A fixture with a 100-watt-equivalent LED at CRI 80 will technically meet your lumen target while producing skin tones that look slightly off. The cost difference between a CRI 80 and CRI 95 bulb is usually a few dollars per bulb, and the difference is immediately visible in the mirror.
Color temperature should land in the 2700K to 3000K range for a residential, warm-white feel, or 3500K for a slightly crisper modern look. Above 4000K starts to read clinical and is a common cause of bathroom regret. If you genuinely cannot decide, choose tunable white bulbs that let you adjust from warm to cool depending on the time of day. Many smart bulbs now do this from the same fixture without rewiring.
Dimming is non-negotiable in a bathroom that gets used at all hours. A vanity at full brightness at 6 a.m. is welcome; the same vanity at full brightness at 11 p.m. is hostile to your retinas and your sleep cycle. Specify a dimmable LED driver and a compatible dimmer, and confirm compatibility before installing. Mismatched dimmers and LED drivers cause flicker and buzz that can be impossible to fix without replacing one or the other.
Common Layout Mistakes and How to Avoid Them
Several specific errors show up over and over in bathroom remodels. The first is mounting side sconces directly on the mirror itself or just inside its edges. This causes glare from the fixture reflecting in the mirror and kills the cross-fill effect. Sconces should always sit on the wall to either side of the mirror with a small visual gap, typically 1 to 4 inches between the fixture edge and the mirror frame.
The second is choosing fixtures with bulbs aimed directly at the user. An exposed Edison bulb at eye level is decorative when seen from across the room, but at vanity distance it becomes a glare bomb that you stare at every morning. Diffused, shaded, or indirect sources are nearly always the better choice for vanity sconces. Save the exposed bulbs for entryways and dining rooms.
The third is forgetting about height when the floor is uneven or the vanity itself is unusually tall or short. Mounting heights are measured from the finished floor, not from the vanity countertop. A vessel sink on a tall counter pushes the user's eye level higher; a wall-hung floating vanity may sit lower than standard. Adjust the mounting centerline to maintain the same relationship to the user's face, not to the cabinet.
The fourth, and probably the most expensive, is not running the wiring before the wall is closed. Sconce locations need to be marked on framing during the rough-in stage, before drywall, tile, or backer board goes up. Adding a sconce after a tile wall is finished requires either surface-mounted conduit or removing tile, and both options are ugly or expensive. Plan the locations early and confirm them with your electrician before drywall.
Code, Safety, and Working With an Electrician
Bathroom lighting is regulated by the NEC because of the moisture, the proximity to water sources, and the high frequency of nighttime use when alertness is reduced. Three rules apply to almost every install. First, all branch circuits feeding bathroom outlets and lighting near the vanity must be GFCI-protected. Second, fixtures within the tub or shower zone must carry the appropriate damp or wet rating, with wet-rated fixtures required directly above a tub or shower. Third, all junction boxes must be accessible after the install is complete, which is why surface-mounted boxes are sometimes used behind cabinets.
If you are upgrading from a single bath bar to a pair of side sconces, you will likely need a new branch circuit or at least new wiring runs. Pulling new cable through finished walls without damaging surfaces is the kind of work where a licensed electrician earns their fee quickly. A typical sconce relocation in an existing bathroom runs a few hundred dollars in labor, depending on the access path. Trying to fish wire across multiple stud bays through a tile backsplash is a much harder project than it looks.
For the control side, consider a two-circuit setup that lets you operate the sconces independently from the ceiling fixture. This is the difference between a bathroom that feels generic and one that feels designed: at night, the ceiling stays off and only the dimmed sconces are active, providing enough light for navigation and basic tasks without the glare of overhead fixtures. The American Society of Interior Designers (ASID) highlights independent layer control as one of the most-requested features in residential lighting projects over the past three years.
Finally, if you live in a jurisdiction that requires permits for electrical work, pull the permit. Bathroom electrical is a frequent source of insurance disputes after fires or water damage, and an unpermitted upgrade can complicate a claim significantly. The cost of the permit and inspection is small relative to the long-term clarity it provides.
Conclusion
The choice between side-mounted and above-mirror sconces is rarely about taste. It is about the geometry of light on a face. Side mounting at 60 to 65 inches AFF, spaced 28 to 36 inches apart and centered on the sink, produces shadow-free task lighting that flatters every user every day. Above-mirror mounting at 75 to 80 inches AFF with a downward-facing diffuser is the right answer when wall space, mirror width, or windows force the choice, and it works well when the bulb is properly diffused.
The lumen target is 1,600 to 2,400 lumens of total task light at CRI 90 or higher, color temperature 2700K to 3500K, on a dimmable circuit that is independent of the ceiling fixture. Hit those numbers and the bathroom will feel both functional and warm. Miss them and no amount of expensive tile or stone will rescue the room from feeling slightly off every time you walk in.
Have you measured the existing sconce centerline in your bathroom? It is the single fastest diagnostic. If the number is significantly above 65 inches, you have probably been living with shadows you blamed on age or fatigue. Fixing the height alone, without changing the fixtures, will measurably improve how the room performs every morning.
Ready to plan your sconce upgrade? Pull a tape measure to your existing fixtures, mark the centerline, and compare it to the 60-to-65-inch target. If you are renovating, sketch the wall elevation with mirror, sink centerline, and proposed sconce locations before ordering. Then bring in a licensed electrician early enough to influence the wiring layout. The result will be a vanity that performs at hotel-suite quality on a residential budget.
More Articles You May Like


Comments
Post a Comment