Appliance Garage Roll-Up Doors vs Bifold Lift Door Mechanisms
The appliance garage is back, and it has grown up considerably since its 1990s tambour-door ancestors. Today's appliance garages hide stand mixers, espresso machines, toasters, and food processors behind disappearing fronts that vanish entirely when the cook needs access. The two dominant mechanisms competing for that role, the roll-up tambour door and the bifold lift door, behave very differently in daily use, cost dramatically different sums to install, and integrate with cabinetry in ways that are not always obvious from a showroom photograph. Choosing between them well means understanding both the engineering and the kitchen workflow.
The 2025 Houzz Kitchen Trends Study noted that 38% of remodels priced above $80,000 included at least one dedicated appliance garage, up from 22% three years earlier. Within that group, bifold lift doors held a slight market share lead at 53% versus roll-up at 47%, but the trend was reversing as new tambour systems with quieter operation and PVC-free materials reached the market. This guide walks through every meaningful difference so you can choose the mechanism that actually serves your kitchen rather than the one your contractor happens to install most often.
How Each Mechanism Works and Where the Volume Goes
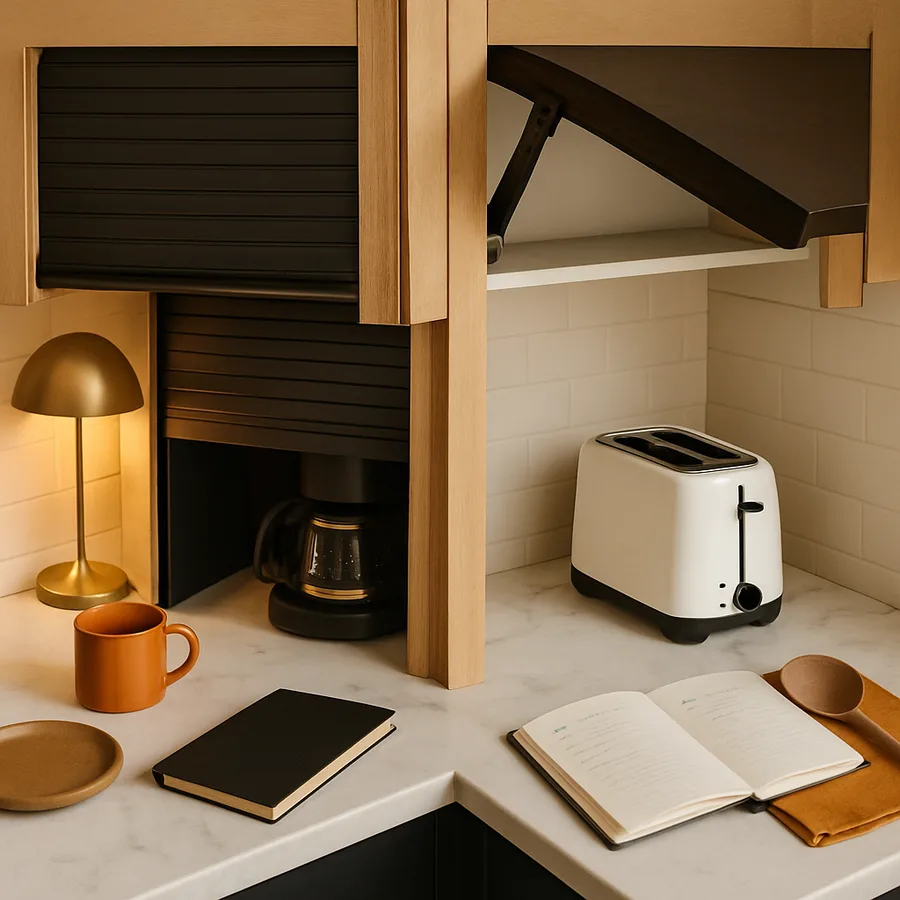
A roll-up tambour door consists of dozens of narrow horizontal slats joined by a flexible backing, riding in tracks along the side of the cabinet. When you push or pull the door upward, the slats roll around a curved track at the top of the cabinet and disappear into a horizontal pocket above the appliance space. The mechanism is purely passive; the door stays where you leave it because friction holds it in position, no springs or counterweights required.
A bifold lift door consists of two solid panels hinged together along a horizontal centerline. When you lift the lower edge, the panel folds upward and the assembly tilts backward into a horizontal storage position above the appliance space. The mechanism is powered by gas-spring lift hardware that holds the door at any height and provides controlled descent when closing. The bifold is more architecturally substantial because the door panels themselves can match the surrounding cabinetry exactly, including face frame, drawer face, or slab door styling.
The volume each mechanism consumes differs significantly. A roll-up tambour requires approximately 4 to 5 inches of horizontal pocket depth at the top of the cabinet to hold the rolled slats. A bifold lift requires 6 to 8 inches of vertical clearance above the door opening to accommodate the folded panels in their open position. In a kitchen with 36-inch upper cabinets, the bifold consumes more usable interior storage than the roll-up, but the roll-up consumes more cabinet depth, reducing how far back you can place an appliance against the back wall.
Daily Workflow and the One-Hand Test
Appliance garages get judged on the speed of access. The user should be able to open the door, retrieve the appliance, set it down, and start using it in under five seconds, ideally with one hand. Both mechanisms can pass this test, but they pass it differently.
A roll-up tambour requires you to push the door upward by about 24 inches to clear a typical countertop appliance. Done smoothly, this is one motion, but the door must travel a substantial vertical distance, and once open, it occupies the full pocket above the appliance until you close it. There is no partial-open position useful for daily work; the door is either up or down.
A bifold lift door, by contrast, opens by tilting the lower panel outward and upward, a rotational motion that requires less travel distance. Premium bifold hardware lets the door stop at any height, so you can crack the door open three inches to ventilate steam from a coffee machine without fully opening the cabinet. This intermediate-position capability is the bifold's quiet daily advantage and the reason many serious cooks prefer it.
Have you considered which appliance lives in the garage? A toaster used twice a day rewards the bifold's faster open-and-close cycle. A bread proofer used weekly tolerates the slower tambour. The National Kitchen and Bath Association recommends matching mechanism to frequency: high-frequency appliances behind bifold lifts, lower-frequency behind tambour rolls.
Hardware Cost, Installation Complexity, and Long-Term Reliability
The cost gap between the two systems is substantial. A complete tambour roll-up kit for a 24-inch-wide cabinet runs $150 to $400, depending on slat material, color, and track quality. The hardware is mechanically simple, with no springs or motors to fail, and a quality kit lasts 20 years or more with minimal maintenance.
A complete bifold lift door kit for the same cabinet width runs $400 to $1,200. Premium German hardware from manufacturers like Blum (Aventos series) or Hettich (Lift Advanced) sits at the upper end, with integrated soft-close gas springs, electronic touch-to-open options, and concealed mounting that vanishes into the cabinet box. The hardware is more complex, requires precise installation, and the gas springs themselves typically need replacement every 12 to 15 years at $80 to $150 per spring.
Installation complexity follows the cost curve. A skilled DIY homeowner can install a tambour kit in a weekend, working from the manufacturer's instructions and basic woodworking tools. A bifold lift door installation typically requires a professional cabinet installer, especially if the door panels must match existing cabinetry exactly. Costs from a licensed installer range from $300 to $800 for the labor portion, according to National Association of Home Builders contractor pricing data.
Aesthetic Integration and the Cabinetry Match Question
Aesthetics may be where the two systems diverge most dramatically. A tambour roll-up door has a distinctive ribbed appearance that reads as utilitarian, almost industrial. Modern tambours come in painted MDF, real wood veneer, aluminum, and PVC, but all retain the horizontal slat texture that visually separates the door from the surrounding flat-paneled cabinetry. In a kitchen with shaker doors or full-overlay slab cabinets, the tambour reads as an obvious appliance compartment, not as a continuation of the cabinetry.
A bifold lift door, in contrast, can be ordered with door faces that exactly match the surrounding cabinetry: same shaker profile, same slab style, same wood species and finish. When closed, a well-installed bifold lift disappears into the cabinet bank as if no garage existed at all. This invisible-when-closed quality is the bifold's defining aesthetic advantage and the reason it dominates the high-end remodeling market.
The Architectural Digest coverage of recent luxury kitchens has consistently featured bifold lift doors as the appliance garage solution of choice in homes where the kitchen reads as furniture rather than as a working studio. The American Society of Interior Designers 2025 trends report similarly noted bifold lift doors in 64% of luxury kitchen remodels featuring appliance garages, compared to tambour rolls in 36%.
Steam, Heat, and the Ventilation Reality
Hot appliances inside a sealed cabinet generate heat and humidity that can damage both the cabinetry and the appliance itself. A countertop espresso machine running through a back-to-back morning cycle produces meaningful steam during the wand-purge step. A toaster generates radiant heat that can reach 200 degrees Fahrenheit at the housing during sustained use. Both heat and humidity must escape the appliance garage to prevent finish damage and mildew.
Tambour roll-up doors provide poor ventilation because the closed position seals the cabinet pocket relatively tightly. Most installations require leaving the door cracked open by 4 to 6 inches during appliance operation, which defeats some of the visual benefit of the garage and creates a daily action item the user must remember.
Bifold lift doors are easier to vent because the intermediate-position capability lets you leave the door open at any partial height during use. Many premium kitchens also incorporate small ventilation grilles in the toe-kick or back panel of the appliance garage, allowing passive convection to clear heat even with the door closed. The 2024 Hardware Industry Council data showed that ventilated appliance garages reduced internal humidity by 35 to 50% compared to sealed cabinets during typical morning espresso routines.
For appliances that produce significant steam, including some sous-vide circulators and rice cookers, neither mechanism is ideal without active ventilation. Have you confirmed your specific appliance's heat output and humidity profile? The manufacturer's spec sheet typically lists both, and matching that data to the cabinet's ventilation strategy avoids long-term finish damage.
Durability, Repair, and the Replacement Parts Question
Long-term durability separates the two systems further. A tambour roll-up has very few failure modes: a slat can crack if abused, the track can warp if exposed to sustained moisture, and the flexible backing can stiffen with age in heated kitchens. Each of these issues is repairable, often with parts shipped directly from the manufacturer for under $100. Major manufacturers including Hafele and Rev-A-Shelf maintain replacement slat inventories for 15 to 20 years after a model's introduction.
A bifold lift door has more components and more failure modes. The gas springs are the consumable item; they lose pressure gradually and eventually fail to hold the door open or close it gently. Replacement is straightforward but does require ordering the correct spring strength matched to the door panel weight. The hinge plates and concealed mounts are extremely durable and rarely require service. The soft-close dampers, when present, fail every 8 to 12 years and need replacement.
Hardware availability varies significantly by manufacturer. Premium European brands (Blum, Hettich, Hafele) maintain parts inventories for 20 years or more. Generic imported bifold hardware sometimes becomes unavailable within five to seven years of installation, leaving the homeowner with a partially functional door and no easy path to repair. This availability gap is the strongest argument for spending the extra money on premium hardware at install time.
Conclusion: Choosing the Right Mechanism for Your Kitchen
The choice between roll-up tambour and bifold lift door mechanisms is ultimately a choice between simplicity and refinement. The tambour wins on cost, ease of DIY installation, and long-term mechanical simplicity. The bifold lift wins on aesthetic integration with surrounding cabinetry, daily usability through intermediate-position capability, and the premium feel that matches a high-end kitchen. Neither is universally better; each fits a specific set of priorities and budgets.
For a budget-conscious remodel where the appliance garage is a functional storage element rather than a design feature, the tambour roll-up at $200 to $500 installed delivers excellent service and lasts the life of the cabinetry. For a luxury remodel where the appliance garage must visually disappear into the cabinetry bank, the bifold lift door at $700 to $2,000 installed is the only credible option. The middle ground, a mid-range remodel with one important appliance garage near the prep zone, often justifies the bifold for that single location while using simpler storage strategies elsewhere.
Whichever mechanism you choose, plan the ventilation strategy from the start. Even passive ventilation through a small toe-kick grille or rear baffle dramatically extends the life of the cabinet finish and reduces the daily need to leave the door open after appliance use. The NKBA kitchen planning guidelines recommend at least 12 square inches of total ventilation area per cubic foot of garage volume for any space housing heat-generating or steam-producing appliances. This is the single most overlooked specification in appliance garage design and the most consequential one for long-term durability.
Before you finalize your cabinetry order, list every appliance you intend to store in the garage, look up each unit's heat and steam output, and bring those numbers to your kitchen designer. The right mechanism, the right ventilation, and the right hardware tier together determine whether your appliance garage becomes a feature you love every morning or a problem you wish you had solved differently. Done well, it is one of the most satisfying small upgrades in modern kitchen design.
One additional planning consideration worth noting is the electrical strategy. Appliance garages need power inside the cabinet, and the location of those outlets affects both the safety and convenience of the installation. Outlets mounted on the back wall of the garage at counter height let you plug in the appliance once and leave it powered, but they create a visible cord run through the garage interior. Outlets mounted in the toe-kick or below the counter line let you tuck cords out of sight but require longer reach when plugging in. Consult your electrician on whether the garage outlet should be on its own circuit. A 1500-watt espresso machine drawing simultaneously with a 1200-watt toaster easily trips a shared 15-amp circuit and produces a kitchen full of frustrated cooks every Saturday morning.
Plan also for the hidden but consequential detail of internal lighting. A dark cabinet interior makes appliance retrieval awkward, especially for older cooks with reduced low-light vision. A simple LED puck light on a motion sensor, activated when the garage door opens, illuminates the interior automatically and adds perhaps $30 to the project cost. This single small upgrade is the most consistently appreciated detail in finished appliance garage installations and the one most frequently forgotten in the planning phase. With ventilation, electrical, and lighting all coordinated, the appliance garage genuinely lives up to its promise as one of the smartest small spaces in a modern kitchen.
More Articles You May Like


Comments
Post a Comment