Picture Lights Over Artwork: Choosing the Right Size and Angle
Most Artwork Hangs in the Dark
A homeowner spends hours selecting a painting, waits weeks for framing, agonizes over the hanging height, and then positions the finished piece on a wall where the only illumination comes from a ceiling fixture six feet away and a window eight feet to the left. The artwork that received careful attention at every other stage of the process receives almost no attention when it comes to lighting, and the result is a piece that looks muted, flat, and unremarkable during most of the day. Colors appear washed out. Textures disappear. The subtle tonal variations that give the work its depth and character become invisible under generic ambient light that illuminates the wall uniformly from above. A painting without dedicated light is furniture without a room to put it in: technically present but functionally diminished.
The difference between a properly lit artwork and an unlit one is not subtle. Gallery directors and museum curators have understood this for centuries. The International Council of Museums (ICOM) publishes detailed lighting standards for displayed artwork, specifying illuminance levels, beam angles, and color rendering requirements that transform how visitors perceive each piece. The same principles apply at residential scale, where a $30 picture light can produce a transformation in visual impact that rivals the cost of the artwork itself. According to the American Society of Interior Designers, dedicated artwork lighting is one of the most cost-effective design upgrades a homeowner can make, delivering disproportionate visual impact relative to its modest cost and simple installation.
Picture lights are the most traditional and most accessible form of dedicated artwork illumination. A picture light is a horizontal fixture that mounts to the wall above the artwork or to the top of the frame itself, projecting a wash of light downward across the painting's surface. The fixture is visible, intentionally so, and its form contributes to the presentation of the artwork as a valued object worthy of attention. In galleries and museums, the light is infrastructure. In homes, the picture light is also decoration, a small but significant signal that the homeowner considers this piece important enough to spotlight. That signal changes how every visitor perceives both the artwork and the home.
Have you ever walked through a museum and noticed how every painting seems to glow from within, even though the gallery itself is relatively dim? That effect is entirely produced by the lighting, not by the paint. The same effect is available in your hallway, your living room, your dining room, and your staircase landing. This guide covers every decision involved in achieving it: fixture sizing, light source selection, beam angle, color temperature, mounting method, and the common mistakes that produce hot spots, shadows, and color distortion instead of the even, warm wash that professional installations deliver.
Sizing the Fixture to the Frame
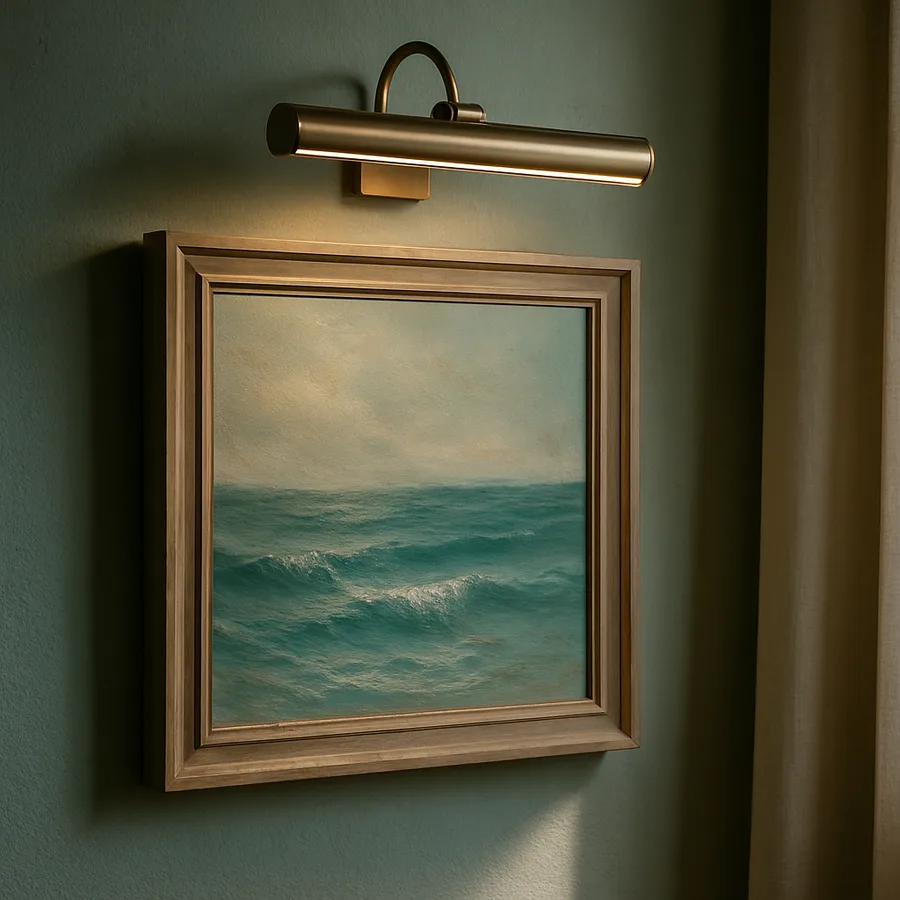
The most common mistake in picture light selection is choosing a fixture that is too small for the artwork. An undersized picture light produces a narrow beam that illuminates the center of the painting while leaving the left and right edges in shadow, creating a spotlight effect where a wash effect is needed. The general sizing rule used by lighting designers and gallery professionals is that the picture light should measure between one-half and two-thirds the width of the artwork frame. A painting in a 30-inch-wide frame should be lit by a picture light measuring 15 to 20 inches. A painting in a 48-inch-wide frame requires a fixture measuring 24 to 32 inches. Erring toward the wider end of this range is safer than erring toward the narrow end, because a slightly overlapping beam is invisible while a beam that falls short of the frame edges is immediately apparent.
Standard picture light sizes follow a progression that accommodates most framed artwork: 14 inches, 16 inches, 24 inches, 30 inches, and 36 inches are the most common lengths available from manufacturers. Some manufacturers offer custom lengths for oversized works, typically up to 48 or 60 inches. When the artwork falls between standard fixture sizes, choose the larger option. A 24-inch fixture on a 36-inch painting (two-thirds ratio) produces better results than a 16-inch fixture on the same painting (less than half ratio). The slight visual weight of a proportionally generous fixture is far less distracting than the uneven illumination produced by one that is too small.
For very large artworks measuring 60 inches or wider, a single picture light may not provide sufficient spread even at the maximum standard length. In these cases, two picture lights positioned side by side with a small gap between them, or a single extra-long fixture ordered to custom specifications, delivers the necessary coverage. An alternative approach for very large works is to use recessed ceiling-mounted adjustable fixtures aimed at the artwork from above, which can illuminate any width from a sufficient distance. However, this shifts the lighting from the traditional picture light aesthetic, where the fixture is visible and part of the display, to a concealed lighting approach that spotlights the art without drawing attention to the light source itself. Both approaches are valid, and the choice depends on whether the homeowner wants the light to be part of the visual composition or invisible within it.
Frame depth affects the projection dimension of the fixture, which is how far the light arm extends outward from the wall before curving down. A deeply framed artwork, such as a canvas in a floater frame or a shadowbox, requires a picture light with enough projection to clear the frame's top edge and cast its beam onto the artwork surface rather than onto the top of the frame. Most standard picture lights offer 3 to 5 inches of projection, which is sufficient for frames up to 2 inches deep. Deeper frames, particularly those found on contemporary canvases, may require extended-arm fixtures or fixtures designed specifically for deep-profile framing. Measure the frame depth from the wall surface to the front face before purchasing, and verify that the fixture's projection exceeds this measurement by at least one inch.
Beam Angle, Aiming, and Even Coverage
The beam angle of a picture light determines how wide the light spreads as it travels from the fixture down to the artwork surface. A narrow beam angle of 15 to 25 degrees concentrates the light into a tight column that is bright in the center and dim at the edges, suitable for illuminating a single small piece or creating a dramatic gallery spotlight effect. A wide beam angle of 40 to 60 degrees spreads the light across a broader area with more gradual falloff, producing the even wash that most residential artwork installations require. For standard rectangular paintings and prints, a beam angle between 30 and 45 degrees produces the best balance of brightness and uniformity across the artwork surface.
The aiming angle, which is the tilt of the fixture arm relative to vertical, works in conjunction with the beam angle to determine where the light falls on the artwork. A picture light mounted at the top of a 36-inch-tall painting and aimed straight down at zero degrees illuminates only the upper portion of the canvas. The same fixture tilted outward at 30 degrees from vertical projects the beam further down the canvas, covering the lower two-thirds but potentially missing the top. The correct aiming angle depends on the fixture's mounting height relative to the artwork's center, but most picture lights are designed with a fixed or adjustable arm tilt that defaults to approximately 20 to 30 degrees from vertical, which covers the full surface of artwork mounted at the standard center-at-60-inches height.
Hot spots are the most visible symptom of incorrect aiming. A hot spot is a bright concentration of light on one area of the painting, usually the upper-center region, that is visibly brighter than the surrounding areas. Hot spots occur when the beam angle is too narrow for the artwork's size or when the fixture is aimed so that the center of the beam hits the canvas directly while the beam's edges fall off the surface before reaching the bottom of the frame. The solution is a wider beam angle, a greater mounting distance above the artwork, or a steeper aiming angle that pushes the brightest part of the beam toward the artwork's center rather than its top edge. Adjustable picture lights allow the homeowner to correct hot spots after installation by tweaking the arm angle until the illumination appears uniform across the entire surface.
The Illuminating Engineering Society (IES) recommends a uniformity ratio of no worse than 3:1 for gallery lighting, meaning the brightest point on the artwork should be no more than three times as bright as the dimmest point. Achieving this ratio with a picture light requires the combination of adequate fixture size, appropriate beam angle, and correct aiming angle described above. A simple test is to step back 8 to 10 feet from the illuminated artwork and evaluate whether any section appears noticeably brighter or darker than the rest. If the top third looks bright while the bottom third looks dim, increase the aiming angle. If the center looks bright while the sides are dark, the fixture is too small for the artwork. These adjustments take minutes and produce results that are immediately visible.
Color Temperature and Color Rendering for Artwork
Color temperature, measured in Kelvin, determines whether the light cast on your artwork appears warm and golden or cool and bluish. This single specification has more influence on how your painting looks under artificial light than any other factor. A warm 2700K light emphasizes red, orange, and yellow tones, making warm-palette paintings appear rich and inviting but potentially shifting blues and greens toward muddiness. A cool 5000K light renders blues and greens with clarity but can make warm tones appear harsh and skin tones look pallid. For most residential artwork lighting, a color temperature between 2700K and 3000K produces the most flattering results, consistent with the warm ambient light typical of living spaces, while preserving adequate color fidelity across the spectrum.
Color Rendering Index, or CRI, measures how accurately a light source renders the full spectrum of colors compared to natural sunlight, which has a CRI of 100. A picture light with a CRI of 80, which is the minimum standard for most residential LED products, reproduces colors adequately but may dull certain hues, particularly reds and deep blues. A CRI of 90 or above, classified as "high CRI," reproduces colors with significantly greater accuracy and is the minimum specification recommended by the Architectural Digest editors for any application where color fidelity matters. For original paintings, limited-edition prints, and photographs with carefully calibrated color profiles, a CRI of 95 or above is ideal. Several LED picture light manufacturers now offer 95+ CRI products specifically designed for artwork illumination, including lines from Cocoweb, Battery Operated LED Art Light, and House of Troy.
The interaction between color temperature and CRI creates four distinct lighting scenarios for artwork. High CRI plus warm temperature produces the most pleasing residential result, rendering colors accurately within a warm tonal envelope that flatters most artwork and coordinates with the surrounding room's lighting. High CRI plus cool temperature produces the most museum-like result, with sharp color accuracy and a clinical clarity that some homeowners find beautiful and others find sterile in a residential context. Low CRI plus warm temperature is the most common default in inexpensive LED fixtures and produces acceptable results for decorative prints but noticeably dulls the richness of high-quality paintings. Low CRI plus cool temperature is the worst combination for artwork, producing flat, washed-out color with an unpleasant bluish cast. Always check both specifications before purchasing.
UV emission is a secondary light-source concern for valuable or irreplaceable artwork. Incandescent and halogen bulbs, once the standard for picture lights, emit measurable ultraviolet radiation that degrades pigments and fades colors over years of exposure. LED light sources emit virtually zero UV radiation, making them the safest choice for artwork illumination by a wide margin. The American Institute for Conservation (AIC) recommends LED lighting for all artwork display applications, citing both the absence of UV emission and the absence of infrared heat, which can dry canvases and crack paint over extended exposure periods. If you are still using halogen or incandescent picture lights, replacing the bulbs or the entire fixture with LED equivalents protects your artwork while simultaneously reducing energy consumption by 80 percent or more.
Mounting Options for Different Wall Types and Artwork
Picture lights mount in one of three configurations: wall-mounted above the frame, frame-mounted on the top edge of the frame itself, or hardwired into the wall with no visible fixture body. Wall-mounted picture lights are the most common type, attaching to the wall surface via a backplate secured with screws or anchors. The fixture extends from the backplate on an arm that arcs over the top of the artwork frame and positions the light source above the painting's center. Wall mounting allows the fixture to be positioned at the optimal height relative to the artwork and can accommodate artwork of any weight, since the fixture's load is borne by the wall rather than the frame.
Frame-mounted picture lights, also called clip-on or clamp-on picture lights, attach directly to the top edge of the artwork frame using a spring clamp, set screws, or a padded clip. This mounting method requires no wall penetration whatsoever, making it ideal for renters, for artwork hung on surfaces that resist fasteners like brick or concrete, and for gallery walls where artwork is rotated frequently. The limitation is weight. A frame-mounted picture light adds 1 to 3 pounds to the top edge of the frame, which increases the load on the hanging hardware and shifts the center of gravity upward, potentially causing the frame to tilt forward. Lightweight frames and wire-hung artwork are most susceptible to this effect. Test the frame's stability after attaching a frame-mounted light, and upgrade the hanging hardware if necessary to accommodate the additional load.
Battery-operated picture lights have expanded the category's reach into spaces where no electrical outlet is accessible. Cordless LED picture lights powered by rechargeable lithium batteries offer 8 to 40 hours of runtime per charge depending on brightness level, and several models include remote controls for on/off and dimming. The Better Homes and Gardens editorial team has highlighted battery-operated picture lights as one of the simplest ways to add gallery-quality lighting to hallways, staircase landings, and powder rooms where running electrical cord to an artwork location is impractical or impossible. The trade-off is the maintenance burden of periodic recharging, which modern USB-C rechargeable models have reduced to a quick cable connection every week or two.
Hardwired picture lights connect to electrical wiring inside the wall, eliminating the cord entirely and producing the cleanest possible installation. A junction box is installed in the wall at the fixture's mounting location, and the picture light connects directly to the wiring behind the backplate. A wall switch or dimmer controls the fixture. This is the premium option favored in custom homes and professional interior design projects, but it requires electrical work during construction or renovation and is not easily relocated once installed. For homeowners who know exactly where their artwork will hang for years to come, hardwired picture lights deliver the most polished result. For everyone else, the flexibility of plug-in or battery-operated alternatives outweighs the aesthetic perfection of a hardwired installation.
Common Mistakes and How to Avoid Them
The five most frequent picture light mistakes, each of which undermines the fixture's purpose and the artwork's presentation, are consistently observed by lighting designers and gallery professionals. Mistake one: fixture too small. As discussed in the sizing section, a fixture that does not cover at least half the artwork's width produces a spotlight rather than a wash, drawing attention to the center of the painting at the expense of the edges. The fix is straightforward: replace the fixture with one that falls within the half-to-two-thirds ratio. Mistake two: wrong color temperature. A 5000K daylight bulb in a living room with 2700K ambient lighting makes the artwork look like it belongs in a hospital corridor. Match the picture light's color temperature to the room's ambient light within 300K for visual coherence.
Mistake three: mounting too close to the artwork. A picture light mounted directly at the top edge of a tall painting cannot spread its beam across the full surface, because the geometry does not allow it. The closer the light source is to the artwork surface, the narrower the area it can cover. Moving the fixture 4 to 6 inches above the frame's top edge increases the throw distance and allows the beam to spread to the frame edges before it reaches the bottom of the painting. Mistake four: ignoring glare on glazed artwork. Paintings under glass or acrylic glazing reflect light like a mirror at certain angles, creating a bright rectangular reflection of the picture light that obscures the artwork underneath. Tilting the fixture so that the primary beam angle avoids the reflection angle, typically by increasing the downward tilt, eliminates this glare for a viewer standing at normal distance.
Mistake five: treating all artwork the same. A matte oil painting, a glossy photograph behind glass, a heavily textured impasto canvas, and a watercolor on paper each respond differently to the same light. Oil paintings with texture benefit from light angled to graze across the surface, which reveals the brushwork and dimensionality of the paint. Flat prints behind glass benefit from light angled more steeply to minimize reflection. Watercolors, which are the most light-sensitive medium, benefit from lower illuminance levels, ideally under 15 foot-candles, to prevent fading over time. Evaluating each piece individually and adjusting the picture light's angle and brightness accordingly produces results that honor the artwork's specific characteristics rather than applying a one-size-fits-all formula.
What is the most valuable or meaningful piece of artwork in your home, and how does it look right now under its current lighting? Walk over to it, look at it carefully, and notice whether the colors appear as vivid as they did in the gallery or shop where you first saw it. Notice whether the surface appears flat or dimensional. Notice whether the edges of the frame are as bright as the center. If any of these observations reveal a gap between what the artwork could look like and what it currently looks like, a properly chosen and correctly installed picture light closes that gap entirely. The investment is small, the installation is simple, and the visual payoff arrives the moment you flip the switch for the first time. Browse the picture light collections at your preferred lighting retailer this week and give your artwork the presentation it deserves.
More Articles You May Like


Comments
Post a Comment