Laundry Room Utility Sink Placement Next to Washer Hookups
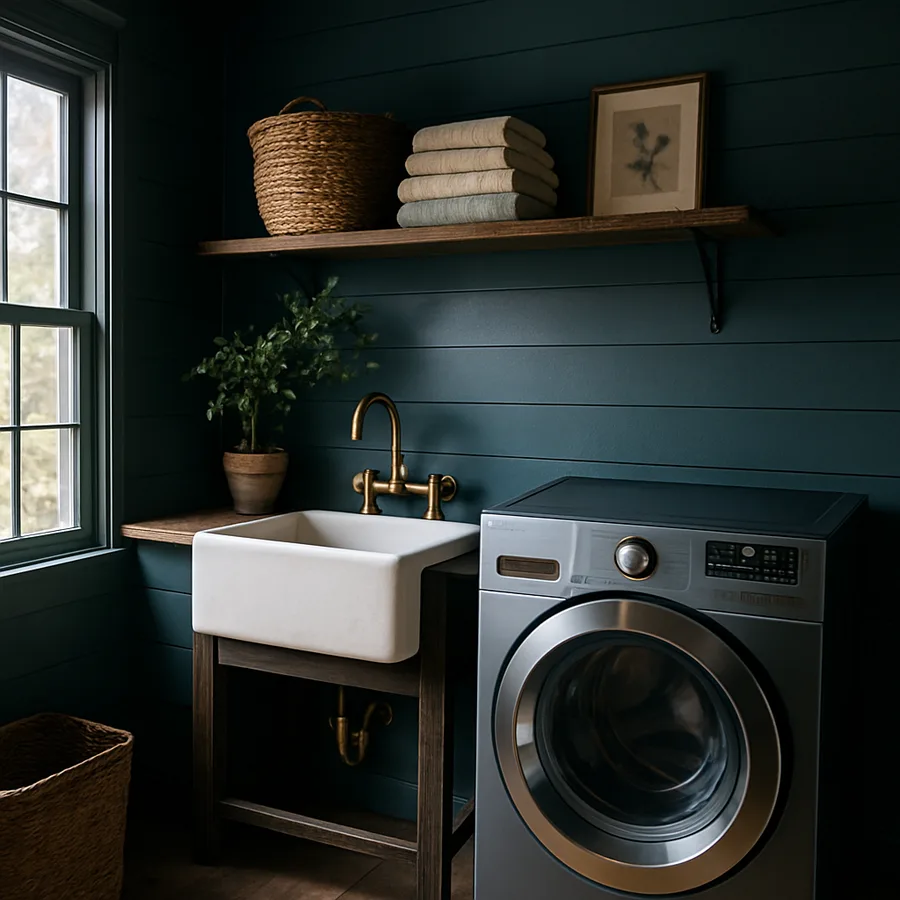
Of all the small decisions that go into designing a laundry room, the placement of the utility sink relative to the washer hookups has an outsized effect on both daily usability and long-term plumbing cost. Locate the sink next to the washer, and you shorten drain runs, simplify venting, reduce the risk of drain backflow, and put a basin exactly where most of the pre-wash, hand-wash, and overflow work actually happens. Locate the sink across the room, and you turn a two-day plumbing rough-in into a four-day ordeal that involves cutting more floor, routing more vent stacks, and, if you are unlucky, opening a second wall for access.
The utility sink has evolved from the basement workhorse of previous generations into a genuinely useful fixture in modern laundry-room design. The National Association of Home Builders (NAHB) has documented that utility sinks appear in roughly half of new single-family laundry-room specifications and are frequently listed as a feature buyers actively seek. That popularity tracks with the growing recognition that laundry rooms are, increasingly, multifunction spaces: they pretreat stains, hand-wash delicates, clean pet dishes, rinse paintbrushes, and occasionally bathe small dogs.
Why Proximity to the Washer Hookups Matters Plumbing-Wise
Every plumbing fixture in a home connects to two systems: a water supply and a drain-waste-vent (DWV) system. The washer already requires both, and the hookups are typically rough-in on a shared wall with the utility sink. Co-locating the sink with the washer lets both fixtures share the same water supply branch and the same drain and vent.
The International Plumbing Code (IPC) and the Uniform Plumbing Code (UPC), published respectively by the International Code Council and IAPMO, set the standards that govern how these systems are installed. Both codes recognize the utility sink as a laundry tray fixture and allow it to share a common drain with the washer standpipe under specific conditions. When the sink is within a few feet of the washer, the branch drain that serves the washer can often serve the sink too, saving the installation of a separate branch that would otherwise need its own vent.
That matters because venting is what drives the cost of a plumbing rough-in. A fixture located far from the existing stack generally needs its own vent extension up through the roof or an air admittance valve where permitted, plus a dedicated drain run. Co-located fixtures can often share venting and save real money. For a typical residential laundry rough-in, the difference between a well-planned co-located layout and a poorly planned split layout can be hundreds of dollars in materials and several additional hours of labor.
Overflow Safety and the Hidden Value of an Adjacent Basin
This is the functional argument for putting the sink next to the washer, and it is genuinely important. Front-load washers drain by pumping water up through a drain hose into a standpipe or, in some jurisdictions and older installations, directly into the utility sink. If the standpipe clogs or the drain line backs up, water has to go somewhere. When the sink sits next to the washer, a slow drainage issue shows up first as a slowly filling sink rather than as water on the floor. The sink becomes a mechanical canary, an early warning system for drain problems.
The Insurance Information Institute tracks residential property claims, and appliance-related water damage is consistently among the top five causes of non-weather homeowners' insurance claims. A backed-up washer drain that overflows onto a laundry room floor can cause thousands of dollars of damage, especially if the laundry room is on a second floor above a finished ceiling. A laundry room with an adjacent utility sink catches problems before they reach the floor.
Have you ever come home to a puddle spreading from behind your washer? It is one of the least pleasant homeowner discoveries. A properly installed standpipe in a sink-adjacent layout makes that scenario rare. Combine that with a floor drain in the room and a water-alarm sensor near the floor, and you have genuine, layered protection against the most common cause of laundry-related damage. The American Society of Home Inspectors (ASHI) consistently flags missing laundry-room floor drains and poorly routed standpipes as high-priority issues in inspection reports.
The Ideal Layout: Washer, Sink, Dryer, and Counter
The highest-performing laundry-room layout puts the sink immediately to one side of the washer, with the dryer on the other side, and a continuous counter running across all three. The water-using fixtures share a wet wall; the dryer vents through the same wall to the exterior; the counter spans everything and provides folding and staging space above.
Specific dimensions matter. The sink cabinet is typically 24 to 30 inches wide, with the basin itself measuring around 20 inches by 16 inches interior. A utility sink is deeper than a kitchen sink, often 12 to 14 inches deep, to accommodate hand-washing bulky items or filling buckets. Place the sink cabinet 18 to 24 inches from the washer to leave clearance for the washer door to swing open, if it is a front-load model, or for the top to open if it is a top-load. Add 18 to 24 inches on the other side of the washer to the dryer for the same reason.
Counter height over the appliances and the sink should match. Most utility-sink cabinets are standard 36-inch base height, which is two to four inches lower than the ideal folding-counter height discussed in our standing-height folding counter article. There are two solutions: either run a single 38-inch counter across everything and accept that the sink is slightly lower, or run a split-level counter with the sink at 36 inches and the folding zone at 40 inches. The split-level approach is more complex but genuinely more ergonomic for both tasks.
Faucet Selection: More Than a Kitchen Afterthought
A utility-sink faucet does different work than a kitchen faucet. It fills five-gallon buckets, rinses paintbrushes, hand-washes delicates, and occasionally bathes a small dog. It needs high flow, a tall spout, a pull-down or pull-out sprayer, and a body tough enough to survive chemical cleaners and hot water over decades.
Look for a faucet with a gooseneck or high-arc spout at least 12 inches above the sink rim. That clearance lets you fit a mop bucket, a gallon jug, or a laundry hamper under the stream. A pull-down sprayer with a spray-and-stream toggle is the single most useful feature for a utility sink. If you have ever tried to rinse a full bucket of dirty rags under a fixed kitchen spout, you already know why.
Flow rate is worth attention. Federal policy under the U.S. Department of Energy (DOE) caps kitchen and bathroom faucet flow at specific gallons-per-minute thresholds, but utility and pot-filler faucets in some categories have different limits. A utility faucet rated at 2.2 to 2.5 gallons per minute fills buckets meaningfully faster than a 1.8 gpm bathroom faucet. Verify the specification with your plumber and with current code before purchase.
Finish matters too. A utility-sink faucet will see bleach, ammonia, and occasionally denatured alcohol. Solid brass construction with a PVD finish resists chemical damage better than plated steel. Ask for the manufacturer's warranty on the cartridge and finish; reputable manufacturers certified by the Plumbing Manufacturers International (PMI) trade association generally warranty the finish for five years or more on a utility-grade fixture.
Sink Material, Depth, and Supporting Hardware
Utility sinks come in four common materials: stainless steel, composite granite, cast iron, and thermoplastic. Each has a distinct profile.
Stainless steel is the most popular for good reason. It is lightweight, easy to clean, stain-resistant, and priced reasonably. Look for 16- or 18-gauge steel; thinner gauges feel flimsy and can dent. Composite granite, made from crushed stone bonded with resin, is quieter than stainless because water does not ring off it the same way, and it resists scratching, but it is heavier and more expensive. Cast iron with a porcelain enamel finish is the traditional choice; it is nearly indestructible but very heavy and can chip if struck hard with a metal tool. Thermoplastic sinks, often called mop basins in commercial contexts, are the cheapest and most acid-resistant option; they are less attractive but completely functional.
Depth is a key specification. A utility sink should be at least 10 inches deep internally; 12 to 14 inches is better for most applications. Shallower basins splash more and fail at the bucket-filling use case. Do you plan to hand-wash large items like wool sweaters or delicate curtains? If yes, specify 14 inches minimum. Are you primarily filling mop buckets? Twelve inches is plenty.
Supporting hardware rounds out the installation. A good utility sink installation includes a stainless-steel grid on the bottom to protect the basin from dropped tools, a swing-arm towel holder mounted to the side of the cabinet, a deck-mounted soap dispenser, and adequate GFCI-protected outlet coverage on the nearby wall. The National Electrical Code (NEC) requires GFCI protection on all laundry-room receptacles within six feet of a sink, so the electrical layout should be planned to match the sink position.
Common Mistakes and How to Avoid Them
Several predictable errors show up in poorly planned laundry-room sink installations. The first is placing the sink on the opposite wall from the washer. This doubles the plumbing cost, separates the overflow-protection benefit from the washer, and creates a daily workflow where water from the washer pretreat has to be carried across the room.
The second is specifying a sink that is too shallow. A six-inch-deep laundry basin is barely a sink; it is a decorative feature. Pretreating a stain requires submerging the garment, which means at least eight inches of standing water, which is impossible in a six-inch basin. Go deep or skip the sink entirely.
The third mistake is undersizing the supply lines. A utility faucet with a pull-down sprayer and a 2.5 gpm flow rate demands adequate supply; half-inch PEX or copper is the minimum. Running a utility sink off a three-eighths-inch supply line produces anemic pressure and a frustrated homeowner. The IAPMO Green Plumbing Supplement, which guides efficient fixture selection, addresses this balance between flow and conservation and is worth consulting during design.
The fourth mistake is forgetting about the sink trap and cleanout access. A utility sink will eventually clog; hair, lint, and grit accumulate in the P-trap over years. Design the cabinet below the sink so the trap is accessible without major disassembly, and include a removable panel if the cabinet is fully enclosed. Have you ever fished a toy out of a utility sink trap? If the cabinet is sealed, that becomes a surprisingly expensive service call.
Conclusion: A Small Fixture That Anchors the Whole Room
Placing a utility sink next to the washer hookups is one of those design decisions that looks minor on paper and turns out to be foundational in practice. The plumbing savings are real. The overflow protection is genuinely valuable. The workflow advantages of having a basin next to the appliance that most needs it are the kind of benefit you only fully appreciate after a year of daily use. Any laundry-room renovation that pushes the sink away from the washer to accommodate cabinetry or aesthetics is almost certainly making a mistake, and a savvy plumber or designer should push back on the layout before the rough-in is committed.
As you plan, prioritize the core decisions in the right order. First, confirm the wet wall and locate the washer hookups. Second, place the sink immediately adjacent, allowing for washer door swing clearance. Third, run the dryer on the other side of the washer and vent through the same exterior wall. Fourth, specify a deep, high-flow utility sink with a pull-down sprayer faucet. Fifth, add a floor drain and a water-sensor alarm for belt-and-suspenders overflow protection.
The supporting considerations of material selection, faucet specification, cabinet design, electrical placement, and ventilation all follow from that core layout. Resources from the NAHB, the NKBA, and IAPMO provide detailed design and code guidance, and any competent local plumber will know the local code variations that apply in your jurisdiction. The American Society of Plumbing Engineers (ASPE) also publishes residential design resources worth consulting during the planning phase.
A laundry room with a properly placed utility sink punches well above its weight. It handles the pretreat, the hand-wash, the bucket-fill, the paintbrush rinse, and the small-pet bath, all while providing passive overflow protection for the single most claim-generating appliance in the house. It is a small fixture that anchors the entire room.
If you are planning a new laundry room or rethinking an older one, start by mapping the wet wall and placing the utility sink next to the washer before you specify anything else. Guidance from the NAHB, IAPMO, and the U.S. Department of Energy will help you get the plumbing, the fixtures, and the efficiency right the first time.
More Articles You May Like



Comments
Post a Comment