German Schmear Brick Technique for a Rustic Mortar-Washed Look
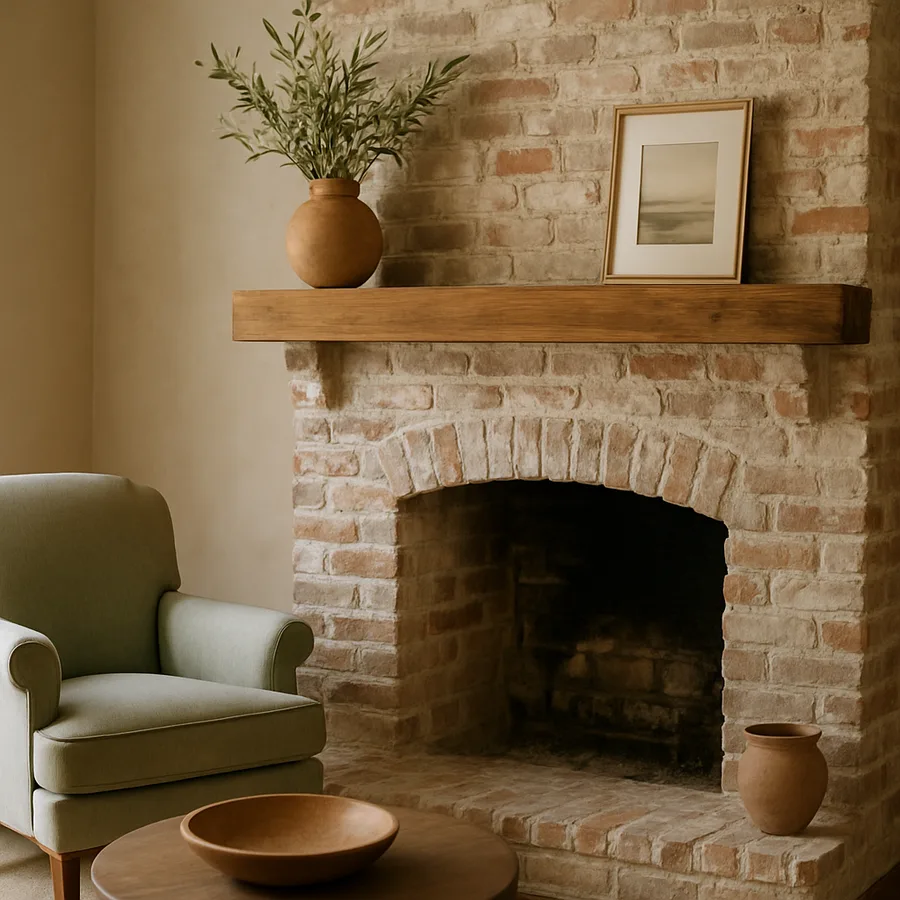
There is something undeniably captivating about exposed brick that has been softened by time and weather, its sharp edges blurred by decades of mortar residue and organic patina. The German schmear technique, sometimes called mortar wash or schmear coat, recreates this aged European aesthetic on ordinary brick surfaces by applying a thin, irregular layer of mortar or thinned joint compound directly over the brick face. Unlike paint, which completely obscures the brick's texture and color, a schmear allows the underlying masonry to show through in unpredictable, organic patterns that give each wall a one-of-a-kind character. According to the Brick Industry Association, mortar-washed treatments have seen a 28 percent surge in specification for residential interiors, driven by homeowners seeking authenticity and texture in an era of smooth, manufactured surfaces. This guide walks through everything you need to know to execute a German schmear finish that looks naturally weathered rather than artificially applied, whether your canvas is an interior fireplace, an accent wall, or an exterior facade.
Understanding the Origins and Appeal of the Schmear
The German schmear technique traces its roots to northern European masonry traditions, particularly in Germany and the surrounding regions where builders would coat exterior brick and stone walls with a rough layer of mortar to provide additional weather protection while giving structures a unified, lime-washed appearance. These historical applications were primarily functional, designed to seal porous masonry against driving rain and frost cycles that could damage exposed mortar joints. Over time, as the protective coating wore unevenly, revealing patches of the brick beneath in irregular patterns, the aesthetic accidentally produced became admired for its character and warmth. Contemporary designers have reverse-engineered this happy accident into a deliberate finishing technique that achieves the same time-worn beauty without waiting a century for natural weathering to do the work.
The appeal of a schmear finish lies in its ability to occupy a middle ground between raw brick and painted brick, two extremes that each carry drawbacks. Raw brick, while beautiful, can feel visually heavy and dark in rooms with limited natural light, and its strong orange or red tones may clash with a homeowner's preferred color palette. Painted brick solves the color problem but sacrifices the texture and depth that made the brick appealing in the first place, producing a flat, uniform surface that many purists find disappointing. German schmear preserves the brick's dimensional texture, its mortar lines, and glimpses of its natural color while softening the overall appearance to a tone that ranges from creamy white to warm gray depending on the mortar mix used. The result is a surface that feels both old and clean, rustic and refined, a combination that resonates strongly with farmhouse, French country, Mediterranean, and transitional design styles.
What makes schmear particularly interesting as a design tool is its inherent imperfection. No two schmeared walls look alike, and even within a single wall, the coverage varies from brick to brick in ways that are nearly impossible to replicate with paint or manufactured products. This randomness is the technique's greatest strength and its greatest challenge: achieving a result that looks effortlessly weathered requires a deliberate but loose hand during application. The Brick Industry Association emphasizes that the best schmear finishes maintain enough variation to tell a visual story, with some bricks almost fully exposed, others partially veiled, and a few nearly hidden beneath the mortar. This variation creates a depth of field effect that draws the eye across the surface and rewards closer inspection with new details at every distance.
Is German schmear right for every brick surface? Not necessarily. The technique works best on brick that has a relatively rough, textured face because the mortar needs physical tooth to grip the surface. Smooth, glazed, or sealed brick will not hold the mortar effectively and may require mechanical roughening with a wire brush or light sandblasting before the schmear will adhere properly. Additionally, the existing brick color affects the final result: lighter brick tones produce a subtler effect because there is less contrast between the mortar and the base, while darker red or brown brick creates a more dramatic, high-contrast finish. Understanding how your specific brick will interact with the mortar is essential for setting realistic expectations before you begin.
Selecting Materials and Preparing the Surface
The mortar mix used for a German schmear is the single most important material decision in the entire project, and getting it right determines whether the finished wall looks authentically aged or sloppily applied. Traditional schmear uses Type S or Type N masonry mortar, mixed to a consistency slightly thinner than standard joint-filling mortar but thick enough to cling to a vertical surface without immediately slumping. A common starting ratio is one part Portland cement to one part hydrated lime to six parts fine masonry sand, mixed with enough water to achieve a thick pancake-batter consistency. The lime component is critical because it produces the soft, chalky white tone that distinguishes a schmear from ordinary mortar and gives the finish its characteristic old-world warmth.
For homeowners who prefer a simpler preparation, pre-mixed mortar products available at major home improvement retailers can be thinned with water to an appropriate schmear consistency. Some applicators achieve excellent results using thinned drywall joint compound instead of true mortar, particularly on interior surfaces where weather resistance is not a concern. Joint compound offers the advantage of longer working time and easier cleanup, but it produces a softer finish that can scratch or dent more easily than cured mortar. On exterior walls or fireplaces that generate heat, genuine masonry mortar is strongly recommended for its durability and heat resistance. Whatever product you choose, mix enough to complete at least one full wall section in a single session, because matching the exact consistency and coverage pattern across batches mixed on different days is extremely difficult.
Surface preparation is straightforward but cannot be skipped. Begin by cleaning the brick thoroughly with a stiff brush to remove dust, cobwebs, loose mortar fragments, and any efflorescence, the white crystalline deposits that sometimes appear on masonry surfaces. If the brick has been previously sealed or painted, the schmear will not bond reliably, and you will need to strip the existing coating before proceeding. Once the brick is clean and dry, lightly mist the surface with water from a spray bottle immediately before applying the mortar. This dampening step prevents the dry brick from sucking moisture out of the mortar too quickly, which would cause it to dry before you have time to work it into the pattern you want. The wall should be damp but not dripping, with no standing water visible on the brick faces.
Gather your application tools before mixing the mortar so everything is within reach when the clock starts ticking. You will need a mason's trowel or a wide putty knife for applying the mortar, a grout sponge or damp rag for wiping back areas where you want more brick to show through, a bucket of clean water for rinsing your tools and sponge frequently, and drop cloths or plastic sheeting to protect floors and adjacent surfaces. Latex or nitrile gloves are highly recommended because wet mortar is alkaline and will dry out and crack your skin with prolonged contact. Some applicators prefer to work with their gloved hands directly, spreading and smearing the mortar by feel rather than with tools, which can actually produce a more organic, less tooled appearance.
Application Techniques for an Authentic Finish
The actual schmear application is where artistry meets execution, and developing a rhythm that produces natural-looking variation takes a bit of practice before it becomes intuitive. Begin by loading a generous amount of mortar onto your trowel and smearing it across a section of brick roughly three to four square feet in size, pressing the mortar into the joints and across the brick faces with broad, sweeping strokes. Do not attempt to be precise or uniform at this stage; the goal is to get mortar coverage across the entire section, filling joints and coating faces to varying depths. Work the mortar into the texture of the brick by pressing firmly enough to force it into the surface irregularities, which creates the mechanical bond that will hold the finish in place as it cures.
Once a section is coated, the critical step of wiping back begins. Using a damp, not wet, grout sponge, begin removing mortar from selected brick faces while leaving it thick in other areas and in the joints. This is the step that creates the characteristic German schmear pattern, and your approach should be deliberately inconsistent. Wipe some bricks almost clean to expose their full color and texture. Leave adjacent bricks almost fully covered so they nearly disappear under the mortar. Allow a gradient of coverage on others, with one end of the brick exposed and the other end buried. The key is resisting the natural human urge toward symmetry and evenness; the beauty of a schmear finish comes precisely from its asymmetry and randomness.
Timing is crucial during the wipe-back phase. If you remove mortar too soon, it will not have developed enough adhesion and will come off too cleanly, leaving no residue on the wiped bricks. If you wait too long, the mortar will begin to set and become difficult to remove without scraping, which can damage the underlying brick face. The sweet spot varies depending on temperature, humidity, and your specific mortar mix, but generally falls between five and fifteen minutes after application. On hot, dry days, you will need to work faster because the mortar sets more quickly. On cool, humid days, you will have more time to finesse the coverage pattern. Working in small sections rather than coating an entire wall at once gives you the control to wipe back each area at the optimal moment.
After completing the wipe-back on a section, step back several feet and assess the overall pattern before moving on. Squint your eyes to blur the details and evaluate the balance of light and dark areas across the surface. If the coverage looks too heavy or uniform, go back with a damp sponge and expose more brick. If it looks too sparse, apply additional mortar to selected areas and blend the edges into the existing coverage. According to the Portland Cement Association, the most visually successful schmear finishes maintain approximately 50 to 70 percent mortar coverage, leaving 30 to 50 percent of the brick face visible. This ratio produces the layered, time-worn quality that makes the technique so appealing without tipping into either extreme of too much coverage or too little.
Adapting the Technique for Fireplaces and Interior Walls
Fireplaces represent the most popular interior application for German schmear, and for good reason. A brick fireplace surround is often the largest masonry surface inside a home, and its prominent position as a room's focal point means its appearance disproportionately influences the entire space's character. Schmearing a dated red brick fireplace can transform it from an eyesore that the homeowner has been considering covering with drywall into a stunning centerpiece that anchors the room's design. The warmth and texture of a schmeared fireplace surround pairs beautifully with reclaimed wood mantels, wrought iron accessories, and the dancing light of an actual fire, creating a composition that feels both timeless and intentionally curated.
When schmearing a fireplace, there are specific considerations that differ from a standard wall application. The firebox itself, where the fire burns, should never be schmeared because the extreme temperatures will cause the mortar finish to crack, flake, and potentially release debris into the room. Limit your application to the surround, the outer face of the fireplace structure that does not directly contact flames. Even on the surround, temperatures can reach levels that standard joint compound cannot withstand, so always use genuine masonry mortar rated for heat exposure on fireplace applications. The hearth, if it is brick, can be schmeared to match the surround, but use a more durable mortar mix on this horizontal surface because it will endure foot traffic, dropped logs, and cleaning that vertical surfaces do not.
Interior accent walls of standard drywall-over-stud construction present a different scenario because you first need brick to exist before you can schmear it. Thin brick veneer, sometimes called brick tiles, offers an excellent solution: these half-inch-thick slices of real brick adhere to drywall or cement board with mastic or mortar and create a convincing masonry surface at a fraction of the weight and cost of full-depth brick. Once the veneer is installed and the adhesive has fully cured, which typically takes 24 to 48 hours, the surface can be schmeared exactly like traditional brick. The Brick Industry Association notes that thin brick veneer has become the most common substrate for interior schmear projects because it allows the technique to be applied in any room regardless of the existing wall construction.
How does a schmear finish hold up in high-traffic areas like kitchens, hallways, and mudrooms? When properly applied with genuine mortar on a sound brick substrate, a German schmear is remarkably durable. The cured mortar creates a hard, mineral surface that resists scuffing, does not chip under normal contact, and cannot be scratched by pets or furniture. Cleaning is straightforward: a dry dusting with a soft brush removes surface dust, and occasional spot-cleaning with a damp cloth handles more stubborn marks. The finish is not suitable for surfaces that will be regularly scrubbed or exposed to standing water, such as a shower surround, but for dry interior walls and fireplaces, it will last decades without requiring maintenance or refreshing.
Common Pitfalls and How to Avoid Them
The most frequent mistake made by first-time schmear applicators is making the mortar mix too thin. When the mortar is watery, it runs off the brick faces, pools in the joints, and dries to a thin, chalky film that lacks the thick, dimensional quality of a proper schmear. The mortar should cling to the trowel when held vertically and should stay where you place it on the brick face without immediately sliding downward. If your mix is slumping, add more dry mortar powder in small increments until the consistency thickens to a spreadable paste. Remember, you can always thin a mix that is too thick by adding small amounts of water, but adding dry material to an already-mixed batch can create lumps and inconsistencies that show in the finished surface.
Overworking the surface is another common error, particularly among detail-oriented individuals who instinctively want to fuss over every brick until it matches some mental ideal. The more you go back and rework areas that are already partially set, the more you disturb the mortar's bond with the brick and create visible trowel marks that look deliberate rather than weathered. A successful schmear requires a certain amount of letting go, accepting the results of each pass and resisting the urge to perfect every square inch. The imperfections are not mistakes; they are the entire point. If a particular brick ended up with more or less coverage than you intended, leave it alone and let it contribute to the overall randomness that makes the finish authentic.
Failing to protect surrounding surfaces is a practical mistake that creates unnecessary cleanup headaches. Wet mortar is difficult to remove from hardwood floors, carpet, and painted trim once it begins to set, and the alkalinity of masonry products can etch or discolor certain stone and metal surfaces permanently. Invest fifteen minutes before you begin in thoroughly covering floors with drop cloths, taping off adjacent trim and mantels with painter's tape, and removing any hardware or decor from the work area. This preparation time is repaid many times over by the hours of cleanup you avoid and the damage to surrounding finishes you prevent.
Attempting to schmear brick that is too cold, too hot, or too dry will also produce suboptimal results. Masonry mortar cures through a chemical hydration process that is sensitive to environmental conditions. Temperatures below 40 degrees Fahrenheit slow curing dramatically and can cause the mortar to freeze before it develops adequate strength, resulting in a powdery finish that crumbles off the wall. Temperatures above 90 degrees cause the mortar to flash-set before you can work it, eliminating your wipe-back window. The Portland Cement Association recommends working in temperatures between 50 and 80 degrees for optimal mortar workability and curing. On interior projects, controlling the room temperature with HVAC is usually sufficient; for exterior applications, plan your work for mild weather and avoid direct sun exposure on the wall during application.
Pairing Schmeared Brick with Interior Design Elements
A German schmear finish creates a rich, textural backdrop that interacts beautifully with a wide range of interior design elements and material palettes. The creamy, mineral tones of a white mortar schmear pair naturally with warm wood tones, making reclaimed timber mantels, floating shelves in natural oak, and hand-scraped hardwood floors ideal companions. Wrought iron light fixtures, fireplace tools, and hardware introduce a complementary material contrast that echoes the Old World European origins of the technique. The combination of schmeared brick, natural wood, and iron creates a material palette that reads as collected over time rather than assembled from a single catalog, which is precisely the lived-in quality that many homeowners are seeking in their spaces.
Fabric and upholstery choices can either amplify or temper the rustic character of a schmeared wall. Linen, burlap, and nubby wool textures reinforce the organic, handmade quality of the finish and create a cohesive story of natural materials and tactile surfaces. For homeowners who want to balance the rusticity with contemporary polish, pairing the schmeared wall with clean-lined upholstery in velvet or leather introduces a tension between rough and smooth, old and new, that elevates the entire room beyond a single design category. Area rugs in natural fibers like jute, sisal, or wool provide a grounding layer that connects the textural story from wall to floor.
Color temperature is an important consideration when decorating around a schmeared wall. The lime-white mortar of a standard schmear has warm undertones that harmonize with cream, honey, terracotta, sage, and other earthy hues. Cool-toned decor in icy blues, stark whites, or chrome metallics can create a jarring contrast that makes the schmear look dirty rather than deliberately aged. If your personal style leans toward cooler tones, consider mixing a small amount of gray-tinted Portland cement into your mortar to produce a cooler, more silver-toned schmear that bridges the gap between the warm brick and your cooler decorating preferences. This subtle adjustment in the mortar color can make the entire room's palette feel more cohesive and intentional.
Ready to transform your tired brick into a textured showpiece? Start with a small, low-stakes test area, perhaps the side of the fireplace that faces the wall rather than the room, to practice your application technique and test your mortar consistency before tackling the most visible surfaces. Once you have developed a feel for the material and a rhythm for the wipe-back process, the main application will proceed with greater confidence and better results. The German schmear technique rewards patience and a willingness to embrace imperfection, and the finished product will add a layer of character and warmth to your home that no paint color or wallpaper pattern could ever replicate.
More Articles You May Like



Comments
Post a Comment