Cooktop and Wall Oven Layouts for U-Shaped Kitchens
The U-shaped kitchen layout, with its three walls of cabinetry forming a horseshoe around a central work area, is one of the most efficient configurations available for residential cooking spaces. It naturally creates a compact work triangle and provides abundant counter and storage space relative to its footprint. When it comes to positioning a separate cooktop and wall oven within this layout, however, the three-wall design presents both opportunities and constraints that require careful planning. The National Kitchen and Bath Association (NKBA) guidelines specify minimum clearances and recommended distances between work zones that become particularly relevant in the enclosed geometry of a U-shaped kitchen, where every inch of wall and counter space must serve a clear purpose.
Understanding the U-Shaped Kitchen's Unique Geometry
A U-shaped kitchen is defined by three contiguous runs of cabinetry, typically with a sink centered on one wall and the remaining two walls available for cooking appliances, refrigeration, storage, and additional counter space. The interior width between opposing cabinet faces is critical to functionality. The NKBA recommends a minimum of 42 inches between facing cabinets in a single-cook kitchen and 48 inches in a kitchen where two people cook simultaneously. Below 42 inches, opening oven doors, bending to access lower cabinets, and passing between work zones becomes uncomfortably tight, especially when a hot pan is in transit from cooktop to counter.
The three-wall design creates natural zones that lend themselves to logical appliance placement. The wall containing the sink typically anchors the wet zone, where food preparation, washing, and cleanup occur. The two remaining walls, which we will call the left wing and right wing, host the cooking and refrigeration functions. The fundamental layout decision is which wing gets the cooktop and which gets the wall oven, or whether both should share the same wing with the refrigerator occupying the other. Each arrangement produces a different workflow, and the best choice depends on the kitchen's specific dimensions, the location of windows and doorways, and the cook's personal habits.
Natural light distribution is a factor that many kitchen designers consider when placing appliances in a U-shaped layout. If one wing has a window, that wall is often better suited for the cooktop than the wall oven, because the cooktop allows counter space on either side where natural light enhances food preparation visibility. A wall oven installed in a tall cabinet directly in front of a window blocks the light entirely. Conversely, a windowless wall is an ideal candidate for a tall oven cabinet because no light is sacrificed, and the solid expanse of cabinetry creates a clean, built-in appearance.
Does your U-shaped kitchen have a window on one of the side walls, and have you considered how appliance placement on that wall would affect your natural light? Mapping the light patterns in your kitchen at different times of day before finalizing the layout can reveal preferences you would not have anticipated from a floor plan alone. Morning cooks may value east-facing light at the cooktop, while evening cooks may prefer the ambient light of a west-facing window illuminating their prep area.
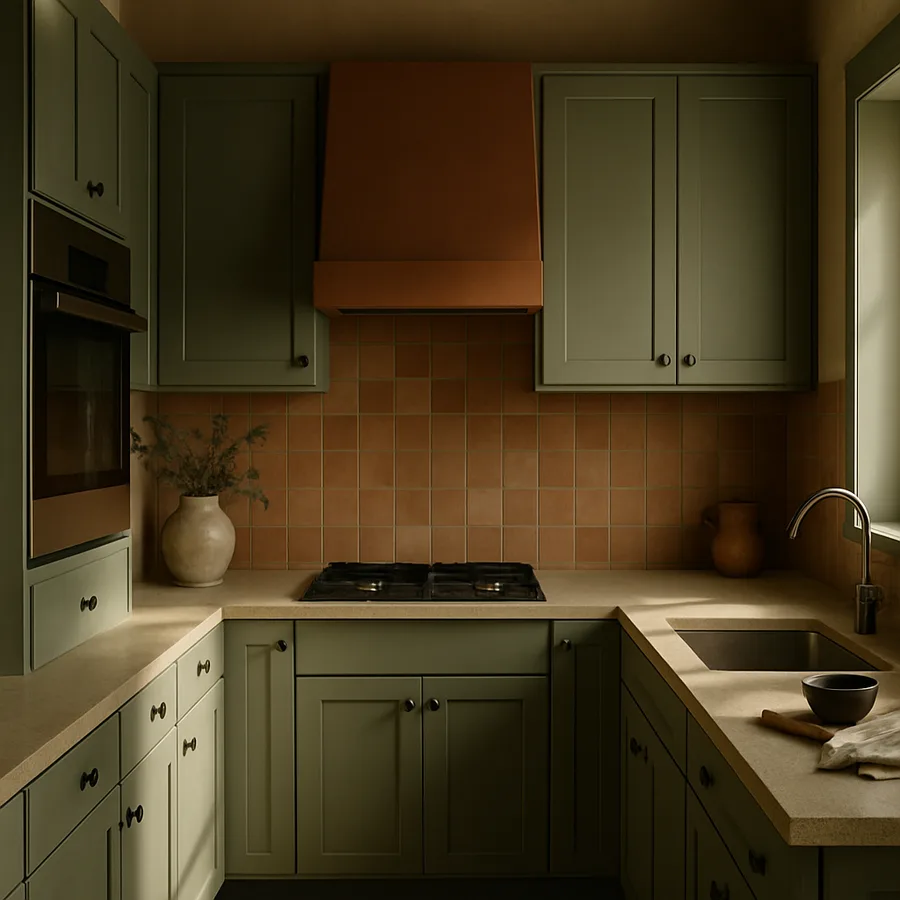
Cooktop Placement Strategies That Maximize Counter Space
The cooktop is the appliance that demands the most adjacent counter landing space because it is the primary location where ingredients are staged before cooking and where hot pans are set down immediately after removal from the heat. The NKBA recommends a minimum of 15 inches of counter space on one side of the cooktop and 12 inches on the other, with 24 inches on at least one side considered ideal. In a U-shaped kitchen, placing the cooktop along the center of one wing wall, with counter extending on both sides, satisfies these requirements most naturally and creates a balanced visual composition.
Corner placement of the cooktop, at the junction where one wing meets the sink wall, is a layout that some designers propose to free up the center of the wing for continuous counter space. While this approach has theoretical appeal, it introduces practical problems. Corner cooktops require specialized angled base cabinets or a diagonal countertop section that wastes the dead space in the corner below. Reaching the back burners of a corner-placed cooktop requires leaning across the front burners at an awkward angle, which raises safety concerns. Ventilation is also more complex in a corner placement because the hood must be mounted at an angle or in a ceiling-mounted position, increasing both cost and visual bulk.
A more effective strategy for maximizing counter space is to place the cooktop on the shorter wing if the U-shape has asymmetric arms. The shorter wall often has just enough room for the cooktop flanked by landing areas, while the longer wall accommodates the refrigerator, wall oven, and a generous stretch of prep counter. This asymmetric approach takes advantage of the natural dimension differences rather than fighting them, and it keeps the cooktop and the sink wall in closer proximity, which shortens the distance traveled when draining pasta, filling pots with water, or rinsing utensils during cooking.
If your U-shaped kitchen includes a peninsula rather than a true third wall, positioning the cooktop on the peninsula is an option worth evaluating. A peninsula cooktop faces the adjacent living or dining area, allowing the cook to interact with family or guests while cooking, a social advantage that has made this configuration increasingly popular in open-concept floor plans. The peninsula must be deep enough to accommodate both the cooktop and adequate counter space on the room-facing side, typically requiring a minimum peninsula depth of 36 inches. Ventilation for a peninsula cooktop can be handled with a downdraft system integrated into the countertop or a ceiling-mounted hood, either of which avoids the visual barrier of a wall-mounted hood.
Wall Oven Positioning for Ergonomic Access
The wall oven's greatest advantage over a range oven is the ability to install it at a height that eliminates bending and stooping, and in a U-shaped kitchen, selecting the right wall and height for the oven can dramatically improve cooking comfort. The ergonomic sweet spot for a wall oven positions the bottom of the oven cavity at approximately 30 to 36 inches above the floor, which places the oven rack at roughly waist height for an average-height adult. At this height, sliding a heavy roasting pan in and out requires no bending, and the cook can see the contents of the oven without crouching or using a flashlight. According to a study by the Cornell University Ergonomics Research Program, kitchen tasks performed at waist height reduce lower back strain by up to 40 percent compared to the same tasks performed at floor level.
In a U-shaped kitchen, the wall oven is typically installed in a tall cabinet on one of the wing walls, either as a single oven with storage or a microwave above, or as a double oven stack occupying the full height of the cabinet. The key ergonomic principle is to position the oven so that the most frequently used rack sits at a height that requires neither reaching up nor bending down. For a single oven installed above a storage drawer, this usually means the oven opening is between 30 and 34 inches above the floor. For a double oven, the lower oven should be positioned with the same waist-height principle, which means the upper oven will be at chest to shoulder height, suitable for lighter items like casseroles and cookies.
The relationship between the wall oven and the nearest counter surface is critical for safe operation. When removing a hot dish from the oven, you need an immediately accessible heat-resistant landing surface where you can set the dish down without taking more than one step. The NKBA guideline specifies that at least 15 inches of counter should be within 48 inches of the oven opening. In a U-shaped kitchen, this requirement is usually easy to satisfy because the return of the adjacent wall or the corner counter is typically within arm's reach. However, if the oven is placed at the far end of a wing, verify that the nearest counter is close enough to allow a single smooth transfer from oven to surface.
Have you tested the ergonomic height for your wall oven by simulating the motion of removing a heavy pan at various heights? A simple test using a weighted box on a shelf at different elevations can reveal your personal comfort zone, which varies with height, arm length, and any physical limitations. Customizing the oven height to the primary cook's ergonomics, rather than defaulting to a standard cabinet dimension, is one of the advantages of a custom or semi-custom kitchen renovation that a stock cabinet configuration cannot easily provide.
Managing the Work Triangle in Three-Wall Configurations
The kitchen work triangle connects the three primary work stations, the sink, the cooktop, and the refrigerator, with imaginary lines whose total length should fall between 13 and 26 feet according to traditional NKBA guidelines. Each leg of the triangle should measure between 4 and 9 feet, and no leg should be obstructed by an island, peninsula, or traffic path. In a U-shaped kitchen without an island, the enclosed geometry naturally produces a compact triangle that typically falls well within these parameters. The challenge is less about total triangle size and more about ensuring that the wall oven, which is not part of the traditional triangle, does not create a bottleneck or force awkward navigation between the three primary stations.
Placing the wall oven on the same wing as the refrigerator creates a "cold and hot" wall that groups the two appliances whose doors swing open into the work zone. This arrangement works well when the wing is long enough to separate the two appliances by at least 36 inches of counter, providing a buffer zone where dishes can be staged between refrigerator retrieval and oven insertion. If the appliances are placed too close together, both doors cannot be open simultaneously, which creates a frustrating bottleneck during meal preparation. The opposing wing, free of tall appliances, becomes a continuous sweep of counter at a uniform height, ideal for food preparation, plating, and small appliance staging.
An alternative approach distributes the tall appliances across both wings, with the refrigerator on one side and the wall oven on the other. This bilateral arrangement prevents either wing from becoming visually dominated by tall cabinets and distributes the door-swing zones so they do not conflict. The cooktop in this arrangement typically goes on the same wing as the wall oven, grouping the cooking functions together, while the refrigerator occupies the opposite wing near the sink wall, keeping cold storage close to the wet preparation zone. This is often considered the most balanced layout for a U-shaped kitchen because it separates the traffic patterns associated with cooking from those associated with ingredient retrieval.
Modern kitchen design has evolved beyond the rigid work triangle toward a more nuanced concept of work zones, which groups tasks rather than appliances. The preparation zone includes the sink, the primary cutting area, and often a secondary under-counter refrigerator. The cooking zone includes the cooktop, wall oven, and spice storage. The serving zone includes the area nearest the dining room or breakfast bar. Thinking in zones rather than triangles is particularly useful in U-shaped kitchens because the three walls naturally define three distinct zones, and the arrangement of appliances within each zone matters more than the geometric relationship between individual appliances across the whole kitchen.
Ventilation Solutions That Preserve Sightlines
Ventilation in a U-shaped kitchen deserves special attention because the enclosed geometry can trap cooking odors, steam, and airborne grease more readily than an open layout. The standard solution is a wall-mounted range hood installed above the cooktop on one of the wing walls, ducted to the exterior through the wall behind it or up through the ceiling and roof. In a U-shaped kitchen, this installation is typically straightforward because the cooktop is against an exterior or interior wall with accessible chase space for ductwork. A hood rated at 300 to 600 CFM is adequate for most residential cooktops, with higher CFM ratings needed for high-output gas burners or professional-style cooking.
The visual impact of the range hood is significant in a U-shaped kitchen because the enclosed layout means the hood is visible from virtually every angle within the space. A bulky, box-shaped hood can make the kitchen feel even more enclosed, while a sleek, low-profile hood or a custom hood integrated into the cabinetry above maintains the clean lines that make U-shaped kitchens feel organized and intentional. Chimney-style hoods in stainless steel or painted finishes have become popular choices because they serve as a visual focal point that draws the eye upward and adds a sense of height to the space. The National Kitchen and Bath Association recommends selecting a hood width that matches or exceeds the cooktop width by 3 inches on each side for optimal capture performance.
Downdraft ventilation is an alternative that eliminates the overhead hood entirely, pulling cooking fumes downward through a vent integrated into the cooktop or the countertop immediately behind it. This approach preserves sightlines and eliminates the visual weight of a hood, which can be especially appealing if the cooktop is on a peninsula or if the wing wall has upper cabinets that would conflict with a hood installation. The trade-off is that downdraft systems are generally less effective than overhead hoods at capturing rising steam and smoke, particularly from tall stockpots and high-heat cooking. Their performance is adequate for most everyday cooking but may struggle with heavy stir-frying or deep frying.
Ceiling-mounted or island-style hoods are a third option, suspended from the ceiling above the cooktop without any wall connection. These hoods work well when the cooktop is on a peninsula or when the wing wall does not extend to the ceiling. They require ceiling-mounted ductwork, which can be concealed within a soffit or routed through the attic space. The American Society of Heating, Refrigerating and Air-Conditioning Engineers (ASHRAE) standards for residential kitchen ventilation recommend that ceiling-mounted hoods be installed no more than 36 inches above the cooking surface for effective capture, a height that should be verified against the specific hood model's performance specifications.
Common Layout Mistakes and How to Avoid Them
The most frequent mistake in U-shaped kitchen appliance placement is crowding the corner, positioning the cooktop or wall oven too close to the point where two walls meet. Corner proximity limits the usable counter space on one side of the appliance, creates awkward reach angles, and can interfere with the opening of adjacent cabinet doors. A minimum of 12 inches of clear counter should separate any cooking appliance from the nearest corner, and 18 to 24 inches is preferable. This buffer zone serves as both a functional landing area and a visual breathing space that prevents the corner from feeling cluttered.
Another common error is failing to account for appliance door conflicts. In a U-shaped kitchen where the opposing walls are 42 to 48 inches apart, a wall oven door that opens downward extends roughly 20 inches into the work zone, and a dishwasher door directly across extends a similar distance. If both are opened simultaneously, they can meet in the middle, blocking passage through the kitchen entirely. Mapping the door-swing arcs of every appliance on the floor plan before committing to the layout reveals these conflicts early, when they can be resolved by shifting an appliance 6 to 12 inches along the wall rather than after the cabinetry is installed and the modifications become expensive.
Installing the wall oven at the end of a wing near the kitchen's entry point is a third mistake that compromises both workflow and safety. An oven positioned at the entry forces anyone entering or leaving the kitchen to pass immediately beside an appliance that may have a hot, open door. The oven is also as far as possible from the sink and the primary prep area, increasing the distance that hot dishes must travel. Placing the oven deeper into the kitchen, ideally on the interior portion of a wing wall where it is shielded from the traffic path, keeps it accessible to the cook while minimizing the risk of collision with passersby.
Finally, neglecting to plan for small appliance storage and staging is a layout oversight that undermines the efficiency advantages of the U-shaped design. The three walls of a U-shaped kitchen provide ample upper and lower cabinet space, but if the cooktop, wall oven, refrigerator, and sink consume most of the base cabinet and counter space, there may be insufficient room for everyday items like a coffee maker, toaster, stand mixer, and cutting boards. Designating one section of counter, ideally on the wing opposite the cooktop, as a dedicated small-appliance zone with easily accessible outlets prevents counter clutter from encroaching on the cooking and prep zones. Work with a certified kitchen designer to map every appliance, large and small, before finalizing your U-shaped kitchen layout.
Conclusion
The U-shaped kitchen is inherently well suited for a split cooktop and wall oven configuration because its three walls provide the multiple appliance locations and generous counter space that the split approach requires. The key to a successful layout is treating the three walls as distinct functional zones, assigning the cooktop to one wing and the wall oven to the position that best serves the cook's workflow, whether that means grouping it with the refrigerator on the opposite wing or placing it on the same wing as the cooktop for a consolidated cooking zone.
Every placement decision in a U-shaped kitchen involves trade-offs between counter space, sightlines, appliance door clearances, and ergonomic access. The compact geometry means that shifting an appliance even a few inches can resolve a door conflict, improve a workflow path, or create the landing space needed for safe and comfortable cooking. These are precisely the kinds of decisions that benefit from professional kitchen design expertise, because the interactions between appliance positions, cabinet configurations, and human movement patterns are difficult to optimize through intuition alone.
Whether your U-shaped kitchen is a generous 12-by-14-foot room or a compact 8-by-10-foot space, the principles of workflow efficiency, ergonomic oven height, adequate counter landing areas, and effective ventilation apply equally. The goal is a kitchen where the cook can move fluidly between preparation, cooking, and cleanup without backtracking, reaching awkwardly, or navigating around open appliance doors. When these principles are applied thoughtfully to the U-shaped layout, the result is a kitchen that is not only beautiful but genuinely efficient in daily use.
Taking the time to mock up your layout with painter's tape on the floor and temporary shelf markers at proposed oven heights provides tangible feedback that no digital rendering can fully replicate. Live in the mock-up for a few days, simulating your typical cooking routines, before giving your designer or contractor the final approval. This small investment of time consistently produces layouts that feel natural and effortless from the first day of use, avoiding the costly regrets that arise when appliance placement is finalized on paper without physical validation.
More Articles You May Like


Comments
Post a Comment