Building A Countertop Over Front Load Washer And Dryer
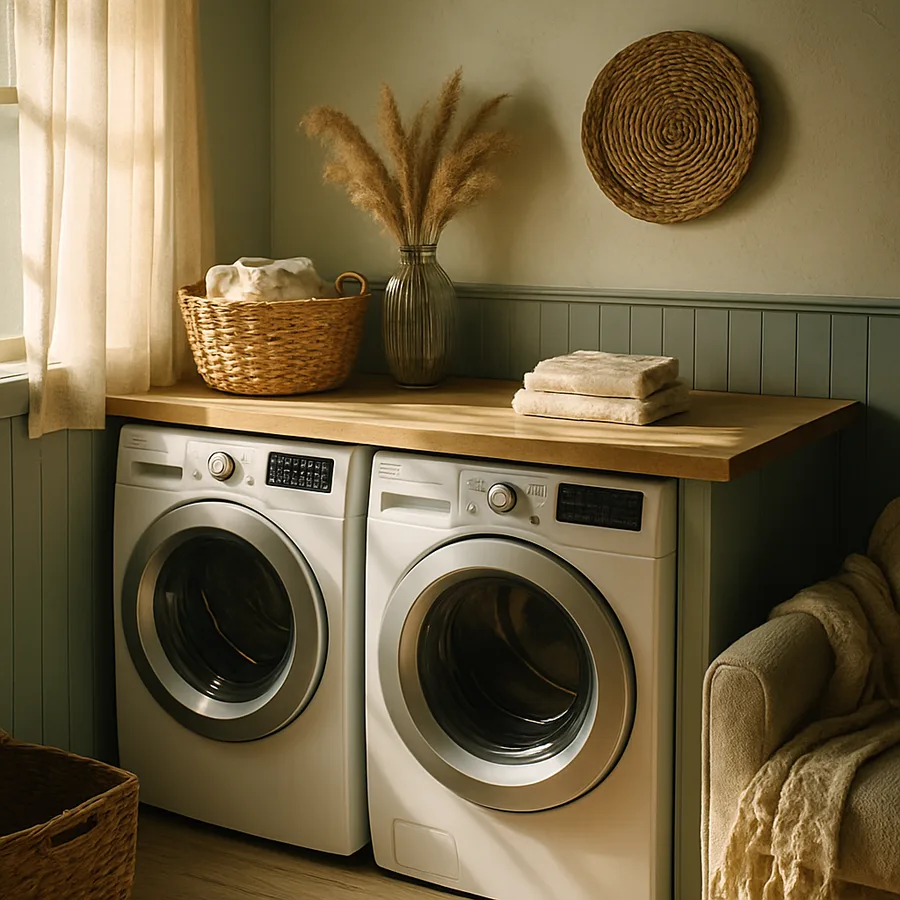
Front-load washers and dryers occupy nearly identical footprints across every major brand. A standard pair from Whirlpool, LG, Samsung, or GE sits at 27 inches wide, roughly 38 to 40 inches tall, and 32 to 34 inches deep including the door. That geometry creates an obvious opportunity. Once you cap them with a counter, the laundry room gains 15 usable square feet of folding surface, storage staging, and workflow space. It also hides the top of the appliances, which have a habit of collecting dust, spare change, and stray socks that fall behind and become permanent residents.
The project sits at the friendly intersection of carpentry and problem-solving. There is no plumbing, no electrical, and no drywall to touch if you plan carefully. The challenge is designing a counter that spans two appliances that vibrate independently, one of which reaches 100 degrees on the top panel during a heavy dry cycle. That means the counter must be strong enough to hold folding laundry, isolated enough to not transmit spin-cycle vibration to the walls, and clearable enough to service the machines when a bearing eventually fails. Get those three constraints right and the build is a satisfying weekend project.
Measure The Appliances And The Alcove
Start with a careful measurement pass. Pull the washer and dryer completely out from the wall, disconnect them if you must, and vacuum the alcove floor. Measure the interior width of the alcove at the floor, at 24 inches up, and near the ceiling. Older homes drift as much as three-quarters of an inch over that vertical distance. Your counter needs to fit the narrowest of those three measurements, not the widest, or it will bind at some point along the wall.
Measure the appliances themselves at their factory maximum footprint including any rear water inlet hoses or dryer vent connections. A front-load washer needs at least 6 inches of clearance behind it for the flexible drain line and the 90-degree elbow on the dryer vent. Do not measure to the wall and assume the appliance can slide back that far. It usually cannot. Add the actual pull-out distance to your alcove depth, then choose a counter overhang that leaves the front edge of the appliance flush or slightly proud of the counter.
Check the top-of-appliance height at both machines while they are level. Front-loaders have adjustable leveling feet, and installers often leave them off by as much as a quarter inch. The counter needs a uniform gap above the appliances or it will rattle every spin cycle. Adjust the leveling feet with a wrench until both units read level side-to-side and front-to-back, then verify with a bubble level laid across both tops simultaneously. That final cross-check catches gaps a single-unit level cannot see.
Sketch the finished elevation on paper. Note the appliance height, the target counter thickness, and the clear vertical space you plan to leave between the top of the appliance and the underside of the counter. Aim for 1 to 1.5 inches of clearance. That gap accommodates the small vertical movement of a spinning washer without letting the machine actually contact the countertop.
Choose The Countertop Material
Butcher block is the most popular choice for laundry counters and for good reason. A 25-inch-deep by 8-foot maple or acacia butcher block from a home center costs 200 to 350 dollars, weighs about 90 pounds, and installs with straightforward wood joinery. Butcher block also tolerates the heat and modest moisture of a laundry environment better than laminate, which can bubble at seams, and better than particleboard, which fails outright the first time water reaches it.
Quartz and solid-surface remnants make an appealing alternative if you can find a fabricator willing to cut a small piece. Remnants often sell at 40 to 60 percent below full-slab pricing, which puts a stone-topped laundry counter within reach of a modest budget. Stone offers superior stain resistance and needs no ongoing maintenance beyond soap and water. Its drawback is weight, which pushes the support structure into serious territory. A 25-inch by 6-foot quartz slab weighs 200 to 260 pounds and requires either wall brackets rated for structural load or full-height cabinets underneath.
Plywood with a hardwood veneer or a plastic laminate over MDF fills the budget end. A 3/4-inch birch plywood counter with iron-on edge banding costs under 100 dollars and looks respectable when finished with a couple of coats of polyurethane. It is not as durable as butcher block, but for a low-traffic laundry counter used mainly for folding, it works fine. Avoid solid MDF without a moisture-resistant finish. Any water intrusion, including a slow washer supply leak, will swell the material within days.
Whatever material you choose, seal it. For butcher block, a food-safe finish like tung oil or a hardwax product provides moderate moisture resistance and lets you reapply easily. Polyurethane offers better water resistance but is harder to spot-repair. Stone needs no sealing beyond the factory finish. Laminate and veneer benefit from a bead of silicone caulk along the back wall to keep water out of the substrate.
Design The Support Structure
The counter cannot rest on the appliances. Front-loaders vibrate during spin cycles at roughly 1,200 to 1,600 RPM, which produces enough movement to fatigue anything rigidly attached to the top panels. The counter must span the appliances and land on the walls, on cleats attached to the studs, or on cabinets that flank the machines. Any of these paths work. Which one you choose depends on the geometry of your laundry room.
For a fully enclosed alcove, wall cleats on three sides deliver the strongest and simplest support. Attach a 2-by-2 or 1-by-3 cleat to the back and side walls, screwed into studs at every location a stud exists. Studs are typically 16 inches on center, so verify with a stud finder and mark before drilling. Use lag screws or structural wood screws rated for at least 200 pounds of shear each. On a 6-foot back cleat you should have four or five screws.
For an open-ended alcove, add a front support that spans across the opening. This can be a simple 3-inch wide apron of the same material as the counter, attached to the underside with pocket screws, so it looks intentional rather than tacked on. Or add small L-brackets to the interior corners of the flanking walls. Either way, the counter should have support on at least three edges, ideally four.
If your laundry room has cabinets to either side of the appliances, use them. Attach a cleat to the interior side wall of each cabinet at counter height, then rest the counter on those cleats. This produces a floating look with excellent load capacity. Just confirm the cabinets themselves are anchored to studs, or the load path terminates at drywall which cannot support it.
Whatever support scheme you use, verify the load capacity against reasonable use. A person leaning on the counter or setting a full laundry basket down applies 50 to 100 pounds of concentrated load. The counter needs to absorb that without deflecting more than about an eighth of an inch at the center. Long spans without a mid-support flex disappointingly under real-world use.
Cut And Install The Countertop
Transfer your measurements to the countertop material and cut it to size. For butcher block, a circular saw with a fine-tooth crosscut blade and a straight-edge guide produces a clean cut. Score the surface first by running the saw shallow along the cut line to prevent tearout, then complete the cut at full depth. Cut on the finished-side-up if using a track saw, or finished-side-down if using a standard circular saw. That orientation keeps the tearout on the hidden side.
For a rear notch or cutout for pipes or an outlet, drill relief holes at the corners with a Forstner bit, then connect the holes with a jigsaw. Cut generously, meaning slightly outside your marked lines, then refine with a rasp or sanding block. It is far easier to enlarge a notch than to fill one that came out too big.
Dry-fit the counter into the alcove before finishing. Set it on the cleats and check for wall gaps, level, and clearance above the appliances. Small gaps at the wall are fine and will be closed with backsplash or caulk. A visibly out-of-level counter needs shimming at the cleat level, not by wedging under the counter itself. Shim with tapered wood shims driven behind the cleat before final screw-down.
Finish the wood before final installation. Sand progressively through 120, 180, and 220 grit, wipe down with a tack cloth, and apply your chosen finish. Two coats minimum, with light sanding between coats using 320 grit. If you plan to use the counter as an occasional cutting surface, food-safe mineral oil applied every few months keeps butcher block hydrated and resistant to cracking. Never oil quartz or laminate. Both finishes are self-contained and require no maintenance.
Address Ventilation And Access
Both appliances need airflow to operate correctly. Front-loading dryers particularly need to exhaust hot moist air, and even condensing dryers benefit from some room ventilation. Verify your dryer vent connection is undamaged and properly connected before the counter goes in. Access to that connection becomes much harder once the counter is installed, and a partially disconnected vent leaks hot moist air into the alcove, which condenses and rots wood over time. The ENERGY STAR dryer guidance emphasizes that a clean, unrestricted vent path is critical for both performance and safety.
Leave enough clearance behind the appliances for service access. Manufacturers specify a minimum of 4 inches behind a front-loading washer for the drain line, and 6 inches behind a vented dryer for the transition duct. Ideally your counter design allows the appliances to slide forward by a foot or so for lint cleaning and hose inspection. A counter locked in with no way to move the machines forward means calling a technician for tasks a homeowner could otherwise handle.
Consider a service gap between the counter's back edge and the wall. A 1-inch gap covered with a removable backsplash cleat lets you drop a fish tape down to retrieve dropped items, feed cables, or replace a supply hose without dismounting the counter. That gap also gives moisture a path to escape rather than pooling against a sealed back edge.
If the alcove has a light fixture or outlet in the ceiling above the counter, verify continued access to both. Building code requires convenience receptacles in laundry areas to remain accessible. Do not build a soffit or upper cabinet that blocks the outlet feeding the appliances. Refer to your local amendments and the National Electrical Code (NFPA 70) Article 210 for the specific requirements applicable to laundry receptacle circuits.
Wrapping Up Your Project
A well-executed laundry counter changes how you use the entire room. Folding gets its own dedicated surface. Baskets have a home. The visual weight of two exposed appliances gets replaced by a clean horizontal line that ties the room together. For a project that requires only a weekend and roughly 300 dollars in materials, the return is substantial.
Before you consider the build complete, verify a few final details. Push the appliances back into their operating positions and run a full spin cycle. Listen for any contact between the appliance and the underside of the counter. If you hear even a light tick or hum during peak spin, the clearance is too tight and needs to increase by another quarter inch. Recheck all cleat screws and confirm none have backed out during initial loading.
Caulk the seam where the counter meets the wall with a paintable silicone. That single bead prevents water from a spilled detergent bottle or an errant hose from finding its way behind the counter and rotting the wall. A quality silicone lasts ten years or more before it needs replacement, and the ten minutes it takes to lay a clean bead is time well spent.
Finally, take a moment to appreciate what you built. Laundry rooms in most American homes are afterthought spaces jammed with appliances and nothing else. A dedicated counter, thoughtfully sized and cleanly finished, transforms the room into a functional workspace with the same rigor a good kitchen has. That is worth doing well, and worth doing yourself. Enjoy the upgrade, and treat the new counter with the care it deserves so it looks as good in year ten as it does in week one.
More Articles You May Like


Comments
Post a Comment