Laundry Room Countertop Over Front-Load Machines for Folding
Why a Folding Countertop Belongs Above Your Front-Load Machines
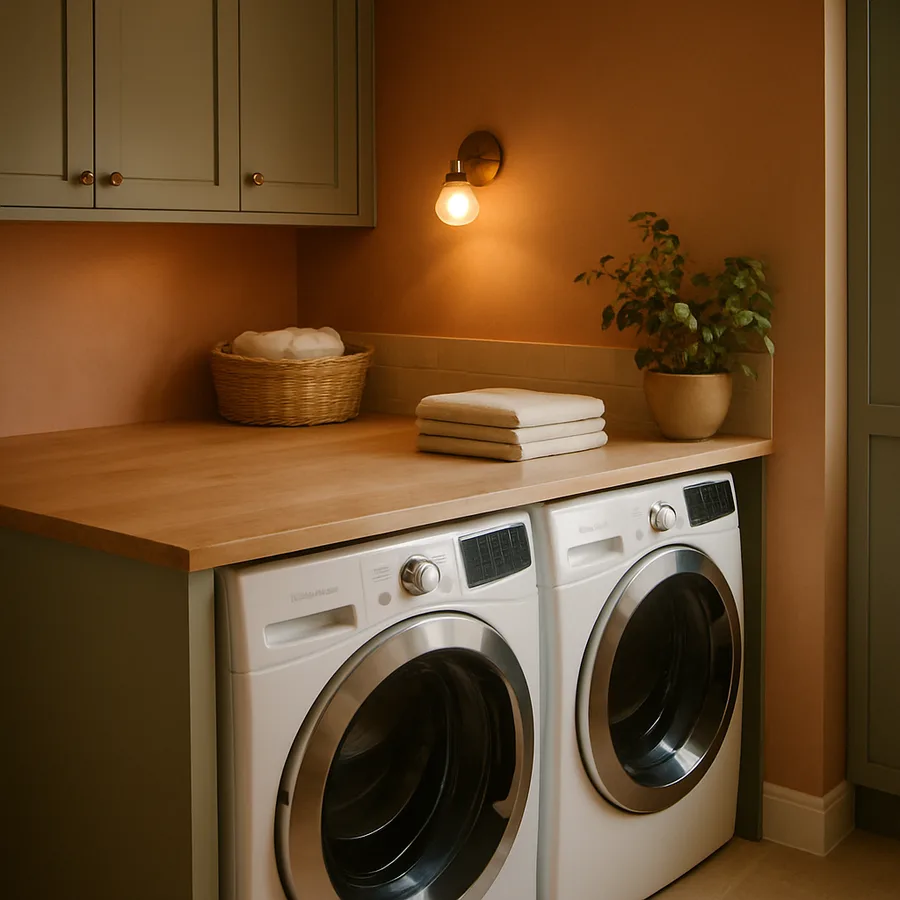
Front-load washers and dryers have become the dominant choice in modern laundry rooms, and for good reason. Their stackable design and energy efficiency make them appealing, but when placed side by side, they create an overlooked opportunity. The flat tops of these machines are too narrow and unstable for serious folding work, yet the space above them is perfectly positioned for a dedicated countertop. A solid surface at the right height transforms dead space into the most functional area of your laundry room.
According to the National Association of Home Builders (NAHB), dedicated laundry rooms rank among the top three most-wanted features in new homes, with 87% of buyers listing them as essential or desirable. That demand reflects a broader shift toward treating utility spaces with the same design attention as kitchens and bathrooms. A folding countertop is the single most impactful upgrade you can make to a laundry room, turning a chore-driven space into an efficient workstation.
The concept is straightforward: a countertop spans the width of both machines, resting on a support framework rather than directly on the appliances themselves. This prevents vibration damage, distributes weight properly, and creates a seamless surface for sorting, folding, and stacking clean laundry. Many homeowners also use the surface for pretreating stains or organizing items before they go into drawers and closets.
Have you ever tried folding a fitted sheet on top of a vibrating dryer? The frustration alone justifies the investment in a proper countertop. Beyond convenience, this addition increases the perceived value of your home and signals thoughtful design to future buyers. The Houzz Kitchen and Bath Trends Study consistently identifies laundry room upgrades as delivering strong returns relative to their modest cost.
Choosing the Right Countertop Material for Laundry Rooms
Material selection matters more in a laundry room than many homeowners realize. Unlike kitchen countertops, laundry surfaces must handle moisture, heat from dryer exhaust, and occasional contact with bleach and detergent. Butcher block offers warmth and character but requires sealing and periodic maintenance to prevent water damage. It works best in laundry rooms with good ventilation and homeowners committed to upkeep.
Laminate countertops remain the most budget-friendly option, and modern laminates bear little resemblance to the flimsy versions of decades past. Brands like Formica and Wilsonart now produce surfaces that mimic stone and wood with surprising realism. Laminate resists staining, cleans easily, and can be cut to custom dimensions with basic tools. For a laundry room countertop that needs to span 50 to 60 inches across two machines, laminate keeps material costs under $200 in most markets.
Quartz and solid-surface materials like Corian sit at the premium end of the spectrum. They are nonporous, heat-resistant, and virtually maintenance-free. The American Society of Interior Designers (ASID) notes that solid-surface materials are increasingly specified for utility rooms in higher-end residential projects. If your budget allows, quartz delivers durability that will outlast the machines underneath it several times over.
Concrete countertops offer an industrial aesthetic that pairs well with modern farmhouse and contemporary laundry rooms. They can be poured to exact dimensions, including integrated backsplashes and drip edges. The weight of concrete, however, demands a robust support structure. A standard concrete countertop at 1.5 inches thick weighs roughly 18 pounds per square foot, so the framing beneath it must be engineered accordingly.
Building the Support Framework Without Resting on the Machines
The most critical mistake homeowners make is resting the countertop directly on the washing machine and dryer. Front-load machines vibrate during spin cycles, sometimes aggressively, and that vibration transfers directly into any surface sitting on top of them. Over time, this loosens fasteners, cracks rigid materials, and creates an annoying rattle that echoes through the house. The countertop must be structurally independent of the appliances.
The standard approach uses a wall-mounted cleat system. Two-by-four lumber or steel L-brackets are anchored to the wall studs behind the machines, creating a ledger that supports the rear edge of the countertop. The front edge rests on vertical legs or a face frame that stands on the floor beside the machines. This creates a bridge that hovers above the appliances with a gap of one to two inches, allowing vibration to dissipate without contacting the surface above.
For homeowners who want a cleaner look without visible legs, a cantilevered design using heavy-duty steel brackets can support the countertop from the wall alone. This requires anchoring into studs with lag bolts rated for the expected load. The National Kitchen and Bath Association (NKBA) recommends that cantilevered countertops not extend more than 12 inches without additional support, so this approach works only when the machines are pushed close to the back wall.
What support method would work best for your laundry room layout? Consider the depth of your machines, the position of your water hookups, and whether you need to pull the machines forward for maintenance access. A well-designed framework allows you to slide machines in and out without disturbing the countertop, which is essential for hose replacement, lint trap cleaning behind the dryer, and leak inspections.
Getting the Dimensions and Height Exactly Right
Standard front-load washers and dryers stand approximately 38 to 39 inches tall without pedestals. Adding a countertop with its support framework typically brings the working surface to 40 to 42 inches from the floor. This height is higher than a standard kitchen counter at 36 inches but lower than a standing desk at 44 inches. For most adults, this range is comfortable for folding tasks performed while standing.
The depth of the countertop should extend at least one inch beyond the front face of the machines. Most front-load units are 27 to 28 inches deep, so a countertop depth of 29 to 30 inches provides a slight overhang that makes the edge easier to grip when folding large items like sheets and towels. Extending the surface too far forward, beyond 32 inches, creates a reach problem for accessing items at the back of the countertop.
Width depends on your specific machine arrangement. Two side-by-side front-load units typically span 54 to 56 inches combined, plus any gap between them. Add three to four inches on each side for overhang, and you arrive at a countertop width of 60 to 64 inches. According to NAHB research, the average dedicated laundry room in new construction measures 56 square feet, meaning most rooms can accommodate this span with room to spare for additional storage or a utility sink.
Measure three times before cutting any material. Account for the slight wobble that front-load machines can develop over time, and leave enough clearance so the machines never touch the countertop even during a heavy, unbalanced load. A minimum gap of 1.5 inches between the machine tops and the underside of the countertop provides adequate clearance for most residential machines.
Installation Steps for a Sturdy and Level Countertop
Begin by locating the wall studs behind the machines using a stud finder. Mark every stud location across the span where the countertop will sit. In most homes framed with standard 16-inch-on-center studs, you will hit three or four studs across a 60-inch countertop span. Each stud anchor point adds significant load capacity, and skipping even one can cause the countertop to sag over time under the weight of stacked laundry.
Cut your wall cleat from a straight two-by-four and attach it to the studs using 3.5-inch structural screws or lag bolts. Use a four-foot level to ensure the cleat is perfectly horizontal before driving all fasteners. Even a small deviation from level will become obvious once the countertop is in place, and correcting it after installation means removing and rehinging the entire surface. Apply a bead of construction adhesive along the cleat before setting the countertop for added stability.
For the front support, build two vertical legs from matching two-by-four lumber, each standing on the floor at the outer edges of the machine pair. Connect the tops of the legs with a horizontal rail that mirrors the wall cleat. Set the countertop on both the wall cleat and the front rail, then secure it from below with L-brackets screwed into the underside of the surface and the top of each support member. This creates a rigid box frame that resists racking and distributes weight evenly.
Finish the exposed edges of the countertop with matching edge banding for laminate, a routed profile for wood, or a polished edge for quartz. Caulk the joint where the countertop meets the wall with a mildew-resistant silicone sealant, the same product used in bathroom installations. This prevents moisture from wicking behind the surface and causing mold growth in a space that generates humidity every time the washer runs.
Design Ideas to Elevate Function and Aesthetics
A plain slab of laminate gets the job done, but thoughtful design choices make the countertop feel intentional rather than improvised. Consider adding a shallow lip or backsplash along the rear edge to prevent small items like socks and dryer sheets from falling behind the machines. A two-inch backsplash made from the same material as the countertop creates a polished, built-in appearance that mirrors kitchen design conventions.
Under-counter lighting transforms the folding surface into a more pleasant workspace. Battery-operated LED strip lights adhered to the underside of the countertop illuminate the machine controls below, making it easier to read cycle settings and load laundry in dimly lit rooms. This is a particularly useful addition in basement laundry rooms where overhead lighting casts shadows directly onto the machine faces.
Some homeowners integrate a pull-out shelf or a drop-down ironing board into the countertop framework. The International Interior Design Association (IIDA) highlights multi-functional furniture and surfaces as a defining trend in residential utility spaces. A pull-out shelf positioned between the countertop and the machines can hold a laundry basket at an ergonomic height, reducing bending and lifting strain.
Color and finish choices should complement the rest of your home. If your kitchen features white quartz, carrying that same material into the laundry room creates visual continuity. Matte finishes hide water spots and lint better than glossy surfaces, a practical consideration in a room where both are constant companions. Pair the countertop with matching floating shelves above for detergent storage, and the space begins to feel cohesive and designed rather than utilitarian and neglected.
Conclusion: Transform Your Laundry Routine with a Purposeful Surface
A countertop over front-load machines is one of the simplest and most rewarding laundry room improvements you can undertake. The project requires basic carpentry skills, a few hours of focused work, and materials that fit nearly any budget. Whether you choose laminate for economy, butcher block for warmth, or quartz for permanence, the result is the same: a dedicated folding surface that makes laundry less tedious and your room more functional.
The key principles are worth repeating. Never rest the countertop on the machines. Build a freestanding support framework anchored to wall studs. Leave adequate clearance for machine vibration. Measure precisely, and choose a material that can handle the moisture and chemical exposure inherent to laundry environments. Follow these guidelines, and the countertop will serve you reliably for years.
The return on this investment extends beyond daily convenience. Real estate professionals consistently cite laundry room improvements as features that resonate with buyers during showings. A well-finished countertop signals a home that has been maintained and improved with care. It is a small detail that communicates a larger story about how the homeowners treated their space.
Ready to get started? Measure your machines this weekend, choose your countertop material, and sketch out your support framework. Visit your local home improvement store to price materials and pick up the hardware you need. Within a single Saturday, you can have a folding surface that changes how you feel about laundry day forever.
More Articles You May Like


Comments
Post a Comment