Outdoor Wood Storage Rack Cover Tarp Versus Roofed Shed
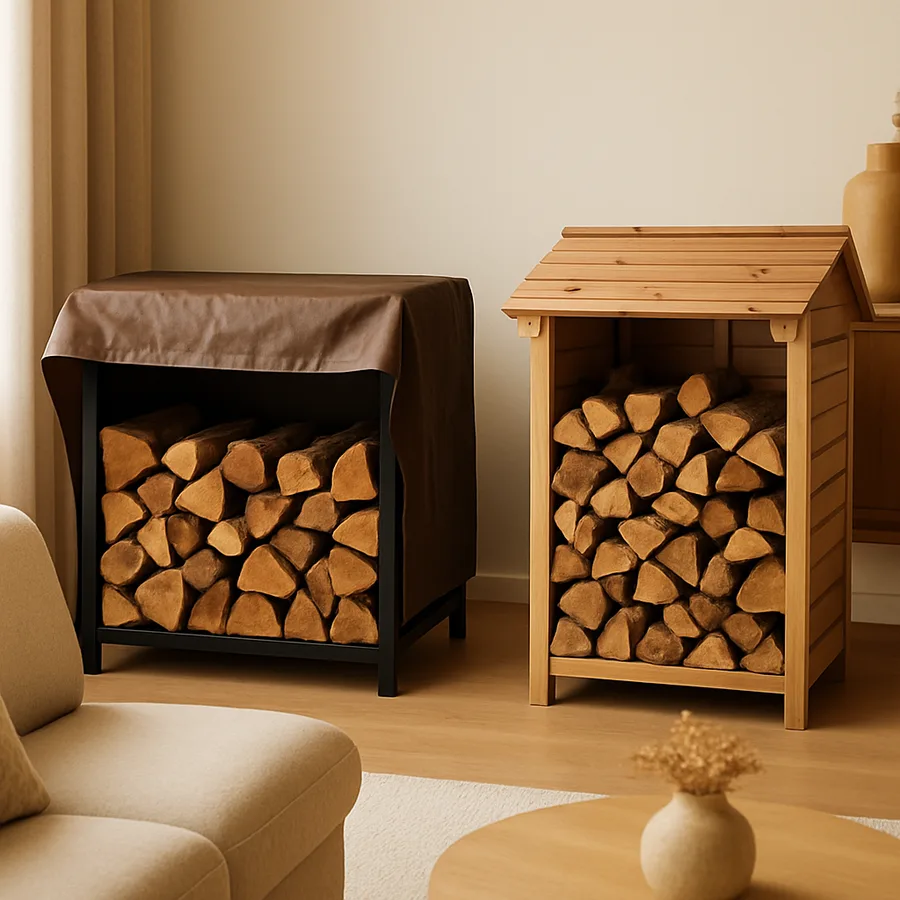
Every wood-burning household eventually faces the same decision. Should you cover your outdoor wood pile with a tarp stretched over a basic rack, or invest in a proper roofed shed? The two solutions look superficially similar from a distance. A few feet of split wood, raised off the ground, with something protecting the top from rain and snow. But the practical, financial, and seasoning differences between the two approaches add up over years of use, and the wrong choice can quietly waste hundreds of dollars in fuel value.
This guide walks through the real trade-offs between tarp-covered racks and roofed sheds. We will examine seasoning performance, cost over time, weather durability, aesthetics, and the surprisingly important question of airflow. By the end, you should be able to choose the right solution for your climate, your budget, and the volume of wood you actually burn each year.
What a Properly Stored Wood Pile Actually Needs
Before comparing solutions, it helps to be clear about what good wood storage actually requires. The EPA Burn Wise program identifies four conditions for proper seasoning: the wood must be elevated off the ground, protected from rain and snow on top, open to airflow on the sides, and arranged so sun and wind can reach the stack. All four conditions are necessary, and missing any one of them slows seasoning or actively damages the wood.
Ground contact is the silent killer. Wood placed directly on soil or even on a patio surface wicks moisture upward continuously, which prevents the bottom layers from drying and can rot the lowest logs within a single season. Both tarps and sheds typically include some method of elevation, usually a pallet, treated lumber sleepers, or steel rack feet. Without elevation, neither solution works.
Have you ever pulled a log from the bottom of a stack and found it slick with mildew? That is almost always the result of ground moisture combined with insufficient airflow. The Hearth, Patio & Barbecue Association notes that improperly stored wood can retain enough moisture to reduce heat output by twenty-five to forty percent, which is a substantial penalty for what looks like a minor storage shortcut.
A practical complement to the four conditions above is stack orientation. Wood piles arranged with their cut ends facing the prevailing wind dry significantly faster than piles arranged perpendicular to wind direction, because air moves more freely through the open grain. In most of North America, that means orienting stacks on a roughly east-west axis to catch westerly winds. The few minutes spent thinking about wind direction before building a stack pays back across an entire seasoning cycle and can shorten time-to-burnable moisture content by several weeks under favorable conditions.
The Tarp-Covered Rack Approach
The most common outdoor wood storage solution in North America is a metal or wooden rack covered with a polyethylene tarp. A rack of this style typically costs between forty and two hundred dollars depending on size and quality, and a decent tarp adds another twenty to fifty dollars. The total investment is low, and the system can be assembled in under an hour without tools.
The strengths of this approach are real. Initial cost is minimal, the system is portable and can be relocated seasonally, and the rack itself does not require permits in most jurisdictions. For homeowners who burn only half a cord or less per year, a tarp-covered rack is often the right answer purely on cost grounds.
The weaknesses, however, accumulate. Tarps degrade in sunlight, and even high-quality polyethylene tarps typically need replacement every two to three years. Wind tears tarp grommets, ice loads can collapse improperly tied tarps onto the wood, and water that pools in tarp folds can saturate sections of the pile. Most importantly, tarps that drape down the sides of the stack trap moisture against the wood, slowing seasoning and creating ideal conditions for mold. The correct technique is to cover only the top of the stack, but maintaining that discipline through a windy winter is harder than it sounds.
One technique that meaningfully improves tarp performance is the use of a ridge pole. A simple length of two-by-four or PVC pipe laid across the top of the stack lifts the tarp into a peaked profile, which sheds water and snow far more reliably than a flat-draped tarp. The peaked shape also reduces the surface area where water can pool, which is the single largest cause of mid-winter tarp failure. This zero-cost upgrade extends tarp life substantially and is the difference between a tarp system that works for a few seasons and one that fails within the first severe storm of its first winter.
The Roofed Wood Shed Approach
A roofed wood shed is a permanent or semi-permanent structure with a solid roof, raised floor, and open sides. Designs range from simple lean-to structures attached to a garage wall to elaborate freestanding cedar buildings that match the home's architecture. Costs range from roughly three hundred dollars for a basic DIY kit to four thousand dollars or more for a custom-built unit.
The strengths of a roofed shed are substantial. The solid roof never tears, lasts twenty to thirty years with minimal maintenance, and sheds snow loads without manual intervention. The open sides allow excellent airflow, which the EPA specifically notes is essential for efficient seasoning. The raised floor stays dry, and the structural framing keeps the stack stable even when half-empty.
Aesthetics also matter for many homeowners. A well-designed wood shed reads as a deliberate architectural feature rather than a temporary utility solution, which can be important in front-yard locations or in neighborhoods with strict appearance covenants. The National Association of Home Builders has reported that thoughtfully integrated outdoor storage structures can contribute meaningfully to perceived home value, particularly in regions where wood heat is common.
The weaknesses are primarily cost and permanence. A roofed shed represents a real financial commitment, may require a building permit in some jurisdictions, and cannot be easily relocated if you change your mind about its placement. For homeowners who are uncertain about long-term wood use, the lower commitment of a tarp solution may be the right starting point.
One often-overlooked benefit of a roofed shed is winter accessibility. A tarp-covered pile in deep snow requires you to clear snow, untie tarp lines with cold fingers, and retie the tarp every single time you restock the indoor supply. A roofed shed with open sides remains accessible regardless of snow depth, which over the course of a winter saves hours of unpleasant outdoor work. This quality-of-life difference is often what convinces longtime tarp users to upgrade after their first severe winter.
Seasoning Performance: Where the Two Solutions Really Differ
The single most important difference between tarps and roofed sheds is seasoning quality. Properly seasoned wood burns hotter, cleaner, and produces less creosote. The EPA recommends a moisture content below twenty percent for efficient combustion, and reaching that level requires consistent airflow over six to twelve months.
Roofed sheds, when designed correctly, almost always outperform tarp-covered racks on seasoning. The open sides allow continuous cross-ventilation, the solid roof prevents top-down moisture infiltration, and the raised floor prevents bottom-up moisture wicking. A stack of green oak placed in a well-designed shed in early spring will typically reach burnable moisture content by the following winter.
The same green oak under a tarp, particularly a tarp that drapes down the sides of the stack, may still be above twenty percent moisture eighteen months later. The difference is dramatic and is the single strongest argument for investing in proper storage if you burn substantial quantities of wood each year. Are you actually getting the heat output you paid for when you ordered that last cord?
Cost Over Time: Running the Real Numbers
The initial cost comparison favors tarps overwhelmingly. A basic rack and tarp setup costs roughly one hundred dollars, while a quality roofed shed costs five to ten times more. But the relevant comparison is total cost over a realistic ownership period of ten to fifteen years.
Over a decade, the tarp solution typically requires three to five replacement tarps, occasional rack repairs, and the inevitable cost of partially ruined wood when tarps fail during storms. A rough estimate puts total ten-year cost in the range of three to five hundred dollars when wood losses are included. The roofed shed, by contrast, typically requires no replacement and minimal maintenance over the same period, leaving its initial cost essentially fixed.
For homeowners burning two or more cords per year, the math favors the shed within roughly five to seven years. For homeowners burning less than a cord per year, the tarp solution often remains more cost-effective indefinitely. The breakeven point depends heavily on local wood prices, weather severity, and personal labor costs for restacking and tarp maintenance.
One additional cost consideration is the value of your own time. Restacking after a tarp failure, replacing torn tarps in cold weather, and salvaging partially weather-damaged wood all consume hours that have real value. Even at a conservative twenty dollars per hour, twenty hours of annual tarp maintenance equals four hundred dollars in labor cost that rarely appears in homeowner calculations. Adding that to the materials and replacement cycle of tarp systems narrows the gap with roofed sheds significantly, particularly for households where the primary wood-handler has other demands on weekend time.
Climate, Location, and Local Considerations
The right choice depends substantially on climate. In dry, windy regions, tarps can perform reasonably well for years because evaporation outpaces moisture infiltration. In wet, snowy regions, particularly the Pacific Northwest and the Northeast, roofed sheds almost always outperform tarps significantly. Snow load is the specific killer. A foot of wet snow on a poorly tied tarp can collapse the entire system in a single storm.
Location on the property also matters. A wood pile placed against the north side of a house in a shaded location will struggle to season regardless of cover type. The same pile placed in a sunny, well-ventilated location will season far faster with either solution. The Hearth, Patio & Barbecue Association recommends placing wood storage at least thirty feet from any structure when possible, both for fire safety and for pest management.
It is also worth thinking about fire department access and local clearance rules. Some jurisdictions limit how close a wood storage structure can sit to a property line, to a residence, or to a propane tank, and a few have outright prohibitions on permanent storage structures within defined wildfire zones. Before building or buying a shed, call your local fire marshal and ask about any applicable setback rules. The thirty-minute phone call can prevent the frustrating experience of building a beautiful shed only to be told months later that it must be relocated or removed.
Conclusion
The choice between a tarp-covered rack and a roofed wood shed is ultimately a question of how much wood you burn, how long you plan to stay in the home, and how much you value clean, efficient combustion. Light users in mild climates often do fine with tarps for years. Heavy users in harsh climates almost always do better with roofed sheds, and they recover the investment through improved fuel quality and reduced wood waste within a handful of seasons.
The worst decision is no decision. Wood stacked directly on the ground, uncovered, exposed to weather, is the default that almost every household falls into by accident at some point. That default wastes fuel, breeds insects, and creates the slick, mildewed bottom layers that make wood-burning frustrating. Either solution, applied consistently, will dramatically improve your wood-burning experience compared to no solution at all.
If you are uncertain which direction to go, start with a quality rack and a heavy-duty tarp, learn how much wood you actually burn over two full seasons, and then decide whether to upgrade. Track your annual consumption, watch how your tarp performs through one full winter, and then make the shed decision with real data in hand. That deliberate path almost always produces better results than over-investing in storage you do not need or under-investing in storage that cannot do the job.
For further guidance, consult the EPA Burn Wise program for seasoning best practices, the Hearth, Patio & Barbecue Association for storage and safety standards, and the National Association of Home Builders for outdoor structure guidance.
More Articles You May Like



Comments
Post a Comment