Shed Roof Modern Architecture For Backyard Studios
The single-slope shed roof has become the unofficial signature of the backyard studio movement. Drive through any neighborhood from Portland to Asheville and you will see it: a clean rectangular volume capped by one tilted plane, often pitched between 2/12 and 4/12, set behind a primary house as a writer's retreat, yoga room, or remote-work office. The form is not new, but its current popularity reflects something specific about how we work and live now. A shed roof is the cheapest, fastest, most daylit way to add a separate room to a property without buying more land.
Why The Shed Roof Dominates The Backyard Studio Category
Three factors explain the shed's grip on this typology. First, the geometry is dead simple. One slope means one drainage direction, one ridge beam, and no valleys or hips to flash. A competent crew can frame and dry-in a 200-square-foot shed-roof studio in under a week, compared with two weeks for a gable structure of similar size. Second, the tall side creates an automatic location for a clerestory window or a full-height glass wall, which solves the daylight problem that plagues most detached outbuildings.
Third, and most important, the shed roof works inside the height envelopes that most municipal accessory structure ordinances impose. Many jurisdictions cap detached studio height at 15 feet measured to the midpoint, and a shed at 3/12 pitch on a 12-foot-wide floor plate clears that limit easily while still delivering a 10-foot interior ceiling on the high side. Have you checked your local accessory dwelling unit code yet? The shed geometry may be the difference between a permitted structure and a denied application.
Getting The Pitch Right
Pitch is the single most important design decision on a shed-roof studio. Too shallow, and the building reads as a flat-roof box without the sculptural quality that makes the form memorable. Too steep, and you lose interior volume on the low side, creating an unusable corner that no amount of furniture arrangement can rescue. The American Institute of Architects notes in its small-projects publications that pitches between 2.5/12 and 4/12 deliver the best balance of visual presence, drainage performance, and interior usability for studios under 400 square feet.
Steeper pitches around 6/12 work for studios in heavy snow regions, but they push the high wall above typical accessory structure height limits in most cities. If you live in Buffalo, Denver, or Burlington, your structural engineer will specify a ground snow load and your pitch will follow from that calculation. In milder climates, the choice is aesthetic. A shallow 2/12 pitch reads more modern; a steeper 4/12 pitch reads more residential and barn-like.
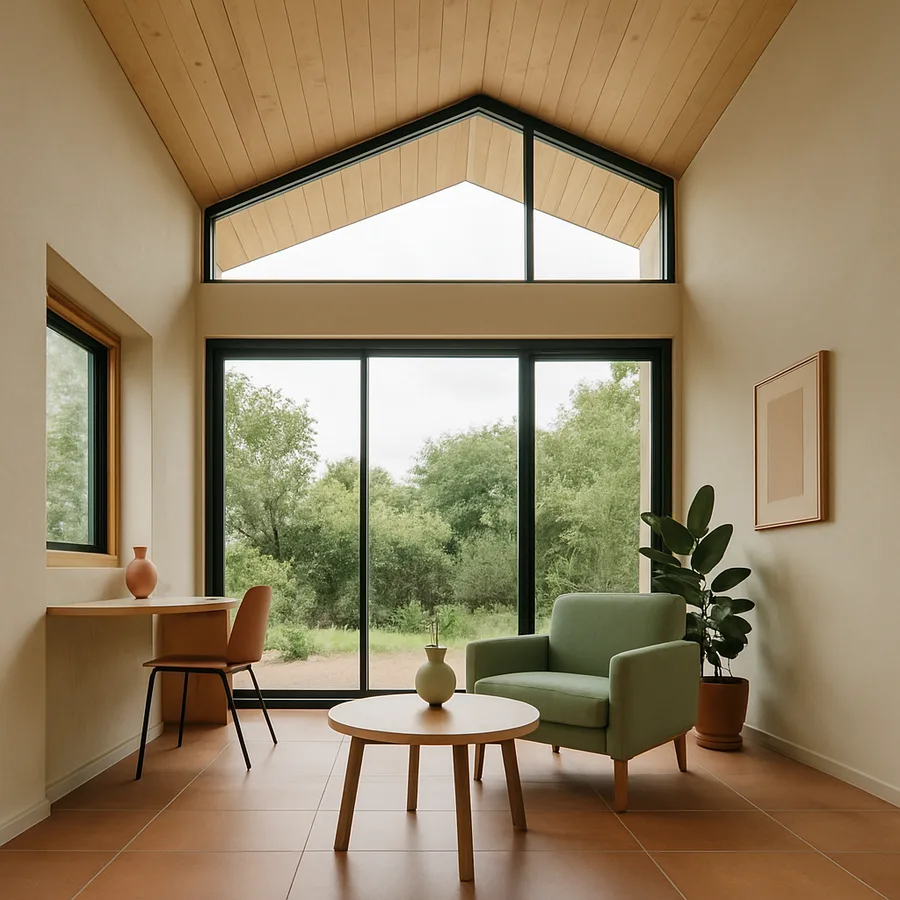
Daylight Strategy: Clerestory Versus Full Glass Wall
The shed form gives you two distinct daylight strategies, and they produce very different spaces. A clerestory window runs along the high wall above eye level and floods the room with even, ambient light without compromising privacy. This works beautifully for studios that need clear wall area for art, bookshelves, or screen-based work. A full glass wall on the high side, by contrast, dissolves the boundary between studio and garden and delivers what amounts to a partial greenhouse experience.
Orientation matters more than glass area. A north-facing high wall produces stable, glare-free light all day, which is why painters and photographers have specified this exact configuration for over a century. A south-facing high wall delivers warmth in winter but requires deep overhangs or exterior shades to control summer heat gain. According to research summarized by the U.S. Green Building Council, well-oriented glazing can reduce annual lighting energy use in small studios by more than 40 percent compared with windowless or poorly oriented alternatives.
Foundation Choices And Site Disturbance
Most backyard studios sit on one of three foundation systems: concrete piers, helical screw piles, or a shallow slab. Piers are the cheapest at roughly $40 to $70 per pier installed, but they require careful frost-depth calculations in cold regions. Helical piles cost more per unit but install in a single day with minimal soil disturbance, which matters if you are working around mature trees or existing landscape. A full slab delivers the most stable floor but requires excavation, formwork, and a concrete pump truck that may not fit through your side yard.
For a typical 200 square foot studio, expect foundation costs between $4,000 and $12,000 depending on system and site access. Site disturbance is often the hidden cost. If your studio location requires removing fence sections, protecting tree roots, or building a temporary access path, add another $2,000 to $5,000 to the budget. Did you walk the route from the street to the building site before signing a contract? Many homeowners discover the access problem only after the foundation contractor has already mobilized.
Cladding That Defines The Modern Shed Aesthetic
The exterior cladding sets the entire tone. Three materials dominate the contemporary shed studio category: vertical board-and-batten cedar, charred-wood shou sugi ban, and standing-seam metal. Each carries different cost and maintenance profiles. Cedar runs roughly $9 to $14 per square foot installed and requires re-staining every five to seven years if you want to preserve color. Shou sugi ban costs more upfront but needs almost no maintenance for decades. Standing seam metal is the most weather-tolerant option and pairs naturally with the shed geometry.
Mixing cladding materials can elevate a small studio dramatically. A common move is to wrap the building in dark vertical cedar on three sides and clad the high-glass wall with a warmer tone or a contrasting horizontal grain. This breaks up the volume visually and prevents the studio from reading as a monolithic block. Avoid the temptation to use vinyl or fiber-cement siding meant to imitate wood. At backyard scale, the materiality is so visible that any compromise reads immediately.
Interior Planning For Real Productivity
The interior of a 150 to 250 square foot studio rewards careful planning. Place the desk perpendicular to the high glass wall rather than facing it directly, which prevents glare on screens while still delivering the visual reward of garden views during thinking pauses. Push storage to the low side of the room where ceiling height drops below seven feet, since that volume is unusable as standing space but ideal for cabinetry, file storage, or a built-in bench.
Consider mechanical needs carefully. A mini-split heat pump rated for 9,000 to 12,000 BTU handles most studios in temperate climates and costs $3,500 to $5,500 installed. Ventilation matters more than most homeowners anticipate, especially for studios used by two or more people simultaneously. A small energy recovery ventilator sized at 50 to 75 CFM ensures fresh air without dumping conditioned air outside. The U.S. Department of Energy reports that indoor CO2 levels in unventilated small spaces can exceed 1,500 ppm within an hour of occupancy, a level documented to impair cognitive performance.
Permitting strategy can save weeks of timeline. Many municipalities exempt structures under 120 square feet from full building-permit review, requiring only a zoning compliance check. Studios in the 120 to 200 square foot range often qualify for a streamlined accessory-structure permit that processes in two to four weeks rather than the eight to twelve weeks required for a full residential permit. If your local code includes such a threshold, designing to the upper edge of the exempt range can dramatically compress the project schedule without meaningfully reducing usable space. Confirm threshold definitions carefully, since some jurisdictions measure footprint while others measure conditioned floor area, and a covered porch can push a borderline project across the threshold unintentionally.
Utility connections are the unglamorous half of the budget. Running underground electrical from the main house panel to the studio typically costs $1,500 to $4,000 depending on trench length and whether the path crosses driveways or hardscape. Adding plumbing for a bathroom raises that figure substantially, often $8,000 to $15,000 once you account for excavation, supply and waste lines, and a backflow preventer if the studio sits at or below the main building elevation. Internet connectivity should also be planned during construction, with conduit run alongside the electrical trench so future fiber or mesh upgrades remain easy. Pulling a second conduit at the same time costs almost nothing and saves significant excavation work later.
Acoustic detailing matters more in backyard studios than in primary residences. The whole point of a separate workspace is to escape household noise, but a poorly insulated shed transmits exterior sound clearly and bounces interior reflections aggressively. Resilient channel on at least one wall, mineral wool cavity insulation rather than fiberglass, and a thoughtfully sized acoustic panel on the ceiling above the work zone transform the listening environment without dramatic cost. Studios used for video calls, music practice, or audio production should treat acoustic design as primary rather than as an afterthought. The difference between a studio that sounds good and one that sounds harsh is rarely visible in photographs but always audible during the first hour of use.
Landscape integration completes the project. A studio that sits awkwardly in the middle of a lawn reads as a shed regardless of how nicely it was detailed. A studio embedded in a thoughtful planting plan, with a small terrace at the entry, a path that reads as intentional rather than improvised, and at least one specimen plant or small tree positioned to anchor the composition, reads as architecture. Budget another $3,000 to $10,000 for the landscape work surrounding the studio, and engage a landscape designer or architect during the studio design phase rather than after construction completes. The two design problems are really one problem solved together.
Door selection sets the tone for daily use more than most homeowners expect. A standard 36-inch entry door reads as utility. A 42-inch wide door with a full-height glass panel reads as architecture. A pair of glass barn doors that slide open to merge the studio with the garden reads as an experience. The cost differential between these options is modest in the context of the overall project budget, and the daily experience differs enormously. Walk through the entry sequence in your head and pick the door that feels right for how you will arrive at the studio every morning.
Heating and cooling load calculations matter even for small studios. A 200 square foot building in a temperate climate has a peak heating load of roughly 4,000 to 6,000 BTU per hour and a peak cooling load of similar magnitude. A 12,000 BTU mini-split is sized for that load with reasonable margin, but a 24,000 BTU unit will short-cycle and produce uncomfortable temperature swings. Right-size the equipment rather than over-specifying it. A properly sized mini-split delivers quiet, even comfort year-round and consumes far less electricity than an oversized unit struggling to modulate at low loads.
Insulation strategy varies by climate but consistently rewards investment. Studios in cold climates benefit from R-30 walls and R-49 ceiling assemblies, with continuous exterior insulation eliminating thermal bridges through the wall studs. Studios in hot-humid climates benefit from radiant barriers under the roof deck and continuous exterior insulation to manage condensation risk. Studios in mixed climates can run somewhere in between but should not skimp on air sealing. The difference between a tight studio and a leaky one shows up in the heating bill, in occupant comfort, and in the long-term durability of the wall assemblies.
Conclusion
A shed-roof backyard studio is one of the highest-leverage residential building projects available to a homeowner today. The form is forgiving to design, fast to build, and naturally suited to the program. With careful attention to pitch, orientation, and daylight strategy, a 200-square-foot studio can serve as a productive workspace, a creative retreat, or even a guest suite for visiting family, all without expanding your home's footprint or compromising your yard.
The single biggest mistake homeowners make is rushing to a contractor before resolving the design fundamentals. Pitch, orientation, glazing strategy, and foundation system should all be decided with an architect or design-build firm before you ever talk to a framer. The decisions made in the first two weeks of design lock in 80 percent of the final building's quality. Hire someone who has built multiple shed studios in your climate and ask to visit completed projects.
Budget realistically. A well-built 200-square-foot shed studio in 2026 prices ranges from $40,000 to $95,000 depending on finishes, mechanical systems, and whether the structure includes a bathroom. Plan for a 10 to 15 percent contingency for unforeseen site conditions, and remember that permitting fees and utility connection costs can add several thousand dollars on top of construction. If you are ready to add a true second room to your property, start interviewing designers this month.
The shed roof rewards restraint. A small, well-detailed studio outperforms a larger, generically built one in nearly every dimension that matters: light quality, usability, resale appeal, and daily satisfaction. Make it small, make it specific, and make it yours.
More Articles You May Like


Comments
Post a Comment