Recording Studio Vocal Booth Build Inside Spare Bedrooms
The spare bedroom is the natural home for a serious vocal booth. It is finished, it has power, it has at least one window for sanity, and it usually sits far enough from the kitchen and the laundry to be acoustically plausible. What the spare bedroom is not is acoustically ready. Most domestic bedrooms measure between 1,000 and 1,500 cubic feet, with parallel walls, a single hollow-core door, an HVAC register sized for human comfort rather than recording silence, and a floor that telegraphs every footstep from the room above. Turning that bedroom into a credible vocal booth is a real construction project, not a weekend of foam panels, and the difference between a credible booth and a hobbyist booth is mostly in the details that get skipped.
This guide is for the singer, voice-over artist, podcaster, or producer who needs a usable booth inside an existing house, who cannot rip out the floor framing or rebuild the foundation, and who still wants the recordings to sound like they came from a real studio rather than from a closet. It assumes a budget that is meaningful but not unlimited, a willingness to give up the room's bedroom function entirely, and a clear-eyed view of the physics. With those assumptions, a spare bedroom can become a vocal booth that broadcasts and tracks at a professional level.
Decide What "Vocal Booth" Actually Means in Your House
The phrase covers three very different rooms. A tracking booth is a small, well-isolated space optimized for recording vocals or a single instrument, with controlled internal acoustics that flatter the source. An isolation booth emphasizes blocking sound transmission, often at the expense of internal acoustics, so that the engineer next door can record drums while the vocalist tracks dry. A broadcast booth prioritizes a low ambient noise floor and a comfortable, slightly damped sound for long voice-over sessions. The right design depends on which of those you actually need, and conflating them is the most common reason home booths underperform.
For most spare-bedroom builds, the realistic answer is a hybrid that leans toward the broadcast end of the spectrum. You will not be tracking drums next door, and you do not need to keep a full band out; you need to keep dogs, kids, neighbors, lawnmowers, and HVAC noise out, and you need the inside of the booth to flatter a microphone at close range. The Audio Engineering Society's studio design literature documents this distinction clearly, and it is worth reading before you commit to assembly choices that solve the wrong problem.
Have you actually written down the worst noise source you need the booth to reject? For most home studios it is not a band; it is a barking dog or a leaf blower forty feet away, and that target dictates a different and slightly cheaper assembly than a true band-isolating booth.
Isolation Targets and Wall Assemblies
A useful starting target for a residential vocal booth is roughly STC 50 to 55 on the boundary walls, with low-frequency-extended performance well below 100 Hz. That is enough to drop a typical exterior lawn mower or interior-television noise to the level of an inaudible whisper inside the booth, while remaining buildable without structural reinforcement of the bedroom floor. Achieving it inside an existing room almost always means building a smaller "room within a room" rather than reinforcing the existing bedroom envelope.
A practical inner-shell wall is a single plate floated on a resilient sill gasket, framed with two-by-four studs at sixteen-inch centers, decoupled from the existing bedroom wall with a one-inch air gap, sheathed with two layers of five-eighths-inch Type X drywall sandwiching a damping compound, and filled with mineral wool batts in the cavity. The Acoustical Society of America's transmission-loss tables for damped double-shell assemblies put this construction in the STC 55 range when executed cleanly, with low-frequency performance markedly better than a single-shell wall of equivalent total mass.
The inner shell must not touch the outer shell at any point. Any rigid contact, a single screw driven through both shells, a piece of trim that bridges the air gap, an electrical box that spans the cavity, will short-circuit the isolation in that frequency band. This is the most common construction error, and it is the reason field measurements of finished booths so often underperform the predicted lab values. Treat the inner shell as a sealed box that touches the outer shell only through engineered isolators at the floor and ceiling.
The Floor and Ceiling Are Half the Project
An above-grade spare bedroom sits on a wood-framed floor, and that floor is the most efficient noise transmission path in the entire room. Footsteps from above, plumbing knocks from the wall behind the toilet, and HVAC vibration from the basement all arrive through the floor first. The fix is the same as in a music room: a floating floor inside the booth, built on calibrated isolators, sheathed in two layers of damped plywood, and topped with a finished surface that does not bridge to the surrounding bedroom floor at any point.
The ceiling is symmetric. The bedroom's existing ceiling is the underside of a wood-framed floor above, and any joist-bridged ceiling will telegraph footfall and impact noise into the booth as a thump. The credible build is a fully decoupled inner-shell ceiling hung on isolation hangers from the existing ceiling, with mineral wool fill, double damped drywall, and a slight downward step from the bedroom ceiling height to make room for the assembly. Expect to lose three to six inches of ceiling height inside the booth, and make sure the resulting clear height is still tall enough for a tall vocalist on a riser without scraping a ceiling-mounted microphone.
For the floor, neoprene-and-spring isolators sized to the actual loaded weight per mount give the cleanest low-frequency performance. Under-loaded isolators are too stiff and pass low-frequency energy nearly unattenuated; over-loaded isolators bottom out and lose isolation entirely. Manufacturer load tables, cross-checked against the AES's published studio-floor case studies, should drive the spec rather than a generic "use these mounts" recommendation from a forum thread.
Doors, Windows, and the Sight-Line Problem
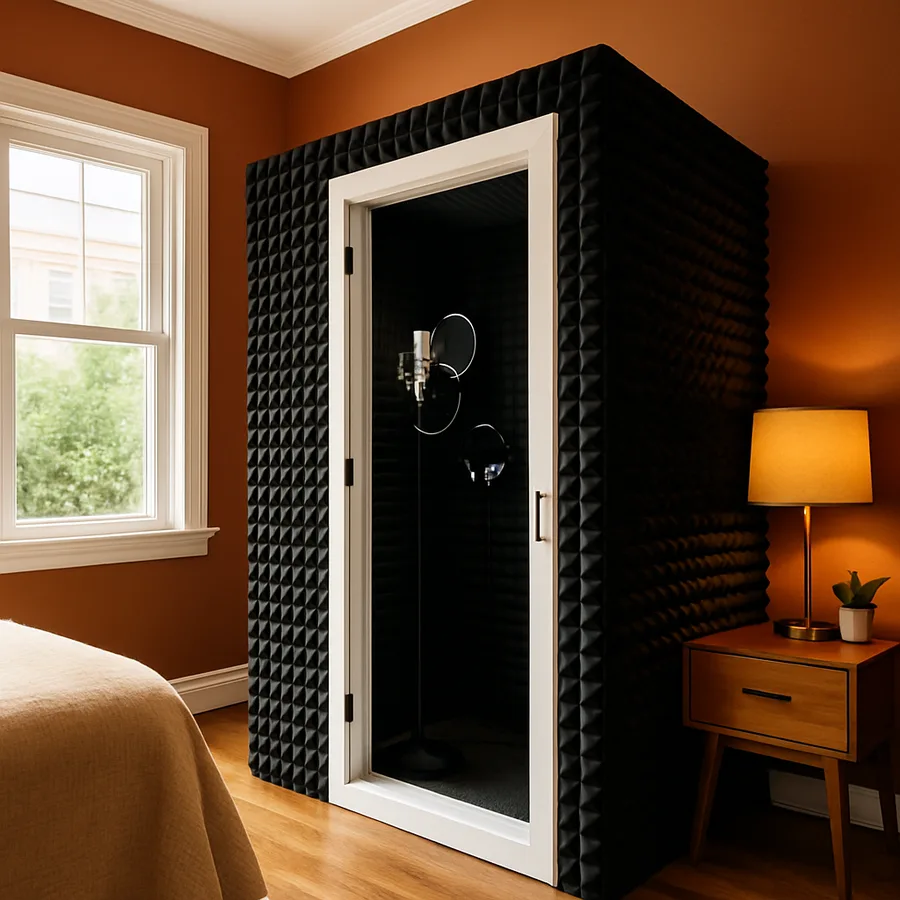
A vocal booth with a hollow-core door is not a vocal booth. The door is the single weakest link in the isolation chain, and a standard residential door rates around STC 20 to 25, which is so far below a serious wall assembly that it dominates the boundary's measured performance. Specify a solid-core or laminated studio door with a continuous perimeter gasket and a drop-down automatic threshold seal, and ideally place the booth's door slightly off-axis from the bedroom's existing door so that the two doors form a small acoustic vestibule with an air gap between them.
A sight-line window between the booth and the control area is highly desirable for any session that involves an engineer, because hand cues are faster and gentler than talkback for restarting a take. Build the window as two laminated glass panes of unequal thickness, ideally three-eighths and half-inch, separated by at least four inches of air gap, with the perimeters sealed against the inner and outer shells respectively. Matched panes share resonances and create a coincidence dip that audibly leaks energy; unmatched panes spread the dip and recover several decibels of low-end isolation, which the AES has documented in published studio-window comparisons.
Two questions worth answering before you frame anything. First, can a vocalist work in a windowless booth? Yes, but session length matters; a thirty-minute commercial take is fine, while a four-hour audiobook session in a sealed black box is brutal even for experienced voice talent. A small interior sight-line window or a high-quality video camera with low-latency monitoring solves the human factor. Second, does the door swing direction matter? Yes; swing the booth door outward into the surrounding room rather than inward, because an inward swing wastes booth volume and forces the talent to step backward away from the microphone every time the door opens.
Internal Acoustics: Not Dead, Not Alive
Once the isolation shell is sealed, the booth will sound terrible without internal treatment. A small, sealed, hard-walled box flutters mercilessly and produces a "boxy" coloration that microphones pick up with painful clarity. The fix is broadband absorption on most of the wall area, plus moderate ceiling treatment, plus thoughtful placement of the microphone and the talent so that nearby reflections arrive late enough or weak enough to be inaudible at recording level.
A practical interior treatment uses four-inch fabric-wrapped mineral-wool panels covering roughly sixty to seventy percent of the wall area, with the panels broken across multiple surfaces rather than ganged on one wall. The remaining surface area should be left reflective or treated with light scattering, because a fully dead booth sounds claustrophobic and produces vocal performances that feel off, with talent tending to push their delivery to compensate for the lack of room support. Aim for a mid-band reverberation time below 0.2 seconds; the AES has published recommendations for tracking spaces that align with that target, and most working voice-over engineers calibrate to it.
Treat the corners and the ceiling first, the rear wall behind the talent next, and the side walls last. Corner trapping in a small booth is unusually effective because the corners concentrate low-frequency pressure, and a small booth's modal problems live almost entirely in the lowest octaves of the vocal range. A ceiling cloud directly over the talent's head, set as low as the room geometry allows, kills the most damaging early reflection in a vocal recording, which is the slap from the ceiling back down into the microphone capsule.
Ventilation, Power, and the Boring Details That Make or Break the Booth
A sealed booth needs mechanical ventilation, full stop. Two adults producing a podcast in a sealed 200-cubic-foot booth will exceed comfortable carbon-dioxide levels in roughly fifteen to twenty minutes, and the resulting cognitive fatigue shows up clearly in long-session recordings. ASHRAE's 62.2 ventilation standard establishes the residential minimums, and a vocal booth typically needs roughly 15 to 20 cubic feet per minute of fresh-air supply per occupant, delivered through a silenced duct that does not leak audible noise into the recording.
The silencer is non-negotiable. A short lined plenum with a labyrinthine airway, two to four feet long, packed around the airway with mineral wool and lined with perforated metal, will drop typical residential supply-fan noise to inaudible at the microphone position. ASHRAE's applications handbook includes the geometry and lining-thickness math, and several published AES papers walk through residential studio implementations that meet the noise targets without exotic equipment. Diffuser face velocities should stay well below 300 feet per minute to keep self-noise below the booth's ambient floor.
For power, run a dedicated circuit to the booth from the panel, terminate every receptacle in an acoustically rated back-box with putty pads to maintain the airtight seal of the wall assembly, and provide a separate low-voltage path for microphone tielines and headphone monitoring. The National Electrical Manufacturers Association publishes specification language for acoustically rated boxes that local inspectors will recognize, which makes permitting cleaner and the wall measurably quieter. Avoid sharing the booth's power with the control area's monitoring system; a clean ground and a star-grounded power tree, common practice in commercial studios, is worth the extra wire even at residential scale.
Conclusion
A vocal booth inside a spare bedroom is a real construction project, but it is well within reach of a serious home studio builder who is willing to do the work in the right order. Define the noise targets honestly, build a true room-within-a-room shell on isolated floors and ceilings, treat the door and window as full assemblies rather than as afterthoughts, and tune the internal acoustics to a target reverberation time that supports vocal performance without sounding dead. Each of those steps has decades of published guidance behind it, and each of them is buildable with widely available materials and standard residential trades.
The booths that succeed are the ones whose owners resisted the temptation to skip steps. The wall assembly that looks expensive on paper saves its money back ten times over against the cost of redoing the project after the first measurement reveals that the door, the duct, or the floor was the actual weak link. The internal treatment that uses real four-inch panels in real corner traps outperforms a wall of two-inch foam at half the visual footprint, and the ventilation system that gets sized for a session-length occupancy makes the difference between a booth people use and a booth people abandon after a month.
If you are about to convert a spare bedroom, please pull the published transmission-loss data for your candidate wall assemblies and the published vocal-booth case studies from the AES before you frame anything. The Acoustical Society of America's transmission tables, the AES's small-room and tracking-room papers, and ASHRAE's noise-criteria guidelines together give you a credible plan that you can hand to a contractor and that will measure on completion close to what the data sheets predicted.
Ready to hear yourself the way your microphones already do? Sketch the bedroom to scale, draw the inner shell with its full air gap on every face, mark the door, the window, and the duct silencer in plan, and only then start ordering materials. The booth will sound like a real booth, and the spare bedroom you sacrificed will earn its keep on every session you record.
More Articles You May Like


Comments
Post a Comment