Picture Frame Molding On Walls For Faux Wainscoting
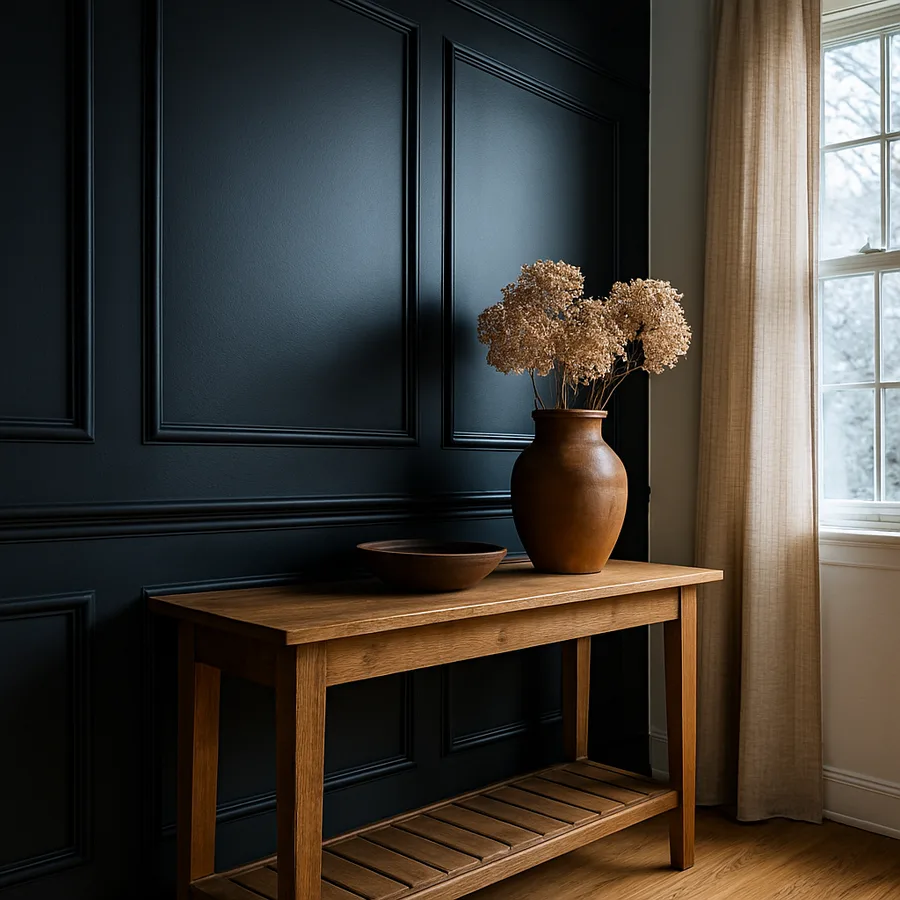
Picture frame molding has become one of the most popular wall treatments in residential design, and for good reason. It delivers the architectural weight of traditional wainscoting at a fraction of the cost, installs in a weekend, and reads as bespoke even on a builder-grade wall. The technique uses simple lengths of decorative molding arranged in rectangular frames on the wall surface, painted the same color as the wall behind them, to create the illusion of a recessed panel.
According to the National Association of Home Builders, more than 40 percent of recent residential renovations include some form of decorative wall molding, with picture frame molding ranking as the most-installed treatment for its accessibility to DIY homeowners. The American Society of Interior Designers consistently identifies it as a high-impact, low-cost upgrade that lifts the perceived quality of an entire room. This guide walks through every decision and step in the process, from layout planning to final paint.
Why Faux Wainscoting Works As A Design Strategy
True wainscoting is a panel system that runs from the floor to roughly chair-rail height, traditionally constructed from solid wood or MDF panels with stiles and rails. It is beautiful, durable, and historically rich, but it is also expensive, with material and labor costs often exceeding 30 dollars per linear foot. Picture frame molding mimics the visual effect at a tenth of that cost, with installation accessible to anyone who can use a miter saw and a nail gun.
The illusion works because the eye reads the rectangular frames as panels, even though the wall behind them is flat. When the entire wall, frames included, is painted the same color, the shadow lines from the molding profiles do the visual work. The result is depth, rhythm, and architectural interest where there was previously a blank surface. The American Lighting Association notes that wall lighting on a faux wainscoted wall produces dramatically richer shadows than on a flat wall, multiplying the effect.
Have you walked into a room and felt that the walls had a quiet sense of order even before you noticed the details? That is the effect of well-laid picture frame molding. The technique can be applied to any room, but it is especially common in dining rooms, entry halls, stair walls, and primary bedrooms, where the visual weight of architectural detail elevates the daily experience of the space.
Choosing The Right Molding Profile
The molding profile defines the character of the finished wall. A simple half-round or quarter-round profile reads as transitional and works in most homes. A flat panel molding with a slight bevel reads as modern and pairs beautifully with contemporary furniture. A more ornate Colonial or Victorian profile reads as traditional and suits classic or restoration projects. Choose the profile that matches the existing trim in the room, including baseboards and door casings.
Material choice matters too. Solid pine molding is inexpensive and easy to cut, but knots can bleed through paint if not properly primed. MDF molding is dimensionally stable, takes paint beautifully, and has no knots, but it cannot tolerate moisture. Polyurethane molding is moisture-resistant, lightweight, and ideal for bathrooms or basement areas where humidity might affect wood products. Pre-primed options in any of these materials save a step in the finishing process.
Profile width usually falls between three-quarters of an inch and two inches for picture frame applications. Anything narrower disappears at a distance, and anything wider starts feeling heavy and overwhelming for the panel sizes commonly used. Architectural Digest has profiled designers who specify custom profiles to match historic restorations, but for most renovation projects, a stock profile from a big-box retailer or a millwork supplier delivers excellent results at a low cost.
Planning The Layout And Panel Proportions
Layout is where most DIY picture frame molding projects succeed or fail. The rectangles need to be sized in proportion to the wall, evenly spaced, and visually balanced from corner to corner. The classical approach uses panels that are taller than wide in a vertical proportion of about 1.4 to 1, mimicking the proportions of a traditional wainscoting panel. For a 36-inch tall panel, that calculation suggests a width of about 26 inches.
Spacing between panels typically falls between 4 and 8 inches, with similar spacing from the surrounding trim, baseboard, ceiling, or chair rail. The spacing should be consistent on all sides of every panel, and the spacing between panels should match the spacing from the panels to the surrounding architecture. This consistency is what creates the calm, ordered feeling of well-executed picture frame molding.
The number of panels on a wall depends on wall length. A short wall might take a single panel. A medium wall takes two or three. A long wall takes four or five. The classical approach centers a panel on any major architectural feature, like a window, door, or fireplace. The panels then march symmetrically outward from that anchor point. Architectural Digest features many examples of this approach in historically inspired renovations, where panel layout is treated with the same care as the placement of furniture.
Tools, Materials, And Setup
The tool list for a picture frame molding project is short and accessible. A compound miter saw with a fine-tooth blade gives clean 45-degree cuts at the corners. A pneumatic brad nailer with 1.25-inch or 1.5-inch brads attaches the molding to the wall. A laser level or a long bubble level keeps everything square. A stud finder helps locate framing for solid attachment, and a tape measure plus a sharp pencil handle the layout.
Material costs are modest. A typical 12-foot dining room wall with eight panels might use about 80 linear feet of molding, costing between 80 and 200 dollars depending on the profile and material. Add brads, paintable caulk, wood filler, primer, and paint, and the total project cost lands between 150 and 350 dollars for materials. Compare that to 1,500 dollars or more for traditional wainscoting installed by a contractor.
What about the time investment? A confident DIYer can complete a single room in a weekend, with most of Saturday spent on layout and cutting and most of Sunday spent on filling, sanding, and painting. The project does not require advanced carpentry skills, just patience and a willingness to measure twice. The National Association of Home Builders consistently lists picture frame molding among the highest-return DIY projects per dollar invested.
Step-By-Step Installation Process
Begin by clearing the room and protecting the floor with drop cloths. Mark the panel layout on the wall with painter's tape, drawing each rectangle in its final location. Stand back and check the layout from across the room, adjusting any panel that feels off-balance. This is the moment to fix any layout error, before a single nail goes into the wall.
Cut the molding pieces to length, with each end mitered at 45 degrees so adjacent pieces meet cleanly at the corners. Test-fit each rectangle on the floor before installing on the wall, making sure all four corners close tightly. Any gap at a corner indicates a slightly off cut, and recutting is faster than trying to caulk it later. Mark each piece with its panel number and position to avoid confusion during installation.
Attach the molding to the wall with brads, nailing into studs where possible and into drywall elsewhere. The brad nailer's small holes are easy to fill, so do not worry about visible fastening. Use a level on every piece to confirm horizontals are perfectly flat and verticals are perfectly plumb. Move methodically around the room, completing one panel before starting the next, to avoid layout drift.
Caulking, Filling, And Finishing
The finishing stage is what separates a good picture frame molding installation from a great one. Fill every brad hole with lightweight wood filler, sanding smooth once dry. Caulk every joint between the molding and the wall with a high-quality paintable acrylic latex caulk, smoothing the bead with a damp finger or a caulk tool. The caulk hides any tiny gap and creates a seamless transition from molding to wall.
Prime the molding and any caulked or filled areas with a quality interior primer. Even pre-primed molding benefits from a fresh coat of primer over the joints and fasteners. Let the primer dry fully, then sand lightly with a fine-grit sanding sponge to knock down any raised grain or imperfection. The smoother the surface at this stage, the better the final paint will look.
Paint with two coats of a quality interior paint, ideally in a satin or eggshell finish for the right balance of washability and visual depth. Use a high-quality angled brush for the molding edges and a small foam roller for the larger flat areas. The finished wall, with molding and field painted the same color, creates the faux wainscoting effect that the entire project is about. Architectural Digest features many homes where this single decision lifts an otherwise ordinary room into magazine-worthy territory.
Maintenance, Updates, And Long-Term Considerations
Picture frame molding is essentially maintenance-free once installed. Dust accumulates on the top edges of the molding profile and should be wiped quarterly with a microfiber cloth. Any chips or dings from furniture contact can be filled and touched up with the original paint, kept on hand in a labeled jar. Cracks in the caulk joints from seasonal humidity changes are easily addressed with a fresh bead of caulk every few years.
The treatment is durable and long-lasting, but it does limit certain future changes. Repainting the wall a different color requires repainting the molding too, which is more time-consuming than rolling a flat wall. Hanging artwork inside or across the molded panels requires care to align with the panel layout, which becomes part of the visual composition. Some designers consider this a feature, since it forces a more thoughtful approach to wall decoration.
Have you considered how the molding will read with your existing furniture and art? Walk the room with the layout taped on the walls before installing. Place existing furniture against the walls and confirm that the panel layout works with the lines of chair backs, console tables, and large mirrors. Adjust the layout if needed before any cuts are made. The American Society of Interior Designers emphasizes this kind of contextual planning as a hallmark of professional-quality interior work.
Conclusion
Picture frame molding for faux wainscoting is one of the highest-leverage DIY projects available to homeowners, delivering a magazine-worthy architectural upgrade for a few hundred dollars and a focused weekend of work. The skills required are accessible, the materials are widely available, and the resulting transformation of a flat wall into a layered, architectural surface is dramatic and immediate.
Plan the layout carefully, choose a molding profile that matches the rest of the room, invest in the right tools, and take the time to caulk and fill thoroughly. The finishing stage is where amateur and professional results diverge, and a patient hand at this step pays for itself in the long-term satisfaction of the finished room. Quality painting completes the illusion and makes the whole project read as deliberate craftsmanship.
The technique works in nearly every room of the home, from formal dining rooms to laundry rooms to entry halls. It is especially powerful in rooms with high ceilings, where the panel proportions can be more generous and the architectural rhythm more pronounced. It also pairs beautifully with picture lights, sconces, and aimed accent lighting, all of which interact with the shadow lines created by the molding.
Ready to start your own faux wainscoting project? Begin by walking the room with painter's tape and sketching a layout on the wall. Order materials from a local millwork supplier or a quality big-box retailer, and block off a weekend on the calendar. If you would prefer professional guidance, browse the ASID directory for a designer who specializes in interior architectural detail and request a one-hour consultation before purchasing materials. The investment is small and the long-term satisfaction is enormous.
Reference materials are available from the National Association of Home Builders, the American Society of Interior Designers, and Architectural Digest.
More Articles You May Like



Comments
Post a Comment