Outdoor Refrigerator Cabinet Ventilation Spacing Requirements
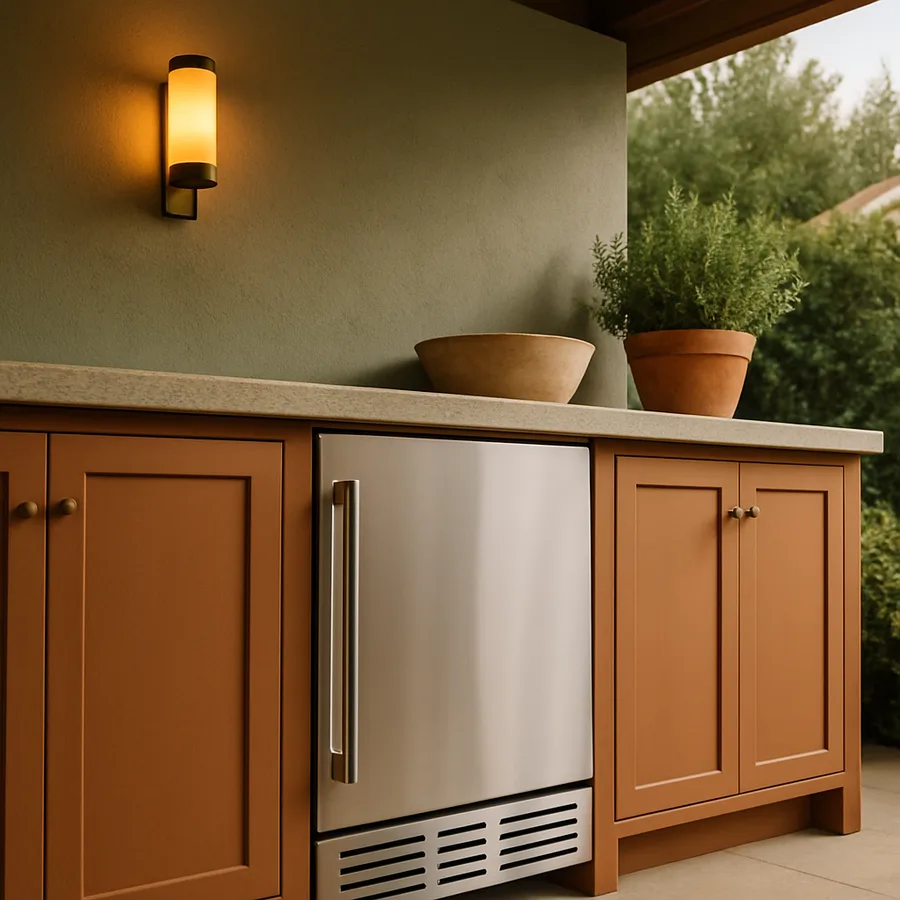
An outdoor refrigerator looks identical to an indoor undercounter unit until you read the installation manual. The clearance specs, ventilation requirements, and cabinet construction rules are dramatically more demanding, and ignoring them is the single most common reason outdoor refrigerators die early. A warranty claim on an outdoor unit installed without manufacturer-specified clearances will almost always be denied, and the homeowner ends up paying out of pocket for a compressor replacement that should have lasted a decade.
The reason is heat. An outdoor refrigerator faces a triple thermal load: ambient air temperature that can exceed 100 degrees Fahrenheit on a summer afternoon, solar heating of the surrounding cabinet, and the unit's own compressor heat that has nowhere to escape if the cabinet is sealed. According to engineering data published by the Association of Home Appliance Manufacturers (AHAM), refrigeration compressor life can drop by half for every 18 degrees Fahrenheit of sustained ambient temperature increase above the design rating. An outdoor unit installed in a sealed cabinet can experience interior cabinet temperatures 25 to 40 degrees above ambient, which is exactly how a five-year compressor warranty becomes a two-year compressor failure.
Why Outdoor Refrigerators Need Front Ventilation Specifically
Indoor undercounter refrigerators frequently use rear ventilation, where compressor heat exhausts through coils on the back of the unit and rises out through a small gap behind and above the cabinet. This works indoors because there is always a path for warm air to escape upward into the conditioned space. Outdoors, especially in a stone or masonry island, that path does not exist. The unit is sealed on five sides, and the only opening is the front door.
This is why every quality outdoor refrigerator is engineered for front-vented operation, with intake louvers at the bottom of the front grille and exhaust louvers at the top of the same grille. The compressor and condenser coils are reoriented to draw cool air in low and exhaust hot air high, all through the front face. This means the unit can be installed in a fully enclosed cabinet as long as the front grille is unobstructed.
The critical implication is that you cannot simply install an indoor undercounter refrigerator in an outdoor kitchen. The unit will overheat, the compressor will short-cycle, and the manufacturer warranty will be void from the day of installation. Look for units that carry a UL listing for outdoor use, typically marked as UL 471 outdoor-rated, and that explicitly state outdoor installation in the product literature. Have you ever seen an outdoor kitchen with an indoor mini-fridge tucked into the cabinet? It will not survive its second summer.
Manufacturer-Specified Clearance Numbers
Every outdoor refrigerator manufacturer publishes minimum clearance numbers, and they vary by model and by brand. There is no universal standard, but the typical ranges are remarkably consistent. Front grille clearance must be zero, meaning fully unobstructed; nothing in the front of the unit can block air movement through the louvers. Side clearances typically range from 0 inches (when the unit is designed for zero-clearance installation with a front-vent path) to 1 inch on each side for older or simpler designs.
Top clearance behind the cabinet face but inside the cabinet box typically ranges from 1 to 2 inches, providing a thermal break between the top of the refrigerator and the underside of the countertop. Rear clearance ranges from 1 to 3 inches depending on whether any portion of the cooling cycle uses rear airflow. The numbers are not arbitrary; they are derived from compressor manufacturer data sheets and from the unit's own thermal modeling, and they are the conditions under which the warranty is valid.
One manufacturer that publishes particularly clear clearance documentation is True Residential, whose outdoor units typically specify zero side clearance and zero rear clearance for fully integrated installations, with the entire ventilation load carried through the front grille. Other manufacturers including Sub-Zero and Perlick publish similar specifications. The pattern is consistent: front grille fully open, sides and rear can be tight, and top inside the cabinet box must have a small thermal break. Always work from the specific model's installation manual, not from a generic rule of thumb.
Cabinet Construction: Materials and Heat Reflection
The cabinet around the refrigerator influences how hot the unit gets, even with proper ventilation. Dark masonry materials like dark slate, dark brick, or black tile absorb solar heat and re-radiate it into the cabinet interior, which raises the ambient temperature the refrigerator's intake air sees. Light-colored materials like limestone, light granite, or stainless steel reflect solar load and keep the cabinet cooler.
For new builds in hot climates, plan a cabinet finish color with a solar reflectance index (SRI) of 40 or higher on any cabinet face that receives direct sun. The Cool Roof Rating Council and the EPA Energy Star program publish SRI values for common building materials, and the same numbers apply to outdoor kitchen cabinetry. A black granite countertop and a dark stone veneer can easily put the cabinet face at 140 to 150 degrees Fahrenheit on a sunny afternoon, which the refrigerator then has to overcome.
Inside the cabinet, the construction must accommodate ventilation airflow without trapping heat. Avoid wood framing inside the refrigerator cavity; outdoor wood expands and contracts with humidity and can throw the cabinet out of square, pinching the unit. Use a metal frame, typically aluminum or stainless steel, with cement board or fiber cement board panels that are specifically rated for outdoor use. The cement board provides thermal mass and resists moisture damage that would destroy plywood within a few seasons.
Roof Overhang, Direct Sun, and Site Orientation
The single most effective cooling strategy for an outdoor refrigerator is a roof overhang that keeps direct sun off the cabinet face. A 24- to 36-inch overhang above an outdoor kitchen counter typically eliminates direct sun on the refrigerator front for most of the day in most U.S. latitudes. The temperature difference between a shaded outdoor refrigerator and an unshaded one of the same model can easily reach 15 to 20 degrees Fahrenheit at the intake louvers, which translates directly into compressor longevity.
Site orientation matters when an overhang is not feasible. North-facing outdoor kitchen walls receive minimal direct sun in the northern hemisphere and are the easiest location for a refrigerator. South-facing walls receive the most sun and are the hardest. East-facing receives morning sun, which is tolerable; west-facing receives afternoon sun on the hottest part of the day, which is the worst case. If you must locate the refrigerator on a south- or west-facing exposure without an overhang, plan for a higher-tier outdoor unit with a more aggressive cooling system and stainless steel cabinet construction.
Wind also matters, in both directions. A site with consistent gentle breeze helps the refrigerator's ventilation by pulling exhaust away from the front grille. A site that is dead calm allows exhaust to recirculate back into the intake, which is the worst-case airflow pattern. According to AHAM thermal performance data, recirculation can reduce effective cooling capacity by 20 percent or more, which is enough to make the unit run continuously on a hot day. Where do prevailing summer winds come from at your site, and is the refrigerator front aligned to take advantage?
Drainage, Condensation, and Defrost Water
Outdoor refrigerators produce condensate even in dry climates, and the condensate has to go somewhere. Most outdoor units route condensate to a small evaporative pan above the compressor, where compressor heat boils off the water under normal conditions. This works fine until the unit has to handle a defrost cycle on a humid day, at which point the pan can overflow.
The fix is a small drain line that runs from the condensate pan to a discharge point outside the cabinet. The discharge can be a simple gravel-filled drainage well, a connection to the outdoor kitchen's drain system, or a discharge onto a stone surface where the water can evaporate. Whatever the discharge, the drain line must slope continuously downhill, must include an air gap to prevent backflow, and must terminate where it will not freeze in winter.
Some homeowners overlook this entirely and end up with a refrigerator that drips inside the cabinet, slowly destroying the cement board and growing mold in places nobody can see. A five-dollar drain line installed during the original cabinet construction prevents a thousand-dollar repair five years later. Building science experts at organizations like the Building Performance Institute consistently flag uncontrolled condensate as among the top causes of premature cabinet rot in outdoor kitchen installations.
Electrical, GFCI, and Whole-Unit Protection
Outdoor refrigerators require a dedicated GFCI-protected electrical circuit, typically 15 amp at 120 volts for residential units, with the receptacle located inside the cabinet within reach of the unit's power cord. The GFCI requirement is mandated by NEC Article 210.8 for all outdoor receptacles. The receptacle must be in a weather-resistant box with an in-use cover, even though the cover is closed when the refrigerator is plugged in.
The dedicated circuit matters for two reasons. First, refrigeration compressors draw a brief but high inrush current at startup, and sharing a circuit with another high-draw appliance can trip the breaker just as the compressor tries to start. Second, GFCI nuisance trips can shut down the refrigerator silently, and you do not discover the problem until the food is spoiled. A dedicated circuit minimizes both issues, and many premium outdoor refrigerators include a connectivity feature that sends a phone alert if the unit loses power.
Surge protection is also worth considering. Outdoor electrical circuits are statistically more exposed to lightning-induced surges than interior circuits, and a refrigerator compressor control board is among the more vulnerable electronics in the appliance. A whole-house surge protector at the main panel costs roughly $200 to $500 installed and protects every appliance in the home; a point-of-use surge protector at the refrigerator receptacle costs $30 to $50 and provides additional protection. The combination is the standard recommendation from electrical engineers and from manufacturers including those that publish guidance through NEMA and similar trade organizations.
Conclusion
An outdoor refrigerator that is properly specified, sited, and installed will run quietly for ten to fifteen years and pay back its cost many times over in convenience. An outdoor refrigerator that is improperly installed will fail within two to four years and take its warranty with it. The difference between the two outcomes is almost entirely in the planning phase, in choices made before the cabinet is built.
The non-negotiable specifications are these: use a unit that is UL-listed for outdoor use; install it with the manufacturer-specified front, side, top, and rear clearances exactly; build the surrounding cabinet from outdoor-rated materials that resist moisture and accommodate airflow; site the unit under a roof overhang or on a north or east exposure if possible; provide a dedicated GFCI-protected circuit; and route condensate to a proper discharge point. Compromise on any of these and you compromise the unit's lifespan.
Budget for the cabinet construction at roughly the same dollar amount as the refrigerator itself; a $2,500 outdoor refrigerator typically belongs in a $2,000 to $3,000 cabinet enclosure when you account for proper materials, ventilation construction, electrical, and condensate drainage. Spending $2,500 on the unit and $400 on the cabinet is a recipe for early failure and disappointment. The cabinet is part of the appliance system, not just decorative trim around it. Treat the enclosure design with the same engineering seriousness you would give the kitchen's plumbing or electrical infrastructure, because the long-term performance of the appliance depends on it just as much.
Ready to plan an outdoor refrigerator installation that lasts? Start with the installation manual for the specific model you are considering, mark every clearance dimension on the cabinet plan, and verify the site orientation, sun exposure, and electrical access. With that documentation in hand, your contractor can build a cabinet that protects the unit, your inspector will sign off without revisits, and you will spend the next decade enjoying ice-cold drinks from a refrigerator that simply works. The hour you spend reading the manual is the most valuable hour of the entire project.
More Articles You May Like



Comments
Post a Comment