Knife In-Drawer Block With Magnetic Strips Holding Blades
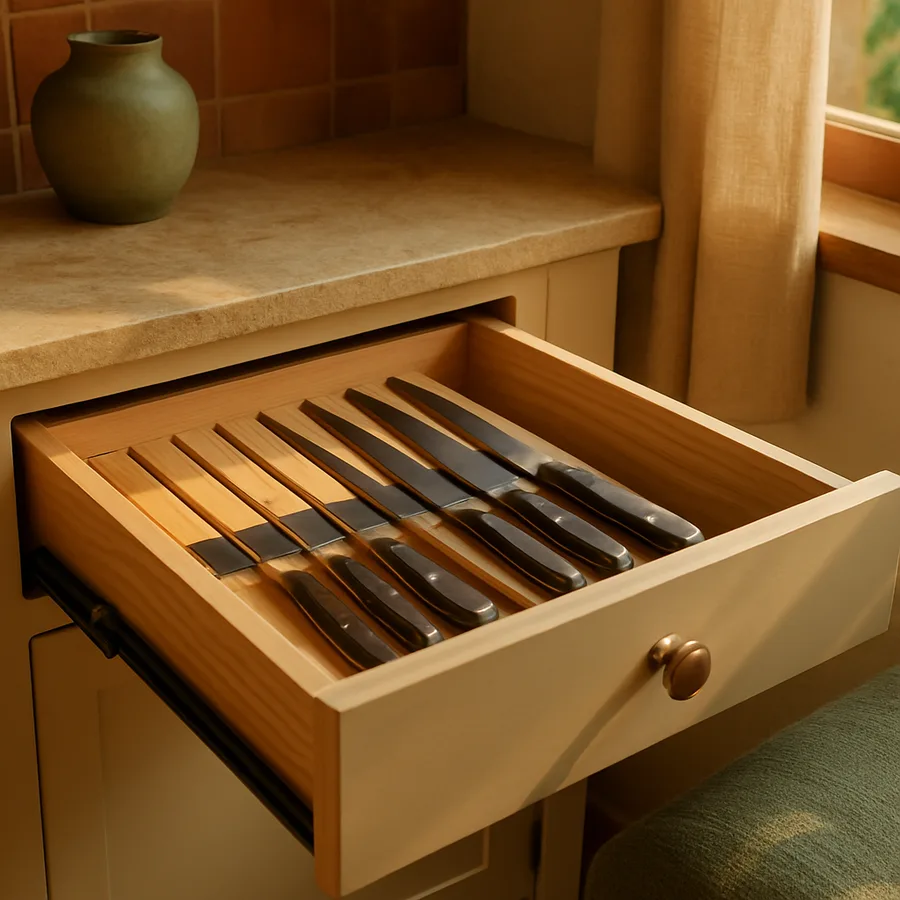
If your countertop knife block is gathering crumbs and your favorite paring knife keeps disappearing into the utensil drawer, an in-drawer magnetic block is one of the highest-leverage upgrades you can make in a small kitchen. Unlike a traditional slotted block, a magnetic in-drawer system holds blades flat, displays them at a glance, and reclaims valuable counter real estate. The catch is that doing it well requires the right magnet strength, the right wood, and a layout that respects the geometry of your specific knife collection.
The National Kitchen and Bath Association (NKBA) reports that storage capacity is the single most cited frustration among kitchen-remodel clients, with cluttered countertops topping the list of visual complaints in pre-design audits. Reclaiming a 12-by-22-inch zone of counter is not trivial. This guide walks through a complete, code-aware in-drawer knife block build using neodymium magnetic strips, with the engineering tolerances you need to avoid blade chatter, drawer warping, and accidental finger contact when reaching in.
Why a Magnetic In-Drawer Block Beats a Slotted Block
Slotted countertop blocks have three quiet problems. First, they trap moisture and food debris in slots that are nearly impossible to clean, even with compressed air. Second, they force you to buy or live with the slot pattern the manufacturer chose, so a serrated bread knife and a delicate yanagiba might end up jammed into the same opening. Third, they sit on the counter, eating into your prep zone. A magnetic in-drawer system solves all three. The blade rests on a wooden cradle, dries in open air, and is fully visible the moment you slide the drawer open.
From a knife-care standpoint, magnetic strips are also gentler on edges than slotted holders, but only if the strips are recessed and faced with hardwood. Bare ceramic or steel strips can micro-chip a thin Japanese edge if you slap the blade down. A wood-faced magnet, by contrast, lets the spine and one bevel face land softly while the magnet does the holding work through 1/8 to 1/4 inch of timber. Have you ever pulled a knife from a slot only to feel a tiny burr you swear was not there yesterday? That is exactly the kind of micro-damage a wood-faced magnetic system eliminates.
There is also a sanitation argument. A 2024 surface-contamination study summarized in trade press from the NSF International family of food-contact research consistently flags knife blocks among the higher-bioburden zones in residential kitchens, largely because the slots cannot be visually inspected or wiped down. An open magnetic cradle can be wiped end-to-end in five seconds with a damp cloth, then dried.
Choosing the Right Magnet: Neodymium Grades and Pull Force
Magnet selection is the single decision that determines whether your block feels premium or feels like a toy. Use N42 or N45 grade neodymium bar magnets, not refrigerator-style ferrite magnets. Ferrite magnets simply cannot generate enough pull through a wood facing to hold a heavy chef's knife reliably. Neodymium magnets, by contrast, deliver several pounds of pull per square inch of contact area, which is what you need to keep an 8-inch chef's blade pinned even when the drawer slams shut.
For a typical home knife collection, plan on roughly 2 to 4 pounds of pull force per inch of blade contact. A 6-inch chef's blade resting against a strip should feel impossible to lift with a single finger; you should need a deliberate two-finger pinch on the handle. If the knife slides under its own weight when you tilt the drawer, your magnets are too weak or your wood facing is too thick. If the knife snaps down so hard that it dings the wood, your magnets are too strong and your facing is too thin.
Wood facing thickness is the key tuning variable. A 1/8-inch hardwood face over an N45 magnet typically produces a firm, controlled grab. Bump that to 1/4 inch and you cut the pull roughly in half. Drop below 1/8 inch and you risk the blade slamming hard enough to chip the wood over time. Pull-force charts published by industrial magnet suppliers, including those referenced by Häfele in their cabinet hardware specifications, show a non-linear falloff with distance, so even a 1/16-inch change in facing thickness has a meaningful effect.
Drawer Prep: Depth, Width, and Bottom Reinforcement
An in-drawer knife block is heavier than people expect. A fully loaded block with eight to ten knives, hardwood cradles, and embedded magnets can easily exceed 6 to 8 pounds. That weight rides every time you open and close the drawer, so the drawer box and slides need to be sized accordingly. Standard drawer slides rated for 75 pounds dynamic load are the minimum; if your drawer also stores other tools, step up to 100-pound slides without hesitation. Soft-close undermount slides from manufacturers like Blum or Häfele in the 100-pound class are the gold standard, and they prevent the drawer-slam that can knock blades loose.
Drawer interior depth needs to clear your longest knife by at least 1.5 inches. For a 10-inch chef's knife, that means a drawer with at least 14 inches of clear interior depth. Width should give you at least 1.25 inches between adjacent blade tips and edges, both for finger safety when reaching in and to prevent blade-on-blade contact. If your drawer is shallow front-to-back, consider running the strips diagonally; a 22-inch-wide drawer can hold an 11-inch knife on a roughly 30-degree diagonal even if the front-to-back depth is only 16 inches.
The drawer bottom matters more than people realize. A 1/4-inch plywood bottom can flex under the weight of a loaded magnetic block, which causes the block to rock when you open the drawer and produces an annoying clatter. Either upgrade the bottom to 1/2-inch Baltic birch plywood or add a stiffening cleat across the underside. The National Association of Home Builders (NAHB) remodeling cost data consistently lists drawer-box upgrades among the highest-satisfaction kitchen improvements per dollar spent, and this is a textbook case of why.
Building the Wood Cradle: Species, Joinery, and Finish
The wood you choose changes both the look and the feel of the block. Hard maple is the workhorse choice; it is dense enough to dampen magnet impact, stable across humidity swings, and food-safe with a mineral oil finish. Walnut and cherry give you a warmer aesthetic and similar stability. Avoid soft woods like pine and avoid open-grain woods like oak; pine compresses where the blade lands, and oak's open grain harbors moisture and bacteria.
The cradle is essentially a series of parallel hardwood strips with magnets embedded along their top edges. A clean, repeatable construction method is to mill strips that are 3/4 inch tall by 1.5 inches wide, route a shallow rabbet along the top inside edge to seat the magnets, and glue a 1/8-inch maple cap over the magnets. Space the strips so your widest blade plus a 3/8-inch safety margin fits between them. For most home collections, that means strip pairs spaced roughly 2.25 to 2.75 inches apart on center.
For finish, use a food-safe option such as a mineral-oil and beeswax blend, or a hardwax oil rated for food contact. Avoid polyurethane on the contact surfaces; it eventually chips where blades land and the chips are hard to detect visually. Refresh the finish every 6 to 12 months depending on use. Did your last cutting board get a single coat of oil and never see another? Treat this block better than that and it will outlast the kitchen.
Layout, Blade Spacing, and Safety Geometry
A great layout reads at a glance. Sort your knives by length and use frequency, then assign the most-used knives to the front of the drawer where your hand naturally falls. A typical sequence runs: paring, utility, santoku, chef's, slicing, bread, with shears or a honing rod tucked along one wall in a dedicated holster. Keep at least 1.25 inches of clear air between blade tips and the drawer side walls, and at least 1.5 inches between any two blade edges that face each other.
For tip safety, angle the strips so blade tips point toward the back of the drawer, away from the hand opening. A 5- to 10-degree tilt also helps the blade sit more positively against the wood face because gravity assists the magnet. If you have left-handed users in the household, consider mirroring the layout in a second drawer rather than trying to compromise on a single orientation, since the natural pinch grip differs.
One often-overlooked safety detail is a finger-relief notch. Cut a shallow scallop, roughly 1.25 inches wide and 3/8 inch deep, into the front face of each cradle strip directly under the knife handle. This lets you slide a finger under the handle to lift the knife straight up, instead of pinching the handle from the sides where your knuckles can drift toward the blade. The American Society for Surgery of the Hand regularly publishes injury data showing that domestic kitchen lacerations spike during knife-retrieval movements, not during cutting, which is exactly the moment a finger-relief notch protects.
Installation, Testing, and Ongoing Maintenance
Installation is straightforward but unforgiving of sloppy measurement. Dry-fit the assembled block in the drawer first, with all your knives loaded, and confirm the drawer closes fully without any blade tip touching the back wall. Then secure the block to the drawer bottom with four to six countersunk screws driven from underneath, using washers to spread the load. Do not glue the block to the drawer bottom; you will eventually want to remove it for refinishing or for adding a knife.
Test the system by opening and closing the drawer with a deliberate slam ten times in a row. Any knife that shifts more than 1/8 inch during this test needs either a stronger magnet at that station or a thinner wood facing. Then pull each knife out and reinsert it, paying attention to the sound; a healthy magnetic grab makes a soft, dampened click, while a too-strong grab makes a sharp metallic snap that signals you are taking micro-damage with every insertion.
Long-term maintenance is minimal but worth scheduling. Wipe the cradle weekly with a barely damp cloth, refresh the food-safe oil every 6 to 12 months, and inspect the magnet faces annually for any cracks in the wood cap. If you ever notice rust spots forming on a knife inside the block, your kitchen humidity is too high or your knives are going in wet; the fix is process, not hardware. According to Häfele hardware engineering documentation, drawer slide failure modes are heavily correlated with corrosion from food acids, so keeping the interior dry pays dividends across the whole drawer assembly.
Conclusion
An in-drawer magnetic knife block is one of those rare upgrades that improves safety, sanitation, and aesthetics simultaneously. The build is genuinely accessible to a careful weekend woodworker with a router, a square, and patience for dry-fitting. The hardware budget for magnets, wood, and slides typically lands between $80 and $180 for a high-end build, which is a fraction of what a comparable factory-made walnut block costs at retail.
The non-negotiables are these: use N42 or N45 neodymium magnets, face them with 1/8-inch hardwood, give your knives at least 1.25 inches of finger clearance, and put the assembly on 100-pound soft-close slides. Skimp on any one of these and the system either fails to hold blades, damages them on insertion, or rattles every time you open the drawer. Invest in all four and you have a kitchen tool that will outlast every other piece of cabinet hardware in the room.
Once the block is installed, take fifteen minutes to teach every household member the lift-and-replace motion, especially the finger-relief grip. A well-built block that nobody knows how to use safely is just a fancier hazard. Treat the first month as a calibration period; if any blade station feels wrong, swap magnet strength or facing thickness before you commit to a finish refresh.
Ready to reclaim your countertop and protect your blades? Pull a tape measure from the back of the drawer to the front, count your knives, and start sketching a layout on graph paper this weekend. The hardest part of this project is committing to the first cut; once the maple is on the bench, the build moves quickly, and you will wonder why you waited so long to evict that crumb-filled block from your counter.
More Articles You May Like


Comments
Post a Comment