Built-In Outdoor Grill Island Designs With Side Burners and Storage
A grill island is the difference between cooking outside and barbecuing outside. With a freestanding cart you tend a grate, plate the food, and run inside for everything else. With a properly designed island you sear a steak, simmer a sauce on a side burner, slide it onto a finished plate, garnish from a refrigerated drawer six inches away, and serve it without ever crossing back through a sliding door. The footprint is similar. The experience is not.
Designing a built-in island that actually works as a kitchen, rather than a glorified grill enclosure, comes down to four decisions: the work-triangle layout, the side burner specification, the storage strategy, and the ventilation that keeps the cook safe. Get those right and a 9-foot island feels like a 250-square-foot kitchen. Get them wrong and you have spent $25,000 on a heavy patio sculpture.
The Outdoor Work Triangle: Why It Differs From Indoor
The classic kitchen work triangle connects the sink, refrigerator, and cooktop with no leg longer than 9 feet and no total perimeter over 26 feet. Outdoor kitchens use the same vertices but with a critical adjustment: the grill itself is both the cooktop and the primary heat source, and the side burner becomes the saute station. The geometry shifts the triangle into more of an L or a U layout, with the prep zone needing twice the counter space of an indoor kitchen because there is no overhead cabinet to hold dry goods or spices.
The National Kitchen and Bath Association outdoor kitchen guidelines recommend a minimum of 24 inches of landing space on each side of the grill, with 36 inches preferred on the primary plating side. Most amateur designs make the rookie mistake of putting the grill at the end of an island with a sink immediately adjacent, leaving zero room to set down a hot platter without crossing the sink basin. The NKBA outdoor design standards are documented at the National Kitchen and Bath Association site.
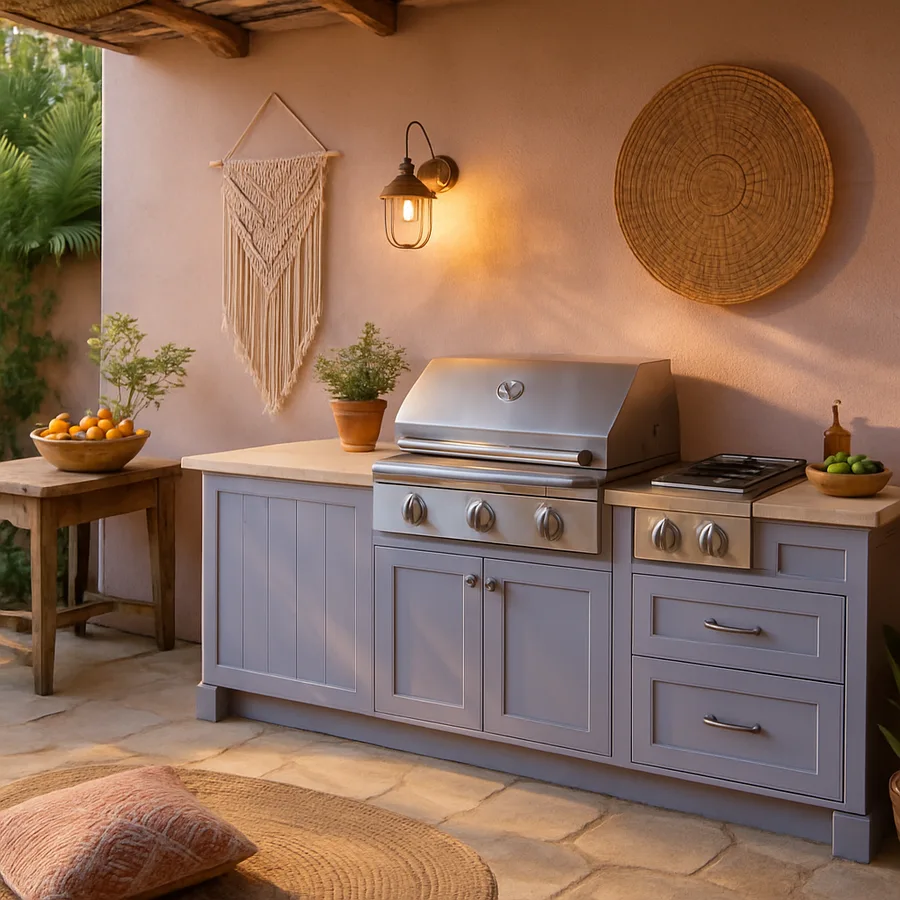
A workable layout for a 9-foot straight island runs as follows from left to right: 24-inch refrigerator drawer, 30 inches of prep counter, 36-inch grill with hood, 36 inches of plating counter, 24-inch double side burner. That puts cold storage, raw prep, primary cooking, plating, and finishing-saute all in a single line you can work without taking more than two steps. The U-shape and L-shape variants of this layout simply wrap the same five zones around two corners to fit a smaller patio footprint.
Side Burner Selection: Single, Double, or Power
The side burner is the most underused appliance in outdoor kitchens because most homeowners specify the wrong type. Three categories exist, and they serve very different jobs.
Standard side burners output 12,000 to 15,000 BTU per burner, fit a 24-inch cabinet, and handle the saucepan and saute jobs that round out a meal. They are the right pick if you mostly grill proteins and want to finish a vegetable side or warm a sauce without going inside. Expect to pay $400 to $900 for a quality unit from manufacturers like Lynx, Coyote, or Twin Eagles.
Power burners are the secret weapon of serious outdoor cooks. They output 25,000 to 60,000 BTU from a single ring, large enough to bring 20 quarts of water to a boil in under 10 minutes for crab boils, low-country shrimp boils, or canning. They require their own dedicated 24-inch cabinet, an upgraded gas line capable of delivering 65,000 BTU at the manifold, and proper clearance because the heat plume can scorch overhead surfaces 24 inches away. If you do any large-format cooking, the power burner is worth more than a third grill burner.
Wok burners are a specialty pick that makes sense if you actually wok-cook outside. The high-output ring sits in a recessed well that supports a round-bottom wok, and the BTU output starts around 30,000. They are useless for flat pans because the recess will not hold a saute pan flat, so do not specify one as your only side burner unless you genuinely live by the wok.
The combination most certified outdoor designers recommend for a 9 to 12 foot island is one standard double side burner plus one dedicated power burner, totaling 36 inches of cabinet width. That gives you saute, sauce, and bulk-water capability without redundancy.
Storage Strategy: Drawers Beat Doors Every Time
Indoor kitchen storage has settled the door-versus-drawer debate decisively in favor of drawers for base cabinets, and the same logic applies even more strongly outdoors. Doors require you to crouch, see into a dark cavity, and reach blind for what you need. Drawers bring everything to the light. Outside, where a wet pair of tongs or a half-empty marinade bottle can spill in a closed cabinet and not be discovered until next month, the visibility advantage of drawers prevents most of the typical outdoor-kitchen storage horror stories.
Specify 304-grade stainless steel drawer boxes with sealed ball-bearing slides rated for outdoor use. The aluminum drawer boxes some midmarket brands sell will pit and corrode within three years, especially in coastal or chlorinated-pool environments. The marine-grade upgrade adds about 15 percent to the drawer cost and extends the functional life from roughly 7 years to 20 plus.
The drawer mix that works best in a 9-foot island is one stack of three drawers next to the grill for tongs, spatulas, thermometers, and gloves; one stack of two deeper drawers for plates, bowls, and serving pieces; and one tall pull-out trash and recycling cabinet at the end. Avoid spice racks, which the salt and humidity destroy in 18 months, and instead use a single deep drawer with sealed glass jars rotated from indoor storage as needed.
The Association of Home Appliance Manufacturers publishes outdoor appliance enclosure standards that include drawer ventilation requirements, especially around any cabinet adjacent to a gas appliance. Their outdoor product testing is at the Association of Home Appliance Manufacturers site. The bottom line is that any closed cabinet within 18 inches of a gas burner needs a vented bottom or back panel to prevent gas accumulation in the unlikely event of a leak.
Ventilation: The Detail That Saves Lives, Skipped Constantly
If your grill island sits under a covered structure, ventilation is not optional. A 36-inch outdoor grill produces between 60,000 and 100,000 BTU at full output and generates significant carbon monoxide. Under an open sky the gas dissipates immediately. Under a pergola with a solid roof, a covered porch, or worse, a screened enclosure with a roof, the gas pools at face level and creates a real health hazard.
The rule from the Hearth, Patio and Barbecue Association is that any grill installed under a permanent overhead cover requires a power vent hood sized at 1,200 CFM minimum for a 36-inch grill, ducted to the outside through a dedicated 8-inch insulated duct. Higher-output grills and dual-grill islands need 1,500 to 1,800 CFM. The HPBA outdoor cooking safety guidelines and certified installer directory are at the Hearth, Patio and Barbecue Association site, and they note that improper ventilation accounts for the majority of outdoor cooking carbon monoxide incidents reported each year.
Three details separate a working hood install from a code violation. First, the hood needs at least 6 inches of horizontal overhang past the grill on each side and 24 to 30 inches above the cooking surface. Second, the duct run from hood to exterior should be as straight as possible, with no more than two 90-degree bends, because each elbow reduces effective CFM by roughly 25 percent. Third, the hood must have a stainless steel fire-rated baffle filter, not a mesh grease filter, because grease drips back into the cooking food and the mesh ignites.
If your island is genuinely under open sky, you can skip the powered hood and install a passive stainless steel chimney instead, which costs roughly one tenth as much and serves the cosmetic purpose of marking the cooking zone without the structural and electrical complexity of a fully ducted system.
Cabinet Construction: Frame Material Determines Lifespan
The cabinet frame is invisible once the island is finished, but it determines whether the island lasts a decade or fails in three winters. Four construction approaches dominate the market, and the price gap between the cheapest and the most durable is smaller than most homeowners expect.
Steel-framed cabinets with stainless cladding and stone veneer are the high-end standard. The frame is welded 16-gauge galvanized steel, with stainless interiors and stone or stucco exterior finish. They tolerate freeze-thaw because the frame moves as a single unit and the stone veneer is mechanically anchored with a 1/8-inch expansion gap. Expect $1,500 to $2,500 per linear foot installed including counter and basic appliances. This is the construction the major outdoor kitchen brands like Brown Jordan Outdoor Kitchens and Kalamazoo build.
Concrete masonry unit (CMU) frames with stucco or stone veneer are the traditional Southwestern build, and they work beautifully in dry climates. In freeze-thaw zones, the moisture absorbed by the CMU expands and cracks the veneer within five to seven years unless the entire structure is sealed with an elastomeric coating and the veneer is installed with a drainage plane behind it. Cost runs $1,000 to $1,800 per linear foot.
Modular polymer cabinets, the newer entrant from brands like Werever and NewAge, ship as preassembled HDPE marine polymer boxes that you bolt together on site. They are completely freeze-thaw immune, will not corrode, and install in a single weekend. The aesthetic is more contemporary, the price runs $800 to $1,400 per linear foot, and the material has a 25-year track record now in marine applications. The drawback is the limited finish options, since they cannot accept stone veneer.
Wood-framed cabinets with cement-board sheathing should be avoided. Wood absorbs water through any seam failure, the framing rots within five to ten years, and the failure mode is hidden until the entire island has to come down. If a contractor proposes wood framing for an outdoor kitchen, get a different contractor.
Layout Variations for Different Patio Sizes
The 9-foot straight island works for a deep, narrow patio, but most homeowners need to shape the island to the lot. Five layouts cover virtually every site condition.
The L-shaped island at 8 feet by 6 feet fits a corner installation and naturally creates a separate prep zone perpendicular to the cook zone. Total counter run is 14 feet. This layout suits patios with one fixed wall and traffic flow on the other two sides.
The U-shaped island at 9 feet by 6 feet by 9 feet creates a complete cook station with the cook standing inside the U. Total counter run is 24 feet. It works on a large patio with the U opening toward the dining area, and it isolates the cooking heat and smoke from guests.
The peninsula with bar overhang attaches the island to an existing wall and adds a 12-inch counter overhang on the patio side for bar seating. Total counter run is 10 to 12 feet plus the bar. This is the most-built layout for suburban backyards because it uses an existing house wall as one boundary and creates social seating without adding furniture.
The two-island setup separates the cook island from the bar island by 36 to 48 inches of walkway. The cook island handles grill, side burner, and prep; the bar island handles refrigerator, sink, and ice maker. This layout works on luxury installations with a 400-square-foot patio or larger and roughly doubles the typical cost.
The compact 6-foot island with grill plus single side burner and a single drawer stack is the entry-level build. Total counter run is 6 feet, fits on a 10-foot by 12-foot patio, and lands in the $8,000 to $14,000 range installed. It will not host a dinner party for 12, but it will absolutely upgrade weeknight cooking from carry-it-all-outside to a real station.
Conclusion: Build Once, Use for Twenty Years
An outdoor grill island is not a furniture purchase. It is a permanent structural addition to the home that should outlast the roof shingles. Building it correctly the first time is significantly cheaper than the inevitable rework when shortcuts fail. The four decisions that determine success are the layout (use the outdoor work triangle, not an indoor template), the side burner spec (a power burner plus a standard double burner is the gold standard), the storage strategy (drawers in marine-grade stainless), and the ventilation (a 1,200-plus CFM powered hood under any cover, period).
Budget-wise, a serious built-in island runs $15,000 to $40,000 for a 9 to 12 foot configuration, depending on appliance grade and site conditions. The largest single line items are the grill itself ($2,500 to $8,000), the cabinet construction ($800 to $2,500 per linear foot), and the gas and electrical work ($2,000 to $5,000). Cutting any of these by more than 20 percent typically produces a visible quality drop within a few seasons.
Two questions to bring to the design consultation: How many people do you typically cook for, because that determines grill size and side burner count? And what is the prevailing wind direction across the patio, because the smoke management changes the optimal grill orientation?
The most expensive outdoor kitchen mistake is not over-building. It is under-planning, then bolting on appliances and storage piecemeal until the layout no longer works. Start with a complete design from a National Kitchen and Bath Association certified outdoor specialist before any construction begins, even if you intend to phase the build over two or three seasons. The plan keeps every phase aligned and saves the cost of tearing out what does not fit.
More Articles You May Like


Comments
Post a Comment