Bidet Toilet Seat Installation on Standard American Toilets
Adding a bidet toilet seat to a standard American toilet is one of the highest-impact bathroom upgrades a homeowner can make in a single afternoon. Most modern bidet seats are engineered to drop directly onto the existing porcelain bowl, share the cold water supply already feeding the tank, and require no special drain plumbing. According to a Consumer Reports survey on bathroom remodeling priorities published in their home improvement coverage, more than 30 percent of U.S. homeowners now consider a bidet seat a desirable feature when planning a bathroom refresh, a sharp jump from less than 10 percent only five years earlier. The pandemic-era paper shortage simply accelerated a trend that had been building for years.
Have you ever stood in front of a wall of bidet seats at the home center and wondered whether your toilet is actually compatible, or whether you should call a plumber? In nearly every case the answer is reassuring: you can do this yourself with a crescent wrench, a measuring tape, and roughly twenty minutes. This guide walks through the entire bidet toilet seat installation process specifically for the two- and one-piece toilets that dominate American homes, with attention to the small details that separate a leak-free, lifetime-grade install from a frustrated weekend.
Confirming Your Toilet Will Accept a Standard Bidet Seat
The first task is verifying fit, because almost every American toilet sold in the past several decades follows one of two bowl shapes: round front or elongated. A round bowl typically measures about 16.5 inches from the seat-bolt holes to the front lip, while an elongated bowl measures closer to 18.5 inches. A bidet seat designed for an elongated bowl will overhang badly on a round toilet, and a round-bowl bidet on an elongated toilet leaves an awkward gap. Pull a tape measure across the bowl before you order anything, and write the measurement on a sticky note rather than relying on memory.
Beyond bowl shape, you need to confirm three more dimensions: the distance between the two seat-bolt holes (this is universally 5.5 inches on American toilets that conform to the IAPMO Uniform Plumbing Code reference dimensions), the clearance between the bolt holes and the back of the tank, and the clearance between the bolt holes and the front edge of the tank. The International Association of Plumbing and Mechanical Officials (IAPMO) standardizes those bolt-hole specs, which is why bidet seats from major manufacturers are advertised as universal-fit. You can read more about the underlying fixture standards on the official IAPMO site.
Tank-to-bolt clearance is the dimension that catches people off guard. Bidet seats need roughly 1.75 to 2.25 inches of flat porcelain behind the bolt holes to accommodate the seat's plastic mounting plate and the hose connections that exit at the rear. Skirted one-piece toilets and certain low-profile designer toilets sometimes give you only an inch, which forces you to look at slim or low-profile bidet models instead. Pull off the existing toilet seat, set a steel ruler across the bolt holes, and measure backward toward the tank wall to be certain.
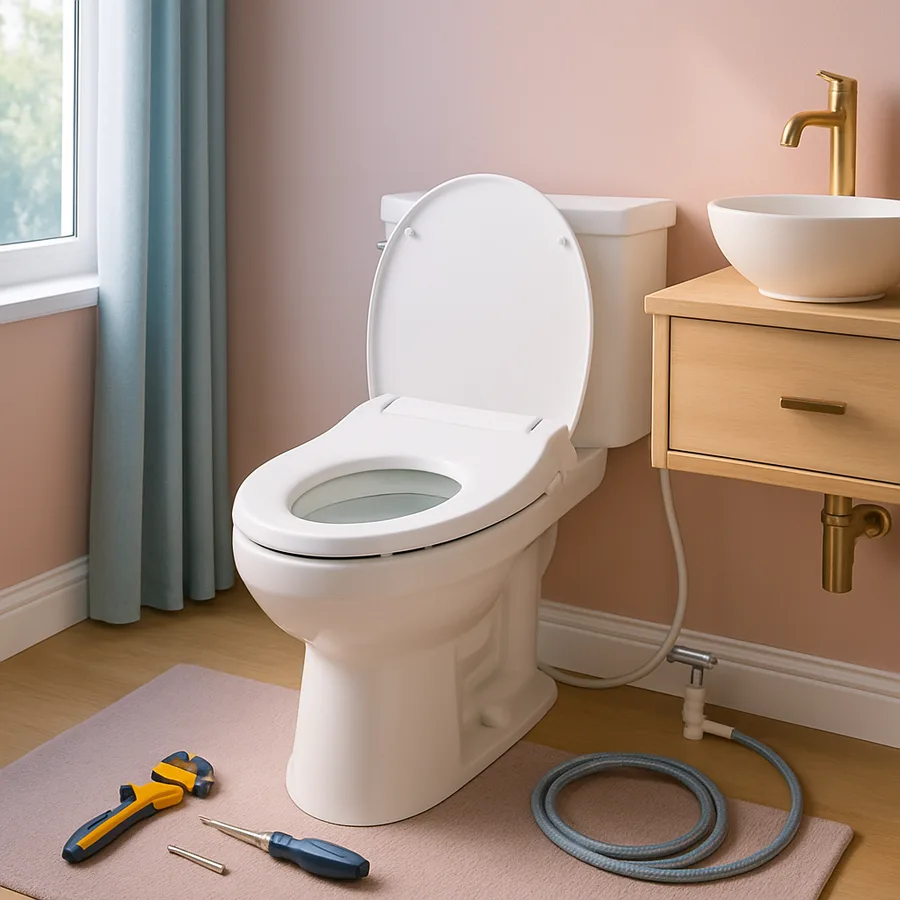
Tools and Parts You Will Actually Need
Manufacturers love to claim "no tools required," but in practice you'll move faster with a small, predictable kit on hand. Lay out an adjustable crescent wrench (the cheap eight-inch model is fine), a pair of slip-joint pliers wrapped with electrical tape to protect chrome, a small bowl or a folded shop towel to catch residual tank water, a flashlight, and a roll of plumber's thread-seal tape. The National Kitchen and Bath Association (NKBA) recommends keeping a dedicated bathroom-tool caddy under the sink for jobs exactly like this; their guidance on small bathroom retrofits is collected at the NKBA professional resources hub.
Inspect the parts that ship in the bidet seat box before you start. You should find the seat itself, a mounting plate (sometimes integrated, sometimes separate), two plastic bolts with washers and wingnuts, a flexible braided supply hose typically 24 to 30 inches long, a brass or plastic T-valve that splices into the existing supply, and a printed instruction sheet. Confirm the T-valve threading matches your local supply standard: residential American toilets almost always use a 7/8-inch ballcock-style female fitting on the tank side and a 3/8-inch compression on the wall side, and the included T-valve usually accommodates both.
Shutting Off Water and Removing the Old Seat
Reach behind the toilet and rotate the angle stop (the small chrome valve where the supply line meets the wall) clockwise until it stops turning. If the valve has not been touched in years it may resist, and you should never force it; corroded angle stops are the single most common source of mid-installation flooding, a point the Plumbing-Heating-Cooling Contractors Association (PHCC) emphasizes in its consumer DIY guidelines. If the valve will not turn cleanly, stop, shut off the home's main water supply, and replace the angle stop before going further.
With the water off, flush the toilet once and hold the handle down to drain as much tank water as possible. Sponge or towel out the residual half-inch in the tank bottom; this prevents drips later when you disconnect the supply. Disconnect the existing supply line from the bottom of the tank using your crescent wrench and let any water trapped in the line drain into your bowl or towel. Now remove the existing toilet seat by reaching under the bowl rim, finding the wing nuts under the bolt heads, and unscrewing them by hand or with pliers if they are calcified.
Take a moment to scrub the bowl rim around the bolt holes with a disinfectant. Years of seat compression hides a surprising amount of grime, and you do not want to install a new $300 bidet seat on top of it. A microfiber cloth with a 1:10 bleach solution clears the area in less than a minute, and the surface dries before the new mounting plate goes on.
Installing the Mounting Plate and Seating the Bidet
The bidet seat slides onto a mounting plate that sits on the porcelain. Drop the supplied plastic bolts down through the seat-bolt holes from above, slide the mounting plate onto the bolts so it rests flat on the porcelain, and confirm the front edge of the plate is parallel with the front edge of the bowl. Loosely attach the wing nuts under the bowl rim, then tug the plate forward or backward until the front-to-back position aligns with the bidet's intended sitting position. Most quality units include a paper template you can lay on the bowl to verify alignment before tightening.
Tighten the wing nuts by hand only, then add a quarter turn with pliers. Over-tightening is the second most common cause of warranty claims in this category; the porcelain itself can crack under the bolt hole if you crank wing nuts down with full-strength leverage. Once the plate is firm, slide the bidet seat onto the plate from the front, listening for the audible click that signals the locking tabs have engaged. Give the seat a gentle tug forward to confirm the lock; it should resist coming off without first depressing the release button.
Connecting the T-Valve and Water Supply
This is where the installation becomes a plumbing job rather than a furniture job. Wrap two clean turns of plumber's thread-seal tape clockwise around any external threads on the T-valve, install the T-valve onto the bottom of the toilet tank inlet, and finger-tighten until snug. Then use the crescent wrench to add no more than a quarter turn; the rubber gasket inside does the actual sealing, and over-torquing distorts it. Reconnect your existing supply line to the bottom port of the T-valve.
Now attach the bidet's braided supply hose to the side port of the T-valve and route it up to the bidet seat's intake fitting. The hose should describe a gentle curve with no sharp kinks; kinked hoses fail prematurely and can rupture under household line pressure, which the U.S. EPA WaterSense program reports averages 60 to 80 psi in American homes - well above what a kinked plastic line tolerates long-term. EPA's water-efficiency reference materials live at the EPA WaterSense site, and they're worth bookmarking for any bathroom project.
Slowly open the angle stop counterclockwise, no more than a quarter turn at first, and watch every fitting for moisture. If you see the slightest weep, close the valve, dry the joint, and add another wrap of thread tape. A common rookie mistake is opening the valve fully and walking away to admire the install; you want eyes on the connections for a full minute under pressure before you trust them. Once the system is tight, open the angle stop fully, flush the toilet to refill the tank, and run the bidet's spray function once to purge air from the line.
Testing, Adjusting, and Final Walkthrough
With water flowing, work through every function the seat advertises. On non-electric models that means front wash, rear wash, and any nozzle-position dial. On electric models that adds heated seat, water temperature stages, dryer, deodorizer, and any user-preset memory. Sit on the seat to confirm the safety sensor (almost all electric units require body contact before the spray will activate), and time how long the seat takes to reach its programmed warmth. Have you confirmed the seat lifts and lowers without scraping the tank? That is the easiest detail to miss and the easiest to fix while the install is still fresh.
Run the spray on its lowest pressure setting and confirm the stream lands where it should - most quality units allow nozzle-position adjustment via a dial or remote. The American Society of Interior Designers (ASID) notes in its accessible-bathroom design guidance that a properly aimed bidet stream is one of the simplest aging-in-place upgrades a household can make, and the same accuracy that helps a senior also makes daily use comfortable for everyone.
Finally, lift the seat and inspect every connection one more time after the system has held pressure for ten minutes. A weeping T-valve will show a small bead at the joint that grows over time; a weeping supply hose typically shows moisture along the braided sleeve. Tighten by no more than a quarter turn at a time, retest, and only call a plumber if a fitting refuses to seal after three attempts - at that point the gasket itself may be damaged.
Conclusion
A bidet toilet seat installation on a standard American toilet is a Saturday-morning project for almost any homeowner who is comfortable using a wrench. The full sequence - measure, gather tools, shut off water, remove the old seat, mount the new one, splice the T-valve, pressurize, and test - takes between twenty and forty-five minutes for a first-timer, and noticeably less the second time you do one. The hardware itself is standardized to IAPMO references, which is precisely why universal-fit seats from major brands install so reliably across decades-old and brand-new toilets alike.
The biggest mistakes are easy to avoid: confirm bowl shape and tank-to-bolt clearance before you buy, never overtighten wing nuts on porcelain, never overtorque the T-valve, and watch every joint under pressure for a full minute before walking away. If a fitting refuses to seal after a fresh wrap of thread tape and a careful re-tightening, that is the signal to call a licensed plumber rather than to keep cranking. The PHCC's nationwide member directory is a reliable starting point if you need professional help in your area.
Beyond the install itself, take a few minutes to teach every member of the household how to use the new fixture comfortably, and store the printed manual inside a labeled folder under the sink so warranty info stays close at hand. Most quality electric bidet seats carry one- to three-year manufacturer warranties, and a quick photograph of the receipt and serial-number sticker emailed to yourself is the easiest possible record-keeping insurance. Treat the install as a long-term system upgrade rather than a one-day project and the seat will quietly serve the home for a decade or more.
Ready to upgrade your bathroom this weekend? Start by measuring your bowl shape today, confirm tank-to-bolt clearance, and order the model that fits your fixture - by next Saturday morning you can be enjoying one of the most underrated comfort upgrades a modern bathroom can offer. Bookmark this guide, share it with a friend who's been on the fence, and post your install photos when you're done.
More Articles You May Like


Comments
Post a Comment