Walk-In Pantry Shelving Layouts for Maximum Jar and Can Storage
Why Shelf Layout Matters More Than Square Footage
A walk-in pantry can feel enormous yet still leave you scrambling for space if the shelving layout wastes vertical real estate or ignores the dimensions of common food containers. The truth is that a well-planned six-by-four-foot pantry can outperform a poorly organized eight-by-six-foot room when every shelf is sized with intention. According to the National Kitchen and Bath Association (NKBA), homeowners who invest in customized pantry shelving report up to 30 percent more usable storage capacity compared to those relying on standard builder-grade shelves. That statistic alone should make anyone reconsider the cookie-cutter approach to pantry design.
The core issue with most walk-in pantries is a mismatch between shelf depth and the items being stored. Standard pantry shelves often arrive at 16 inches deep, which pushes smaller jars and cans to the back where they vanish from sight. A family that buys canned goods in bulk needs a fundamentally different layout than one that stocks primarily tall cereal boxes and baking supplies. Understanding your household's purchasing habits is the first step toward a layout that genuinely works.
Have you ever pulled everything out of your pantry only to discover three duplicate jars of the same spice hiding behind a bag of flour? That scenario is a symptom of poor shelf planning, not careless shopping. When shelving is designed around the actual height, width, and depth of your most-purchased items, duplicates disappear and grocery budgets tighten naturally. The goal is a pantry where every item is visible within two seconds of opening the door.
Beyond personal frustration, disorganized pantries contribute to measurable food waste. The Natural Resources Defense Council (NRDC) estimates that the average American household wastes roughly 30 to 40 percent of its food supply each year, and a significant portion of that waste comes from items forgotten in the back of cabinets and pantries. A thoughtful shelving layout is not just an aesthetic upgrade; it is a practical investment in reducing waste and saving money.
Understanding Standard Jar and Can Dimensions
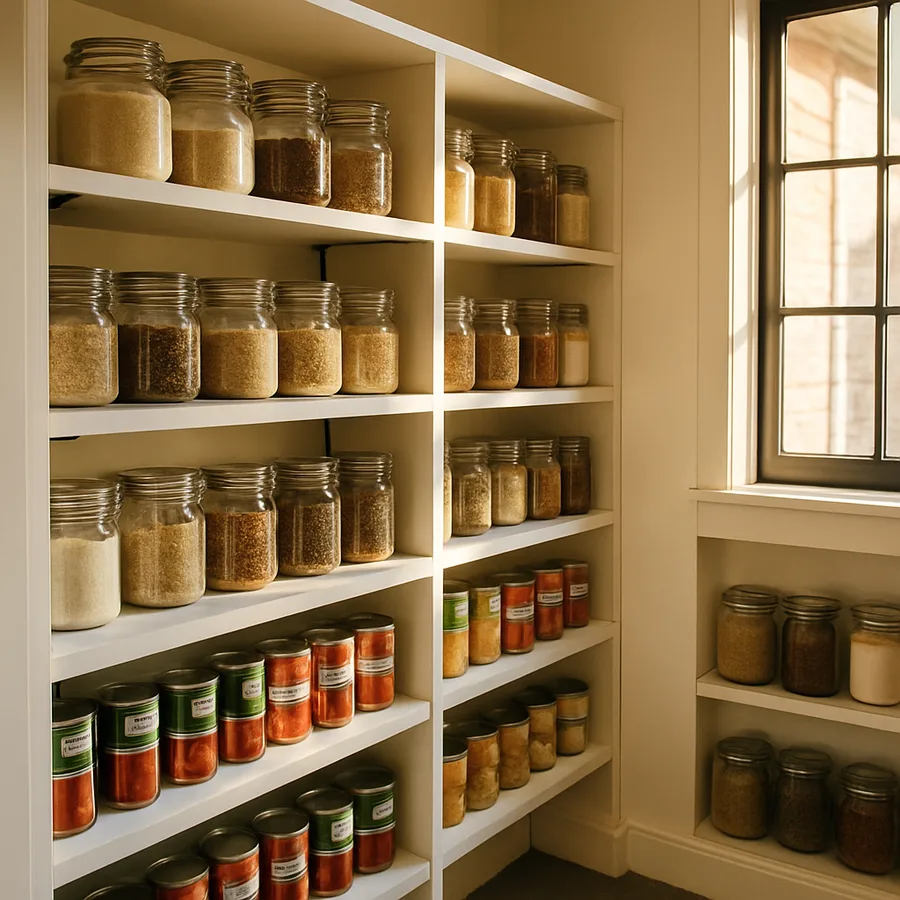
Before selecting any shelving system, you need hard numbers. A standard 15-ounce can measures approximately 4.5 inches tall and 3 inches in diameter. Quart-sized mason jars stand about 7 inches tall with a 3.25-inch base. Pint jars come in at roughly 5 inches. These measurements matter because they dictate the minimum and maximum shelf spacing for each zone of your pantry. Designing without them is like building a bookshelf without knowing the size of your books.
Larger institutional-sized cans, such as the #10 cans popular with bulk buyers and preppers, reach nearly 7 inches tall and 6.25 inches in diameter. If your household regularly purchases these, you will need at least one dedicated shelf zone with 8 inches of clearance. Mixing these large cans on the same shelf as standard 15-ounce cans wastes the vertical gap above the smaller containers. Segregating by size is the single most impactful choice you can make.
Jars present a different challenge because their shapes vary so widely. Salsa jars, jam jars, pickle jars, and specialty sauce containers all have unique footprints. The solution is to group jars by height range rather than content type. A shelf zone dedicated to items between 4 and 6 inches tall can hold pint mason jars, standard condiment jars, and most spice containers. Another zone for 6-to-8-inch items captures quart jars and taller sauces. This height-based grouping eliminates the wasted airspace that plagues most pantries.
Consider keeping a simple measurement reference card taped inside your pantry door during the planning phase. Write down the dimensions of your ten most-purchased jarred and canned items. This card becomes your blueprint for setting shelf heights, and it takes less than fifteen minutes to create. Professional organizers affiliated with the American Society of Interior Designers (ASID) frequently recommend this step as the foundation of any pantry redesign, and it costs nothing but a few moments of attention.
Optimal Shelf Depth and Spacing Configurations
The ideal shelf depth for jar and can storage is 12 inches, not the 16 inches commonly installed in new construction. At 12 inches, standard cans sit two rows deep with the back row still visible, and most jars remain within easy reach. If your pantry is deep enough, consider installing 12-inch shelves on the side walls and reserving one wall for deeper 16-inch shelves dedicated to bulky items like cereal boxes, large bags of rice, and small appliances.
Vertical spacing should follow a tiered strategy. For the can storage zone, set shelves 6 inches apart on center. This provides just enough clearance for standard cans while allowing you to stack two cans high if needed. For the jar zone, 8 to 9 inches between shelves accommodates quart mason jars and most commercial sauce containers without dead space above. A single tall zone with 14 inches of clearance near the top handles cereal boxes, pitchers, and oversized items.
One configuration that professional kitchen designers consistently recommend is the U-shaped layout with three walls of shelving. The left and right walls carry shallow 12-inch shelves at tight vertical spacing for cans and jars, while the back wall features deeper shelves for irregularly shaped items. This layout maximizes the perimeter storage while keeping the center aisle wide enough for comfortable movement. An aisle width of 36 to 42 inches satisfies most building codes and allows two people to pass without bumping elbows.
Are you working with an oddly shaped pantry, perhaps an L-shape or one with an angled wall? Corner shelves with a lazy Susan mechanism can rescue otherwise dead space. A 16-inch lazy Susan installed in a corner shelf can hold 12 to 15 standard cans while keeping every single one accessible with a simple spin. This approach is far more efficient than fixed corner shelves, which tend to become graveyards for forgotten items. The key is choosing hardware rated for the weight of full cans and jars, not lightweight spice-rack turntables.
Adjustable vs. Fixed Shelving Systems
Fixed shelving has one advantage: it is cheap and fast to install. Beyond that, adjustable shelving dominates in every practical category. Adjustable systems use vertical standards with shelf pins or clips, allowing you to reposition shelves in 1-inch or 2-inch increments. This flexibility means your pantry can adapt as your household's needs change, whether that means accommodating a new canning hobby or shifting to bulk buying after a family grows. The upfront cost difference is modest, typically 15 to 25 percent more than fixed alternatives.
Wire shelving systems from brands like ClosetMaid and Elfa by The Container Store offer adjustability at a mid-range price point. Wire shelves allow air circulation, which reduces moisture buildup and the risk of mold in humid climates. However, wire shelves have a notable drawback for small jars and cans: items can wobble or tip in the gaps between wires. Adding shelf liners or custom-cut acrylic inserts solves this problem and creates a stable surface for even the smallest containers.
Solid wood or melamine shelves with 32mm system drilling offer the most refined look and the sturdiest surface. A 3/4-inch melamine shelf spanning 36 inches can support 50 pounds or more without sagging when properly supported at the back and front edges. For a walk-in pantry stocked heavily with cans and jars, structural integrity is not optional. Each linear foot of shelf holding two rows of 15-ounce cans bears roughly 12 to 15 pounds, and that adds up quickly across an entire wall.
Regardless of the system you choose, always anchor shelving units to wall studs. Pantry shelves loaded with glass jars and metal cans carry significant weight, and drywall anchors alone are not sufficient for full walls of storage. A single wall of fully loaded pantry shelves can weigh 200 pounds or more. The NKBA's kitchen planning guidelines emphasize proper structural support for any shelving expected to bear sustained heavy loads, and a walk-in pantry absolutely qualifies.
Zone-Based Organization for Quick Retrieval
Once your shelving is installed, the layout strategy shifts to zone-based organization. This approach divides your pantry into distinct areas based on food category, usage frequency, or meal type. The most effective pantries use a hybrid model: zones are defined by category (canned vegetables, canned soups, baking jars, preserved fruits), but placement within the pantry is governed by how often each category gets used. Items you reach for daily belong at eye level between 36 and 60 inches from the floor.
The bottom shelves, from floor level to about 24 inches, are ideal for heavy items like bulk cans, large jars of pickles or tomato sauce, and backup stock. Bending down is less convenient, but the weight distribution keeps your pantry safer and reduces the risk of a heavy jar falling from an overhead shelf. Reserve the topmost shelves, above 72 inches, for lightweight or seldom-used items such as specialty baking supplies, holiday-specific ingredients, and seasonal preserves.
Within each zone, arrange items with labels facing forward and smaller containers in front of larger ones. This sounds elementary, but it is the single habit that separates a functional pantry from a frustrating one. Consider investing in shelf risers or small stepped platforms within each zone. A three-tier riser on a 12-inch-deep shelf lets you see three rows of cans simultaneously without moving anything. These inexpensive accessories, often under ten dollars, dramatically improve visibility and reduce the time spent searching for a specific item.
Labeling each zone with a small tag or adhesive label ensures that every household member maintains the system. Professional organizers working with the American Society of Interior Designers note that pantry organization fails most often not because of poor design but because of inconsistent restocking habits. When every zone is clearly marked, even children can return items to the correct spot after unloading groceries. The system sustains itself instead of gradually degrading into chaos.
Specialty Add-Ons That Multiply Storage Capacity
Standard flat shelving handles most needs, but a few targeted accessories can push your storage capacity significantly higher. Door-mounted racks are one of the most underused storage surfaces in a walk-in pantry. A sturdy door rack adds 8 to 12 linear feet of shallow shelving perfect for spice jars, small canned goods, and condiment bottles. Because the door swings open toward you, every item on it is immediately visible and accessible without reaching or bending.
Pull-out basket drawers installed beneath fixed shelves create hidden storage for items that do not stack well, such as snack bags, bread, and oddly shaped packages. These drawers glide on full-extension ball-bearing slides and can support 30 to 50 pounds depending on the hardware. Placing them at waist height keeps heavy items ergonomically accessible. They also work beautifully for root vegetables like potatoes and onions that benefit from air circulation but tend to roll off flat shelves.
Under-shelf baskets that hook onto existing shelves capture the dead space beneath a shelf without permanent modification. These wire baskets hang down 3 to 4 inches and can hold lightweight items like tea boxes, granola bars, and small sauce packets. They are especially useful in the zone between can shelves, where the tight 6-inch spacing might otherwise waste the last inch or two of vertical clearance. A dozen under-shelf baskets across an entire pantry can add the equivalent of a full extra shelf of storage.
Finally, consider a can rotation system for families that buy canned goods in bulk. These gravity-fed dispensers load from the top-back and dispense from the bottom-front, automatically rotating stock on a first-in-first-out basis. A single unit sized for standard 15-ounce cans holds 12 to 15 cans per row and ensures nothing expires unnoticed at the back of a shelf. Multiple units stacked side by side create a highly efficient can storage wall that looks impressive and functions flawlessly.
Conclusion: Building a Pantry That Works as Hard as You Do
A walk-in pantry designed around the actual dimensions of your jars and cans will outperform a larger, poorly planned space every single time. The principles are straightforward: measure your most common items, set shelf depth to 12 inches for jar and can zones, space shelves according to container height groups, and organize by zones based on frequency of use. These steps require planning but no specialized skills, and the materials are available at any home improvement store.
The investment pays for itself through reduced food waste, fewer duplicate purchases, and the quiet satisfaction of opening a pantry door to find exactly what you need in seconds. Whether you are renovating an existing pantry or building one from scratch, start by mapping your shelving layout on paper before buying a single bracket. Sketch the three walls, mark your height zones, and assign categories to each section. This fifteen-minute exercise will save hours of frustration and hundreds of dollars in wasted groceries over the coming years.
If you are ready to take the next step, measure your ten most-purchased canned and jarred items this weekend and sketch a zone map for your pantry. That single action will give you the foundation for a shelving layout that maximizes every inch of your walk-in storage. Share your measurements and layout sketches with a local kitchen designer or contractor to confirm structural requirements, and you will be well on your way to a pantry that truly works as hard as you do.
More Articles You May Like


Comments
Post a Comment