Penny Tile Shower Floors: Installation Tips and Design Ideas
The Enduring Appeal of Penny Round Tile
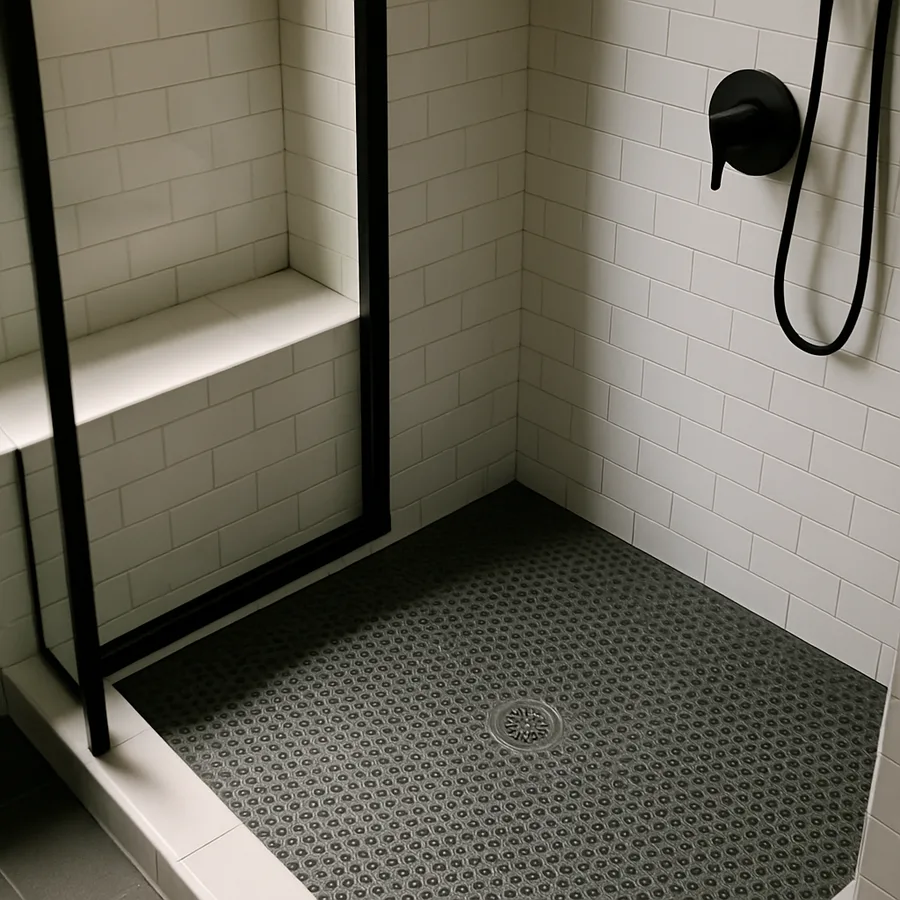
Penny round tile has been a fixture in American bathrooms since the early 1900s, when it lined the floors of grand hotels, public bathhouses, and residential homes from coast to coast. That longevity is not an accident. The small circular format, typically three-quarters of an inch to one inch in diameter, creates a surface with exceptional slip resistance due to the high ratio of grout lines to tile surface. Every grout joint acts as a textural interruption underfoot, providing grip that large-format tiles simply cannot match without additional surface treatments. For shower floors specifically, where wet bare feet meet smooth surfaces daily, this inherent safety advantage makes penny tile a functionally superior choice.
Beyond safety, penny tile offers a visual texture that is difficult to achieve with any other format. The repeating circular pattern reads as both geometric and organic, creating a surface that has rhythm without rigidity. When installed across a shower floor, the small-scale pattern makes the space feel more expansive than it actually is, a quality that designers have exploited for over a century in compact bathrooms. The Tile Council of North America (TCNA) classifies penny round mosaics as one of the most versatile tile formats for wet-area flooring, suitable for both residential and commercial installations when properly specified and installed.
The material options available in penny tile have expanded dramatically beyond the traditional unglazed porcelain that dominated early installations. Today you can source penny rounds in glazed ceramic, porcelain, natural marble, glass, recycled glass, and even metallic finishes. Each material carries distinct performance characteristics in a shower environment. Porcelain and unglazed ceramic offer the best combination of durability, water resistance, and slip resistance. Marble penny tiles bring natural beauty but require sealing and more careful maintenance. Glass tiles create luminous, reflective surfaces but can be slippery when wet unless specified with a textured face. Understanding these material differences before selection prevents disappointment after installation.
What draws you to penny tile for your shower floor? If the answer is aesthetics, you are in excellent company, but the functional benefits deserve equal consideration in your decision. A well-installed penny tile shower floor will outlast the homeowner's taste for any other design element in the bathroom, performing reliably for decades with minimal maintenance. The National Tile Contractors Association (NTCA) considers properly installed mosaic tile floors among the most durable finish surfaces available for residential wet areas, with expected service lives exceeding thirty years when substrate preparation and waterproofing are executed correctly.
Substrate Preparation and Waterproofing Fundamentals
The invisible work beneath your penny tile determines whether the installation succeeds or fails, and this is where many DIY projects and even some professional installations go wrong. A shower floor is not simply a tiled surface; it is a waterproof assembly that must manage water in three dimensions: directing it toward the drain across the floor surface, preventing it from penetrating through the tile and grout into the substrate below, and channeling any moisture that does reach the substrate toward a secondary drainage system. Every layer in this assembly has a specific function, and skipping or shortcutting any layer invites water damage that can cost thousands to remediate.
The traditional mud bed method remains the gold standard for shower floor substrates among experienced tile installers. A deck mud mixture of sand and Portland cement, typically mixed at a ratio of four or five parts sand to one part cement with just enough water to hold a shape when squeezed, is packed onto the shower floor and screeded to create a smooth, sloped surface that directs water toward the drain. The slope, called the pre-slope, should fall at a minimum rate of one-quarter inch per linear foot, a specification established by the TCNA in their Handbook for Ceramic, Glass, and Stone Tile Installation. This slope must be consistent across the entire floor with no low spots where water can pool.
Modern sheet membrane and liquid membrane waterproofing systems have simplified the waterproofing process compared to traditional hot-mopped or cold-applied methods. Products from manufacturers like Schluter (Kerdi), Laticrete (Hydro Ban), and Custom Building Products (RedGard) provide reliable waterproofing when applied according to manufacturer specifications. Sheet membranes are applied over the mud bed with thin-set mortar, while liquid membranes are rolled or brushed on and allowed to cure before tiling. Both approaches work well, but the critical detail is ensuring complete coverage with no gaps, pinholes, or unsealed penetrations at the drain, curb, and wall transitions. According to the TCNA, waterproofing failures at transition points account for the majority of shower leak claims.
Pre-fabricated shower pans and foam substrates offer a third approach that eliminates the skill-intensive mud bed process entirely. Products like the Schluter Kerdi-Shower-Kit and similar systems provide a factory-sloped, waterproof substrate that is ready for tile installation directly. These systems are particularly appealing for competent DIY installers because they remove the variable of hand-sloped mud work, which is one of the most difficult skills to master in tile installation. The trade-off is cost: pre-fabricated systems are significantly more expensive than raw materials for a mud bed, but the labor savings and reduced risk of slope errors can offset that premium, especially for homeowners paying professional installation rates.
Layout, Cutting, and Setting Penny Tile on a Shower Floor
Penny tile arrives from the manufacturer in mesh-backed or paper-faced sheets, typically twelve inches square, with the individual tiles pre-spaced on the backing material. This sheet format makes installation faster than setting individual tiles but introduces its own challenges, particularly on a shower floor where the surface is sloped rather than flat. The sheets must conform to the slope without buckling or creating lippage between adjacent tiles, which requires careful handling and, in many cases, cutting the mesh backing between tiles to allow the sheet to flex across the curved surface near the drain.
Dry-fitting the layout before mixing any thin-set is an essential step that saves significant frustration during installation. Place the sheets on the shower floor in your planned arrangement, working from the drain outward toward the walls and curb. Mark where cuts will be needed at the perimeter and around the drain. Identify any areas where the sheets want to buckle or resist the slope, and plan your mesh cuts accordingly. This rehearsal takes thirty minutes and reveals every challenge you will face during the actual installation, when thin-set is setting and time pressure is real. Professional installers who skip the dry-fit are usually the ones who end up with misaligned grout joints or awkward cuts at the perimeter.
The thin-set mortar for penny tile on shower floors should be a modified (polymer-enriched) product rated for wet areas and bonding to the specific waterproofing membrane you are using. Unmodified thin-set does not provide adequate bond strength for the demanding conditions of a shower floor. Apply the thin-set with a notched trowel appropriate for the tile size. For penny rounds, a three-sixteenths-inch V-notch or one-quarter-inch square-notch trowel works well. The goal is complete thin-set coverage beneath every tile on the sheet, with no voids that could allow water to collect beneath the tile surface. Back-buttering the tile sheets, applying a thin layer of thin-set to the back of the sheet in addition to the troweled bed, ensures full coverage and is considered best practice by the Houzz professional tile installer community.
Cutting penny tile sheets to fit around the drain and along walls requires patience and the right tools. For straight cuts through the mesh backing, a utility knife separates the sheet cleanly between tile rows. For cutting individual tiles to fit against walls or around the drain flange, tile nippers are the traditional tool, though they produce somewhat rough edges that are acceptable when hidden beneath trim or caulk. A wet saw with a small-format blade produces cleaner cuts but requires careful handling of the small tiles. Some installers find that a rotary tool with a diamond-coated cutting wheel offers the best combination of precision and control for individual penny tile cuts, particularly around the curved drain opening where nippers struggle to produce a clean arc.
Grout Selection: The Decision That Defines the Finished Look
If the tile is the performer, the grout is the stage, and on a penny tile floor the grout occupies a remarkable percentage of the visible surface area. Depending on the spacing between tiles on the mesh sheet, grout can represent twenty to thirty percent of the floor surface, compared to roughly five to ten percent on a floor of twelve-inch tiles. This means your grout color choice has an outsized impact on the finished appearance of a penny tile installation. The same white penny tile floor will look dramatically different with white grout, medium gray grout, or black grout, ranging from subtle and uniform to high-contrast and graphic.
For shower floors specifically, epoxy grout is the superior choice over traditional cement-based grout, despite its higher cost and more demanding application process. Epoxy grout is virtually waterproof, stain-proof, and does not require sealing, either at installation or ever afterward. Cement-based grout, even when sealed, is porous and will absorb moisture, soap residue, and body oils over time, leading to discoloration and potential mold growth in shower environments. The TCNA recommends epoxy grout for all continuously wet applications, and a shower floor with its high grout-to-tile ratio qualifies emphatically. The cost difference between cement and epoxy grout for a typical shower floor is under one hundred dollars, a negligible premium for dramatically superior performance.
Color selection for grout on a penny tile shower floor involves both aesthetic and practical considerations. Contrasting grout, such as dark gray or black with white tiles, creates a bold graphic effect that highlights the circular tile pattern and makes each individual penny round visually distinct. This look is striking but demands precise, consistent grout joints, since any variation in spacing or grout depth is emphasized by the contrast. Matching grout, where the grout color closely matches the tile color, creates a more unified, textural surface where the overall pattern reads as a subtle field rather than a collection of individual circles. Matching grout is more forgiving of minor installation imperfections and tends to feel calmer in small shower spaces.
Application technique for grouting penny tile requires more care than grouting larger formats. The numerous joints and curved tile edges create opportunities for grout to build up on the tile surface if not managed carefully. Work in small sections, applying grout with a rubber float held at a forty-five-degree angle to the tile surface, pressing material into the joints from multiple directions. Clean the surface with a damp sponge before the grout begins to harden, rinsing the sponge frequently in clean water. A grout haze remover may be needed for the final cleanup pass, particularly with epoxy grout which can leave a stubborn film if not cleaned promptly. Allow the grout to cure fully before exposing it to shower water, following the manufacturer's recommended cure time, which is typically twenty-four to seventy-two hours depending on the product.
Design Combinations That Work in Real Bathrooms
The classic combination of white penny tile with dark grout on the shower floor paired with white subway tile on the walls has persisted for over a century because it simply works. The format contrast between the small circular floor tiles and the rectangular wall tiles creates visual distinction between horizontal and vertical surfaces while maintaining a unified color palette. This combination suits bathrooms of any size, from compact apartment showers to spacious primary bath wet rooms, and it pairs effectively with virtually any vanity, mirror, or fixture style. If you are uncertain about your design direction, this combination is a safe and sophisticated starting point.
For homeowners drawn to a more contemporary aesthetic, large-format wall tile combined with penny tile shower floors creates a compelling scale contrast. Twelve-by-twenty-four-inch or even twenty-four-by-forty-eight-inch rectified porcelain on the shower walls, with minimal grout lines, paired with the dense pattern of penny rounds on the floor produces a bathroom where the eye moves between two very different visual rhythms. The floor reads as detailed and tactile while the walls read as clean and expansive. This combination works particularly well in modern and minimalist bathroom designs where the design interest comes from proportion and material rather than color or pattern.
Colored penny tile opens a range of design possibilities that neutral options cannot achieve. A shower floor in muted sage green, dusty blue, or warm terracotta penny tile introduces color at the floor level where it feels grounded and intentional rather than overwhelming. Pair colored penny floors with neutral wall tiles and let the floor become the feature element. The Architectural Digest design archive includes numerous examples of colored penny tile shower floors in designer bathrooms, demonstrating that the format adapts to color as effectively as it handles neutrals. The key to making colored penny tile feel sophisticated rather than whimsical is keeping the surrounding surfaces restrained and letting the floor carry the color story alone.
Mixed-material penny tile, which combines two or more colors or finishes within a single sheet, adds complexity without requiring a second tile format. Blends of white and gray, black and gold, or blue and green penny rounds create a terrazzo-like effect that is visually rich but still reads as a unified surface. Some manufacturers offer custom blend ratios, allowing you to specify the percentage of each color in the mix. This customization enables a level of design specificity that off-the-shelf products cannot match. Have you considered how a custom penny tile blend in your shower would create a floor surface that is genuinely unique to your bathroom? The combination possibilities are extensive and worth exploring with tile samples before finalizing your selection.
Maintenance and Long-Term Care for Penny Tile Shower Floors
A properly installed penny tile shower floor with epoxy grout requires remarkably little maintenance to stay clean and attractive over years of daily use. The primary ongoing task is preventing soap scum and mineral deposit buildup on the tile and grout surfaces. A weekly spray with a mild bathroom cleaner, followed by a soft brush scrub along the grout lines, prevents the gradual accumulation that can dull the surface over time. The circular tile shape actually assists in cleaning because the curved edges do not trap debris the way square tile corners can, and the dense grout lines channel cleaning solution across the entire surface when water is applied.
If your installation uses cement-based grout rather than epoxy, annual resealing is essential to maintain stain resistance and water repellency. A penetrating grout sealer, applied with a small brush or applicator bottle directly to the grout joints, absorbs into the porous cement matrix and provides a barrier against moisture and staining agents. The NTCA recommends sealing cement grout within seventy-two hours of installation and reapplying annually in shower environments. Epoxy grout, as discussed earlier, requires no sealing whatsoever, which is a significant long-term maintenance advantage that justifies its higher upfront cost. Over a ten-year period, the accumulated cost of grout sealer and the time spent applying it makes epoxy grout the more economical choice despite its premium purchase price.
Mold and mildew management is a concern in any shower, and penny tile floors are no exception. The high number of grout joints creates more surface area where moisture can linger, and in showers with poor ventilation, this can foster mold growth. The most effective prevention strategy is ensuring adequate bathroom ventilation: the Home Ventilation Institute (HVI) recommends exhaust fans rated at one cubic foot per minute per square foot of bathroom floor area, run during showering and for at least twenty minutes afterward. A bathroom exhaust fan on a timer or humidity sensor automates this process and provides consistent moisture removal without relying on the occupant to remember.
When grout damage does occur, whether from cracking, erosion, or persistent staining, regrouting individual sections of a penny tile floor is feasible without replacing the tile itself. A grout removal tool, either a manual grout saw or an oscillating multi-tool with a grout removal blade, carefully removes the damaged grout from the joints. New grout is then applied to the cleared joints and finished to match the surrounding area. This targeted repair approach can extend the life of a penny tile installation indefinitely, addressing localized damage without the cost and disruption of a full tear-out and replacement. For homeowners considering penny tile, this repairability is a meaningful advantage over large-format tiles where grout failure or tile damage typically requires replacing entire sections of the floor.
Bringing Your Penny Tile Shower Floor to Life
The path from inspiration to a finished penny tile shower floor involves a sequence of decisions and execution steps that reward planning and punish impatience. Begin with material selection, ordering samples of your top tile and grout color candidates and viewing them wet, since that is how they will appear every day in your shower. Wet tile looks different from dry tile: colors deepen, surfaces darken, and grout contrast shifts. Making your final selection based on wet appearance ensures the installed result matches your expectations rather than surprising you on the first day of use.
Budget planning for a penny tile shower floor should account for the full installation assembly, not just the visible tile. Waterproofing membrane, thin-set mortar, grout, backer board or mud bed materials, drain assembly, and professional labor all contribute to the total cost. According to remodeling cost data tracked by the National Association of Home Builders (NAHB), a professionally installed penny tile shower floor in a standard three-by-five-foot shower typically costs between eight hundred and two thousand dollars, depending on tile material, geographic labor rates, and the complexity of the waterproofing system. Marble penny tile at the high end and standard ceramic at the low end define the material cost range, while labor rates vary significantly by region.
Whether you choose a traditional white penny tile floor that connects your bathroom to a century of design heritage or a bold colored blend that makes a contemporary statement, the fundamentals remain the same. Invest in proper waterproofing. Use epoxy grout. Ensure adequate ventilation. Maintain the surface with regular light cleaning. These practical commitments protect the aesthetic investment and ensure your penny tile shower floor performs beautifully for decades rather than becoming a maintenance burden within the first few years.
The best next step is visiting a tile showroom where you can see and touch penny tile options in person, compare grout colors against your tile choices, and discuss installation requirements with knowledgeable staff. Bring photos of your existing bathroom and measurements of your shower footprint. A focused showroom visit with specific dimensions in hand converts inspiration into a concrete plan with real pricing, and that clarity is what moves a project from the idea stage to the construction stage. Your shower floor is one of the hardest-working surfaces in your home, so give it the attention and quality it deserves from the very first planning conversation.
More Articles You May Like


Comments
Post a Comment