Hiding TV Wires Behind the Wall: Tools and Step-by-Step Guide
The Problem With Exposed TV Cables
You spent weeks choosing the perfect wall-mounted television, comparing screen sizes, researching panel technologies, and selecting a mount that holds it at exactly the right height. Then you turned it on, stepped back to admire the result, and saw a tangle of black cables dangling down the wall like an afterthought. Exposed wires undermine the entire purpose of wall-mounting a TV, which is to achieve a clean, streamlined look that frees up floor space and creates a modern focal point. Instead, those visible cords make the installation look unfinished.
Beyond aesthetics, exposed wires present practical problems. They attract dust, creating small ledges where particles accumulate and become visible against painted walls. In homes with young children or pets, dangling cables are a safety hazard that can be pulled, chewed, or tripped over. The Consumer Product Safety Commission (CPSC) has documented numerous incidents involving children pulling on unsecured cords attached to wall-mounted electronics, reinforcing the importance of proper cable management in family homes. Tucking those wires behind the wall eliminates the hazard entirely.
Many homeowners assume that hiding wires behind drywall is either prohibitively difficult or requires a professional electrician. While there are code considerations that must be respected, particularly regarding power cables, the actual physical process of routing low-voltage signal cables through a wall is a straightforward DIY project that most handy homeowners can complete in under two hours. Power cable routing, which involves electrical code compliance, adds a layer of complexity but is also manageable with the right approach and materials.
This guide walks through every step of the process, from the tools you need to the finishing touches that make the installation look professional. Whether you are working with standard drywall, dealing with a fireplace wall, or navigating insulated exterior walls, the methods described here will get those cables out of sight and your living room looking the way it should.
Tools and Materials You Will Need
Gathering everything before you start prevents frustrating interruptions mid-project. The tool list is modest, and most items are either already in a typical home toolkit or available at any hardware store for minimal cost. Divide your supplies into two categories: tools for the wall work itself and the cable management components that will stay permanently installed.
Wall work tools include a stud finder with AC wire detection capability, a drywall saw or oscillating multi-tool with a drywall blade, a drill with a long flexible bit (also called an installer bit or bell hanger bit, typically 54 inches long and 3/8 inch diameter), a pencil, a level, and a vacuum or shop vac for cleanup. A flashlight or headlamp is helpful for peering into wall cavities. If your wall has fire blocks, horizontal framing members that span between studs at mid-height, you will also need a right-angle drill attachment or a long chisel to notch through them.
For cable management components, you need a low-voltage cable pass-through kit, which consists of two wall plates with open cable ports that mount behind the TV and near the floor or media console. These kits cost between eight and twenty dollars and are widely available. For the power cable, the code-compliant solution is an in-wall rated power cable relocation kit, sometimes called a power bridge. This device uses UL-listed in-wall rated cable to extend the power outlet from the lower wall position to a new outlet behind the TV. Using a standard extension cord inside a wall cavity is a violation of the National Electrical Code (NEC) and a fire hazard. The National Fire Protection Association (NFPA) explicitly prohibits running standard power cords through walls, ceilings, or floors.
Optional but recommended items include cable ties or velcro straps for bundling cables neatly before feeding them through the wall, a fish tape or fish rod set for guiding cables through cavities, painters tape for marking cut lines, and spackle with a putty knife for any minor wall repairs. If you plan to add an HDMI cable or other signal cables, purchase in-wall rated (CL2 or CL3 rated) versions, which are manufactured with fire-resistant jackets suitable for installation inside wall cavities.
Step One: Locate the Studs and Plan Your Route
The first physical step is mapping what is inside your wall before you cut into it. Run the stud finder across the wall area between the TV location and the lower outlet or media console position. Mark each stud edge with a light pencil line. You will be routing cables between two studs, so identify a stud bay, the space between two adjacent studs, that runs vertically from the TV height down to the console height. Standard stud spacing is 16 inches on center, which provides approximately 14.5 inches of clear space between studs, more than enough for cable routing.
Use the stud finder's AC wire detection mode to scan for any electrical wiring running through the target stud bay. Existing wires, plumbing pipes, or HVAC ducts inside the wall cavity could complicate or prevent the cable route. If the stud finder indicates live wiring in the cavity, choose an adjacent stud bay or consult an electrician before proceeding. According to the International Association of Certified Home Inspectors, accidentally drilling into a live electrical wire is the most common DIY injury associated with wall-mounted TV installations.
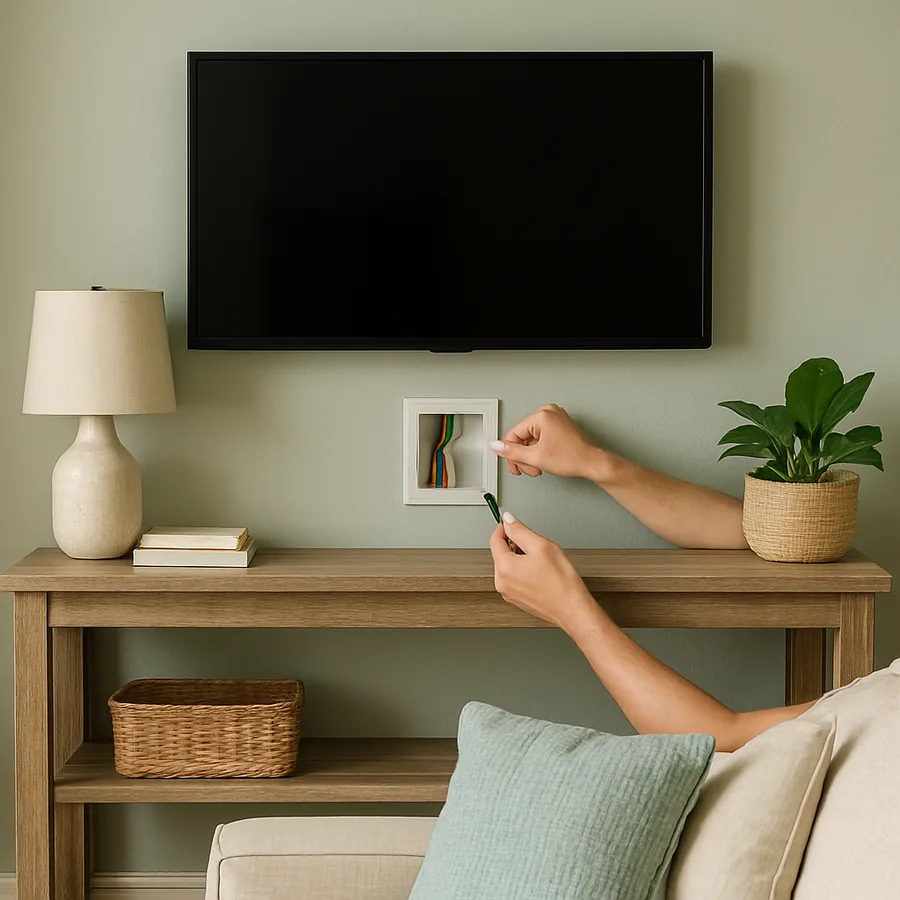
Mark the positions for your two wall plate openings. The upper opening goes directly behind the TV, where the mount's bracket will conceal it. The lower opening goes behind the media console, at a height where the console's back panel will hide it. Use a level to verify that both marks are vertically aligned within the same stud bay. If your TV mount covers a large area, you have flexibility in the exact upper position; place it where it will be easiest to access once the TV is hung. Most single-gang low-voltage wall plates require a rectangular cutout of approximately 2 inches wide by 3.75 inches tall.
Before cutting, confirm the wall material. Standard half-inch drywall is simple to cut with a drywall saw. Plaster-and-lath walls, common in homes built before 1960, require an oscillating multi-tool and more patience. Concrete or brick walls behind a TV mount require a completely different approach involving surface-mounted conduit rather than in-wall routing. If you discover an unexpected material, stop and reassess your method rather than forcing a tool through an unknown substrate.
Step Two: Cut the Openings and Route the Cables
With your marks confirmed, cut the upper wall opening first. Score the drywall along your marked rectangle with a utility knife to prevent tearing, then use the drywall saw to cut out the opening. Work slowly and let the saw do the work; aggressive cutting can crack the drywall beyond the intended opening. Once the rectangle is removed, shine a flashlight into the cavity to visually confirm it is clear of obstructions. You should see the inside faces of the two flanking studs and, depending on your wall, either open cavity space or insulation.
Repeat the process for the lower opening. With both holes cut, you now have visual and physical access to the top and bottom of the stud bay. If the cavity is uninsulated, you can often see light from one opening through the other, which confirms a clear path. If insulation is present, the long flexible installer bit becomes essential. Insert the bit into the upper opening, aim it downward toward the lower opening, and drill through any insulation in its path. The flexible bit will navigate slight curves in the cavity and emerge near the lower opening.
Attach your cables to a fish tape or to the end of a stiff wire, and feed them through the cavity from the upper opening to the lower opening. If you drilled with the installer bit, you can often tape the cables to the bit and pull them through as you withdraw it. Feed the HDMI cable, any audio cables, and the in-wall power cable through together as a single bundle to minimize the number of passes. At this point, leave plenty of extra cable length at both openings; you can trim or coil the excess later. It is always better to have too much cable than too little.
If you encounter a fire block, a horizontal two-by-four nailed between the studs at mid-wall height, you will need to drill through it. This is common in newer construction where fire blocking is required by building codes. Use the long installer bit to bore through the block, or if you can reach it through one of the openings, use a standard drill with a spade bit. Fire blocks are a single thickness of lumber, so the drill will pass through in seconds. Do not remove the fire block entirely, as it serves a structural and fire-safety purpose.
Step Three: Install the Wall Plates and Power Bridge
With cables routed through the wall, it is time to install the permanent hardware that gives the project its finished appearance. Begin with the low-voltage cable pass-through plates. These plates have an open center section, essentially a rectangular frame with a mounting bracket, that allows cables to pass through the wall while providing a clean finished edge around the opening. Slide the cables through the plate, position the plate in the wall opening, and secure it with the included screws or spring clips.
The in-wall power bridge kit requires slightly more attention. These kits typically include two electrical boxes, a length of in-wall rated Romex or equivalent cable, and two outlet faceplates. The lower box connects to your existing wall outlet via a short jumper cable, and the upper box provides a new outlet behind the TV. Follow the kit's instructions precisely, as wiring configurations vary by manufacturer. If you are not comfortable making electrical connections, this is the one step where hiring a licensed electrician is a worthwhile investment. The connection points involve standard household voltage, and an incorrect installation creates a genuine fire risk.
Once the power bridge is installed and tested, plug the TV's power cord into the new upper outlet. Connect the HDMI and audio cables to the TV and to your media devices below. Dress the cables neatly at both openings, using velcro straps to bundle them and prevent any stray wires from protruding past the wall plates. At the lower opening, coil any excess cable length behind the media console where it will be invisible. The Houzz home improvement community consistently rates in-wall cable routing as the single most impactful upgrade for a wall-mounted TV setup, ahead of upgraded mounts, bias lighting, and acoustic panels.
Does the prospect of cutting into your wall make you nervous? That is a reasonable reaction, and it is worth noting that the openings you create are small, hidden behind plates, and easily patched if you ever need to reverse the installation. The wall plates cover the openings completely, and if you relocate the TV in the future, a simple application of spackle and paint restores the wall to its original condition. This is not a permanent or destructive modification; it is a clean, reversible improvement.
Step Four: Clean Finishing and Common Troubleshooting
The difference between a DIY installation that looks professional and one that looks homemade often comes down to the finishing details. Start by inspecting both wall plate installations from the viewing angle where you will see them most often. The plates should sit flush against the wall surface with no visible gaps. If the drywall cutout is slightly oversized, most low-voltage plates have adjustable wings or oversized faceplates that cover minor imperfections. A thin bead of paintable caulk around the plate edge, smoothed with a damp finger, creates a seamless transition from plate to wall.
If you scratched or scuffed the wall during the cutting process, touch up the paint before declaring the project complete. Keep a small container of your wall paint color on hand for exactly this kind of repair. The Better Homes and Gardens home improvement editors recommend maintaining a labeled paint swatch and a small jar of each wall color in your home for touch-ups, a habit that pays dividends across dozens of small maintenance tasks over the years.
Common troubleshooting scenarios include the following. If your HDMI signal drops or shows artifacts after installation, the cable may have been kinked during routing. In-wall HDMI cables with a fiber-optic core are more resistant to signal loss over longer runs than standard copper HDMI cables. If the power bridge outlet does not work after installation, verify that the circuit breaker is on and that all wire connections are secure; a loose wire nut is the most common cause of a dead outlet. If you hear a buzzing or humming from the wall after installation, check that the power cable is not running parallel and in direct contact with the signal cables, as this can cause electromagnetic interference. Separating the power and signal cables by even two inches typically eliminates the issue.
For homeowners in rental properties where wall modifications are not permitted, surface-mounted cable raceways offer a code-compliant alternative that does not require any cutting. These flat channels adhere to the wall surface and paint to match the wall color, concealing cables in a slim profile that is far less obtrusive than exposed wires. They are not invisible, but a well-painted raceway running vertically from the TV to the console is barely noticeable in most room lighting conditions. According to the American Society of Interior Designers, surface raceways have become a standard recommendation for rental and temporary living situations where clean cable management is desired without permanent modification.
Completing the Look: Media Wall Styling Tips
With the wires hidden, your TV wall is a blank canvas ready for styling. The clean, cable-free surface opens up possibilities that were impractical with dangling cords. Consider adding floating shelves flanking the TV to create a balanced media wall composition. Shelves at staggered heights, styled with a mix of books, small plants, candles, and decorative objects, transform a simple mounted TV into a designed feature wall. Keep objects low-profile so they do not obstruct the screen when viewed from the primary seating position.
Lighting behind the TV, known as bias lighting, serves both aesthetic and ergonomic purposes. A strip of LED lights adhered to the back of the TV casts a soft glow on the wall behind it, reducing the contrast between the bright screen and the dark wall and decreasing eye strain during extended viewing. The American Academy of Ophthalmology notes that high contrast between a screen and its surrounding environment contributes to visual fatigue, making bias lighting a functional upgrade as well as a visual one. Choose a warm white LED strip (2700 to 3000 Kelvin) for a living room setting, as cool white light can feel clinical.
The media console below the TV deserves thoughtful attention now that it is no longer cluttered with cable management accessories. A low-profile floating console maintains the airy, wall-mounted aesthetic. Top it with a curated selection of items: a soundbar, one or two decorative objects, and perhaps a small tray holding remotes and coasters. The console should feel deliberate and uncluttered, complementing the clean wall above rather than contradicting it. Symmetry here works well: matching table lamps or identical decorative objects on either end of the console create a composed, intentional arrangement.
Your wall-mounted TV setup is only as refined as its weakest visual element, and before this project, that element was the cables. Now that they are gone, the entire wall reads as a cohesive, intentional design statement. Visit our media wall gallery for inspiration photos organized by room style, and download our free TV wall planning template with measurements for optimal viewing height, shelf placement, and bias lighting positioning. A clean wall is a confident wall, and you have earned it.
More Articles You May Like


Comments
Post a Comment