Clear Container Decanting Systems for a Magazine-Worthy Pantry
What Decanting Actually Means and Why It Works
Decanting is the practice of transferring dry goods from their original packaging into uniform, clear containers. The concept is simple, but the impact on both aesthetics and functionality is substantial. Original packaging comes in every conceivable shape, size, color, and material. Cereal boxes are tall and rectangular. Pasta bags are floppy. Rice sacks are heavy and awkward. Flour bags tear. Sugar bags attract moisture. When these mismatched packages sit together on a shelf, the result is visual chaos that makes your pantry look cluttered even when it is reasonably organized.
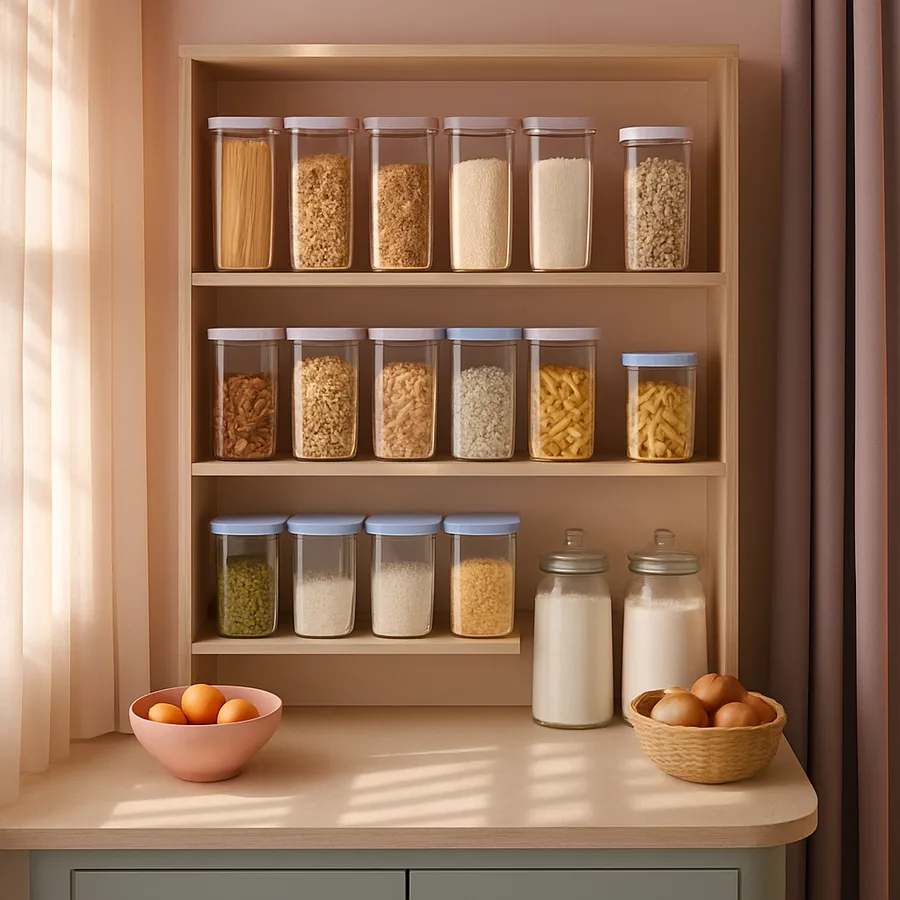
Transferring those same ingredients into matched clear containers transforms the shelf from a jumble of branded packaging into a cohesive storage system where every item is instantly identifiable. You can see exactly how much flour remains without opening anything. You can spot the rice running low from across the room. The visual uniformity creates a sense of calm and order that commercial packaging, designed for shelf appeal in a grocery store, simply cannot provide in a home setting.
Beyond aesthetics, decanting offers measurable practical benefits. Airtight containers protect dry goods from moisture, pantry pests, and staleness far more effectively than bags sealed with chip clips or twist ties. The United States Department of Agriculture (USDA) recommends storing dry goods in sealed, rigid containers to prevent infestation by pantry moths, weevils, and flour beetles, which can chew through paper, cardboard, and thin plastic packaging. A proper decanting system is not just pretty; it is a food safety practice endorsed by the agency responsible for setting food storage standards.
The magazine-worthy pantry you see on social media and in design publications is almost always a decanted pantry. Those images resonate because they represent something most people genuinely want: a space that is both beautiful and functional. The good news is that creating this look does not require a massive pantry, a professional organizer, or a limitless budget. It requires a systematic approach to choosing containers, deciding what to decant, and maintaining the system once it is established. That is exactly what this guide covers.
Choosing the Right Containers: Material, Shape, and Seal
The container market is enormous, and navigating it without a clear framework leads to impulse purchases and mismatched sets. Start with material selection. The three primary options are glass, BPA-free plastic (such as Tritan copolyester), and acrylic. Glass is the premium choice: it does not absorb odors, does not stain, does not scratch, and looks elegant for decades. Its drawback is weight and breakage risk. A quart-sized glass jar filled with sugar weighs over two pounds, and dropping it on a tile floor means both a mess and a safety hazard.
BPA-free plastic containers from brands like OXO Good Grips, Rubbermaid Brilliance, and Sistema offer durability without the weight or fragility of glass. They resist shattering if dropped, weigh significantly less, and cost 30 to 50 percent less per container than comparable glass options. The trade-off is that plastic can absorb odors from strongly scented items like coffee or spices over time, and it may cloud or scratch with repeated washing. For pantry staples like flour, sugar, rice, and pasta that do not carry strong odors, plastic performs well for years.
Container shape matters as much as material. Square and rectangular containers pack together without wasted space between them, maximizing shelf real estate. Round containers leave curved gaps between neighboring jars that add up to significant wasted area across a full shelf. A row of six square containers on a 36-inch shelf utilizes roughly 95 percent of the available surface, while six round containers of the same volume use only 75 to 80 percent. For small pantries where every inch counts, square containers are the clear winner. The pantry organization guides from Better Homes and Gardens (BHG) consistently recommend square or rectangular containers for this reason.
The seal mechanism determines how well your containers protect their contents. Pop-top lids with silicone gaskets, like those on OXO POP containers, create an airtight seal with a single button press. Snap-lock lids with four-sided latches provide a secure closure but require more hand strength to open. Screw-top lids on mason jars offer excellent sealing but are slower to open and close. For items you access daily, like flour and sugar, a pop-top or flip-top lid minimizes friction. For items accessed weekly or less, like specialty grains or baking additives, any airtight seal works fine because speed of access is less critical.
What to Decant and What to Leave Alone
Not everything in your pantry belongs in a clear container. Decanting works best for shelf-stable dry goods that you purchase regularly, use frequently, and store in quantities that fit a standard container. Flour, sugar, rice, pasta, oats, cereal, coffee beans, tea, nuts, dried beans, lentils, baking soda, baking powder, and cornstarch are all ideal candidates. These items come in packages that do not reseal well, they benefit from airtight storage, and they look attractive in clear containers because of their natural colors and textures.
Items that should generally stay in their original packaging include anything with a complex ingredient list or nutritional information you reference frequently, such as specialty dietary products. Canned goods obviously cannot be decanted. Oils, vinegars, and liquid condiments are already in bottles designed for dispensing and do not benefit from transfer. Spices are a borderline case: dedicated spice jars in a uniform set look stunning, but the effort of transferring 20 to 30 different spices into small jars and labeling each one is substantial, and many cooks prefer the convenience of the original jars with built-in shaker lids.
A practical rule of thumb: decant items you buy in bags or boxes that do not reseal, and leave items already in functional containers. A bag of all-purpose flour has no reseal mechanism and tears easily, so it benefits enormously from decanting. A bottle of soy sauce already has a cap and a pour spout, so transferring it to another container adds work without adding value. Apply this filter to your pantry inventory, and you will quickly identify the 15 to 25 items that are genuine candidates for decanting versus the many others that are fine where they are.
What about snack items like crackers, chips, and cookies? These can look appealing in clear containers, but they present a practical challenge: irregular shapes and fragile textures do not transfer neatly, and the containers need to be washed each time before refilling. If visual consistency across every shelf is your priority, decanting snacks is worth the effort. If functionality is your primary concern, keeping snacks in their original packaging inside a labeled basket or bin achieves organization without the transfer step. Both approaches are valid; the choice depends on how much maintenance you are willing to sustain.
Building a Cohesive System: Sizing, Grouping, and Placement
A decanting system looks polished when the containers share a consistent design language: same brand, same material, same lid style, scaled in proportion across different sizes. Most container brands offer their product lines in a range of sizes, typically from half a quart to four quarts or more, all with the same visual profile. Buying within a single product line ensures that your containers stack, align, and coordinate on the shelf without the visual noise of mixing brands, shapes, and closure mechanisms.
Size selection should be driven by your purchasing habits. If you buy five-pound bags of all-purpose flour, you need a container that holds five pounds, which is approximately a 4.5-quart or 175-ounce container. A ten-pound bag requires two containers of that size or a single large 6-to-8-quart bin. For items you buy in one-pound bags, like specialty grains or dried beans, a 1.5-to-2-quart container provides ample room with a small buffer for headspace. The NKBA advises homeowners to audit their purchasing patterns before buying containers, because a pantry full of half-empty oversized jars wastes space just as badly as one full of mismatched packaging.
Group containers on the shelf by meal function or category: baking staples together (flour, sugar, baking soda, baking powder, cornstarch), grains together (rice, quinoa, oats, couscous), pasta varieties together, and snacks together. Within each group, arrange containers from tallest to shortest, or from most-used to least-used, depending on your retrieval habits. Consistency in arrangement makes restocking intuitive and helps every household member find what they need without searching.
Shelf placement follows the same principles as any well-organized pantry. Place heavy, frequently used items like flour and sugar between waist and shoulder height for easy access. Put lightweight or seldom-used items like specialty baking ingredients on upper shelves. Reserve lower shelves for bulk backup stock or heavy items like large bags of rice or pet food that are easier to lift from below. A clear container system does not change where items should live in your pantry; it simply makes every item visible and protected once it is in the right spot.
Labeling: The Detail That Makes or Breaks the System
A shelf of clear containers without labels is a guessing game. Flour, powdered sugar, cornstarch, and baking powder all look nearly identical through a clear wall. Granulated sugar and coarse salt are hard to distinguish at a glance. White rice and orzo could pass for twins from two feet away. Labels are not optional; they are the functional backbone of any decanting system, and skipping them undermines the entire purpose of making your pantry contents visible and accessible.
Label styles range from simple to elaborate. Vinyl decal labels with clean fonts in black or white are the most popular choice for a polished, modern look. Companies like Talented Kitchen and Savvy and Sorted sell pre-made pantry label sets with 100 to 200 common ingredient names for 15 to 25 dollars. These peel-and-stick labels are waterproof, dishwasher-resistant, and available in multiple font styles. For a cohesive look across 20 or more containers, pre-made sets ensure consistent sizing, font, and placement without the tedium of hand-lettering each one.
If you prefer a handwritten look, chalk markers on chalkboard labels offer a warm, personal aesthetic that suits farmhouse and cottage-style kitchens. Chalkboard labels are reusable: wipe off the old name with a damp cloth and rewrite when you change the container's contents. This flexibility is valuable if your pantry inventory shifts frequently or if you use containers for different items at different times of year. The trade-off is legibility; chalk marker text can smudge if containers are handled frequently, and the handwritten look is inherently less uniform than printed vinyl.
Where you place the label on the container matters more than most people think. Front-center placement at eye level on the container face is the standard approach, but labeling the lid is a smart addition for containers stored on high shelves where you look down at them. Some organizers label both the front and the lid for maximum visibility from any angle. According to professional organizers recognized by the American Society of Interior Designers, dual labeling reduces the time household members spend searching for items by an estimated 30 to 40 percent compared to front-only labeling, particularly in pantries with deep shelves or high storage zones.
Maintaining the System Without Losing Your Mind
The most beautiful decanting system in the world is worthless if it collapses within a month because no one maintains it. The number one reason pantry organization fails is that restocking becomes a chore that people skip when they are tired, busy, or simply not in the mood. The key to sustainability is minimizing the effort required to keep the system running. That means choosing containers that are easy to fill, easy to clean, and positioned where they are easy to reach.
Establish a restocking routine tied to an existing habit. The simplest approach is to decant immediately after grocery shopping, before putting anything else away. Unpack the bags, transfer the relevant items into their containers, and recycle the packaging on the spot. This takes 5 to 10 minutes for a typical weekly grocery run and prevents the slow buildup of unopened bags and boxes that clutter the pantry and undermine the system. If decanting gets postponed to "later," later often becomes never.
Cleaning containers is the other maintenance step that trips people up. You do not need to wash a flour container every time you refill it; simply pour the new flour on top of the remaining supply. Full washing is necessary when switching contents, when a container develops an odor, or when residue builds up visibly on the interior walls. For most dry goods, a thorough wash every two to three months is sufficient. Use warm water and mild dish soap, rinse completely, and dry thoroughly before refilling. Moisture left inside a container can cause clumping and spoilage in dry goods, so patience during drying is essential.
Have you ever set up an organization system only to watch it slowly deteriorate as other household members do not follow the rules? The solution is making the system so intuitive that compliance requires no thought. Labels tell people where things go. Consistent container sizes mean there is no puzzle-solving involved in fitting things on the shelf. A designated zone for each category means the decision of where to put something has already been made. When the system does the thinking, the people using it just follow the visual cues, and the pantry stays organized without anyone needing to be the pantry police.
Cost-Effective Approaches and Starter Strategies
A full pantry decanting system with 20 to 30 premium containers, matching labels, and shelf liners can cost 200 to 500 dollars, which gives many homeowners pause. The good news is that you do not need to buy everything at once. A phased approach starting with the five to eight items you use most frequently delivers the biggest visual and functional impact at a fraction of the total cost. Flour, sugar, rice, pasta, oats, coffee, and cereal are the usual starting lineup, and outfitting these with quality containers costs 50 to 80 dollars.
Budget-conscious alternatives to premium branded containers include glass mason jars, which are available in cases of 12 for 10 to 15 dollars, and deli-style plastic containers with screw-top lids, which cost 1 to 2 dollars each in bulk. Mason jars have the advantage of being widely available, dishwasher-safe, and attractive in a farmhouse or rustic kitchen. Their round shape wastes shelf space compared to square containers, but for a starter system or a small pantry with limited inventory, they are hard to beat on value. A dozen wide-mouth quart mason jars can hold your entire baking and grains collection for under 15 dollars.
Discount retailers like IKEA, Dollar Tree, and Target's Brightroom line offer clear storage containers at price points well below specialty brands. The quality varies, and lids may not achieve the same airtight seal as premium options, but for items with high turnover, like cereal or snacks that get consumed within a week, absolute airtightness is less critical. Reserve your premium containers for items that sit longer and genuinely need protection, and use budget containers for high-turnover goods. This tiered strategy cuts costs by 40 to 60 percent while still achieving a cohesive look.
The Consumer Reports organization has tested food storage containers across price ranges and found that seal quality, not brand prestige, is the primary factor in keeping food fresh. Several mid-range containers matched or exceeded the performance of premium brands in airtightness and durability tests. The takeaway: spend wisely on containers with proven seals rather than chasing the most expensive option. Read reviews focused on seal performance and long-term durability from sources like BHG before committing to a brand, and you will build a system that looks and performs excellently without overspending.
Conclusion: From Cluttered Shelves to Curated Storage
A clear container decanting system transforms your pantry from a collection of mismatched packaging into a curated, functional storage space that is genuinely pleasant to use. The visual payoff is immediate: uniform containers on a clean shelf look striking from the moment you close the pantry door. The practical payoff accumulates over time as you waste less food, buy fewer duplicates, and spend less time searching for ingredients during meal preparation. Both benefits are real, and both improve your daily kitchen experience.
Start small, stay consistent, and build your system gradually. The families and households that maintain beautiful pantries long-term are not the ones who bought everything at once in a burst of enthusiasm. They are the ones who started with a few key containers, established a restocking habit, and expanded the system over weeks and months as the routine became second nature. Patience and consistency matter more than the initial investment.
Choose your five most-used dry goods this weekend, purchase a matched set of containers that fit your shelf dimensions, and decant those items before your next grocery trip. That single session will show you how the system feels and whether you want to expand. Once those first five containers are in place, the visual contrast with the remaining packaged items will motivate you to keep going, and your pantry will be on its way from cluttered to magazine-worthy without a single weekend lost to an overwhelming overhaul.
More Articles You May Like



Comments
Post a Comment